Domain SearchInstantly check and register your preferred domain name
 Web Hosting
 cPanel HostingHosting powered by cPanel (Most user friendly)
 KE Domains
 Reseller HostingStart your own hosting business without tech hustles
 Windows HostingOptimized for Windows-based applications and sites.
 Free Domain
 Affiliate ProgramEarn commissions by referring customers to our platforms
 Free HostingTest our SSD Hosting for free, for life (1GB storage)
 All DomainsBrowse and register domain extensions from around the world
 .Com Domain
 WhoisLook up domain ownership, expiry dates, and registrar information
 VPS Hosting
 Managed VPSNon techy? Opt for fully managed VPS server
 Dedicated ServersEnjoy unmatched power and control with your own physical server.
 SupportOur support guides cover everything you need to know about our services
OpenClaw is an open-source AI agent framework that can execute commands, access files, automate workflows, and connect with AI models through chat applications.
Running it on Windows 10 or Windows 11 gives you a convenient way to build and test AI-powered automations from your own computer.
There are two main ways to install OpenClaw on Windows 10 and 11:
- Native installation using PowerShell and Windows tools
- WSL2 installation, which runs OpenClaw inside a Linux environment on Windows for better compatibility and stability
Before getting started, make sure you have:
- At least 16 GB RAM and 20 GB of free disk space
Node.js22.19 or newer (Node 24 is recommended)- Git
- PowerShell with administrator privileges
- An up-to-date Windows 10 or Windows 11 system
Security warning (very important): OpenClaw can execute commands and access files on the machine where it runs.
So, for security, it is best to install it in an isolated environment such as a dedicated user account, virtual machine, or separate test system instead of your primary everyday computer that contains sensitive personal or business data.
Now let’s go ahead and look at how to install OpenClaw on Windows 10 and 11 using both the native and WSL2 methods, together with the best practices for keeping your setup secure and reliable.
Method 1: Native Windows Installation Via PowerShell
If you want the quickest path to getting OpenClaw running on Windows 10 or Windows 11, the easiest and fastest native option is the official Windows Hub companion app.
It provides a desktop interface with a tray icon, a setup wizard, and easier management.
But a good alternative is the PowerShell CLI installer.
The installer handles most of the setup automatically, so you can get your AI agent up and running in just a few minutes.
Step-by-Step Guide Using PowerShell
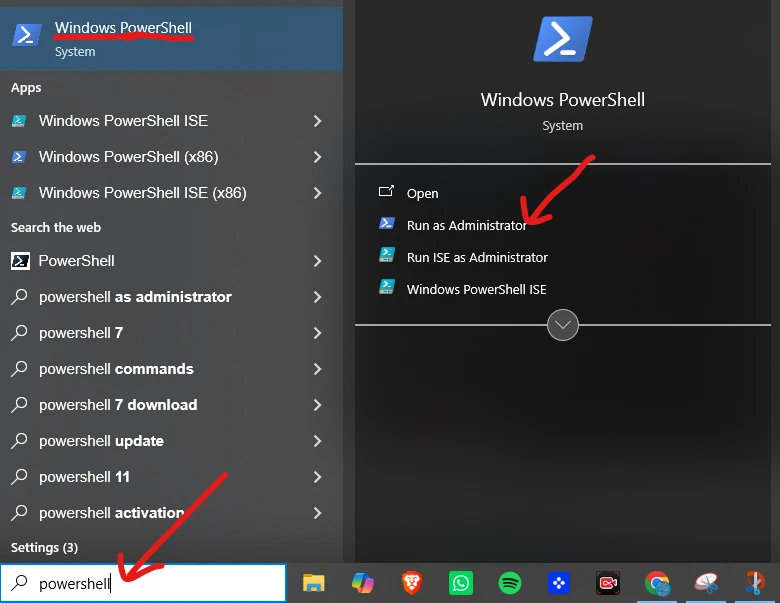
Step 1: Open PowerShell as Administrator
Click the Start button, type “powershell,” then right-click Windows PowerShell, and select Run as Administrator.
Step 2: Set the Execution Policy
Paste this command and press Enter:
Set-ExecutionPolicy RemoteSigned -Scope CurrentUserThis allows the installer script to run without being blocked by Windows security.
Step 3: Run the Installer
Next, paste the official OpenClaw installer into PowerShell and press Enter:
irm https://openclaw.ai/install.ps1 | iexThe script will download OpenClaw and all its dependencies automatically.
Step 4: Complete the Onboarding Wizard
Once the download finishes, the onboarding wizard will launch and guide you through the initial configuration. Use your arrow keys to select options and press enter to continue.
You’ll be asked to:
- Choose your preferred AI model provider (e.g., Claude, OpenAI)
- Select a messaging channel (WhatsApp or Telegram work well)
- Enable any AI skills you want active
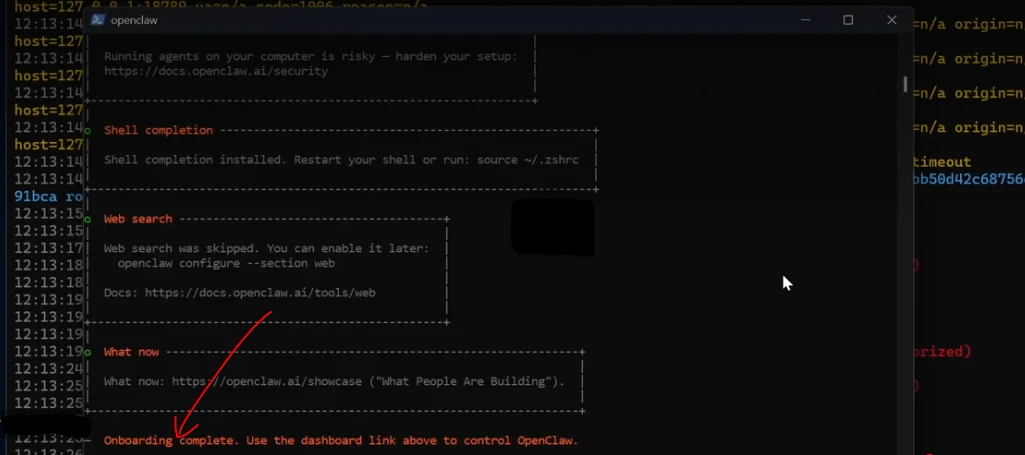
Step 5: Launch the Gateway
Once the setup is complete, follow the on-screen prompts to start the OpenClaw gateway service. You can find your dashboard URL under the “Control UI” block; just copy it and paste it into your browser.
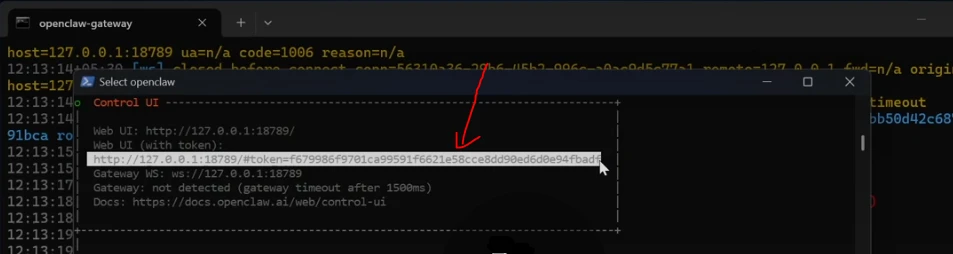
If everything is configured correctly, your AI agent will be live and ready to receive and process requests.
Pros of Installating Via PowerShell
- Fastest installation method
- No Linux or WSL2 knowledge required
- Beginner-friendly setup process
- Most configuration is handled automatically
Cons of Installating Via PowerShell
- Can be less stable than a WSL2-based installation
- Windows dependency conflicts may occasionally occur
- Some updates and integrations may work better in a Linux environment
Common Issues and Fixes
1. Installer command not recognized
Make sure PowerShell is running with administrator privileges and that your internet connection is active.
2. Node.js or Git not detected
Verify that both applications are installed and added to your system PATH. Restart PowerShell after installation if necessary.
3. Execution policy errors
Run the execution policy command again and confirm the change when prompted.
4. PATH-related issues
If commands fail after installation, restart your computer or manually add the required OpenClaw, Node.js, and Git directories to the Windows PATH environment variable.
If you continue running into Windows-specific issues, the WSL2 installation method often provides a more reliable environment for long-term use.
Method 2: WSL2 Installation (Recommended for Stability)
OpenClaw runs best in a Linux-like environment. Running it inside WSL2 (Windows Subsystem for Linux) on your Windows 10 or 11 machine gives you better performance and fewer random errors.
Step-by-Step Guide for WSL2 Installation
Step 1: Install WSL2
Open PowerShell as administrator and run:
wsl --statusThis will tell you if WSL2 is already installed. If not, run:
wsl --installRestart your computer when prompted. This installs WSL2 with Ubuntu by default.
To see which Linux environments you have installed in WSL, type:
wsl --list -v Step 2: Set up Ubuntu
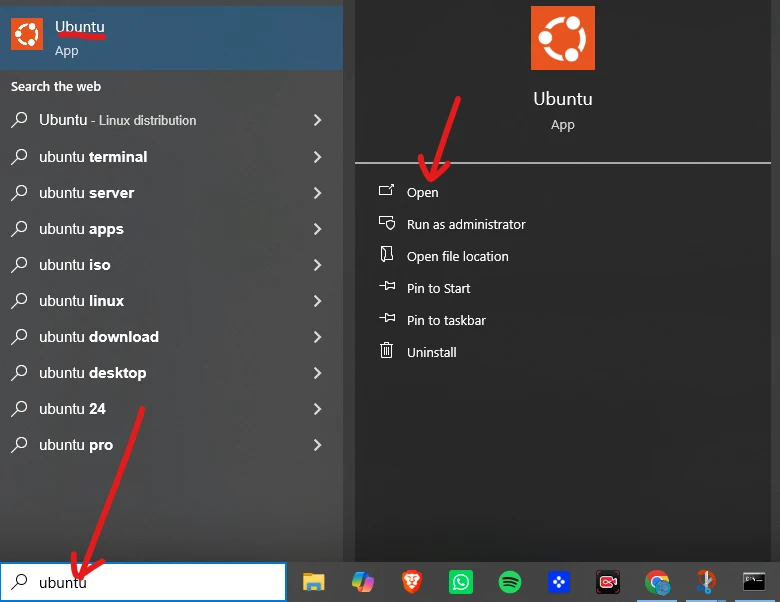
Find Ubuntu in your Start menu and open it. The first launch will ask you to create a Linux username and password.
Step 3: Install Node.js inside WSL via NVM
Using NVM (Node Version Manager) is recommended because it makes Node.js updates easier.
Inside the Ubuntu terminal, run:
curl -o- https://raw.githubusercontent.com/nvm-sh/nvm/v0.39.7/install.sh | bashClose and reopen the terminal, then run:
nvm install 22 && nvm use 22Step 4: Install OpenClaw
Go to the openclaw.ai website and copy the one-liner install command.
curl -fsSL https://openclaw.ai/install.sh | bashMake sure it’s set to one-liner and Linux. Paste that command into your Linux terminal in WSL.

If you get an error that curl is not installed, run the following:
sudo apt install curlAfter that, paste the one-liner again.
Alternatively, run this script and update to the latest version if prompted.
npm install -g openclawStep 5: Run the Onboarder Wizard
openclaw onboardThis launches the same setup wizard.
Choose your AI model, connect messaging channels such as WhatsApp or Telegram, and enable the skills you want to use.
Step 6: Start the Gateway
opencloid installYour OpenClaw gateway is now running inside a stable Linux environment on your Windows machine.
OpenClaw is now running inside WSL2, giving you a Linux-based environment while still working from Windows.
Auto-Start at Boot
To have OpenClaw start automatically, enable WSL startup in Windows and create a small startup script or scheduled task that launches the gateway when you sign in.
This is useful if you plan to keep the service running continuously.
Integration with Windows
WSL2 integrates well with Windows.
Your Linux environment can access Windows files through the /mnt/c path, while Windows applications can interact with files stored in your WSL home directory.
This makes it easy to manage projects and data across both environments.
Performance tips for Kenyan users
- Allocate resources wisely
If your machine has limited RAM, avoid running too many background applications alongside WSL2. OpenClaw performs best when it has enough memory available.
- Use a modern
Node.jsversion
Staying on Node.js 22 or later helps with compatibility and performance.
- Keep WSL on SSD storage
If possible, store your WSL2 environment on an SSD for faster startup times and better overall responsiveness.
- Monitor network usage
Large model downloads and updates can consume significant bandwidth. Schedule heavy downloads during off-peak hours if you have a limited internet connection.
For most users, WSL2 is the preferred installation method because it offers a more reliable and Linux-compatible environment for running OpenClaw on Windows 10 and 11.
Post-Installation: First Steps and Configuration
1) Verify Installation
Once the installation finishes, the first thing to do is confirm it actually worked. Open PowerShell and run:
openclaw --versionIf you get a version number back, you are in good shape. Follow that up with:
openclaw doctorThis command checks your environment for any missing dependencies or misconfigurations. If something is off, it will tell you what and usually point you toward the fix.

Do not skip this step. Catching problems here saves you from chasing strange errors later.
2) Onboarding Details: Connecting Your LLM and Messaging Apps
OpenClaw needs two things to be useful: an AI model to talk to and a channel to talk through.
On the model side, you can connect it to OpenAI, Anthropic’s Claude, a local model, or most other major providers.

You will do this through the configuration file generated during setup. Look for the config.yaml or .env file in your OpenClaw directory, and add your API key and model preferences there.
For the messaging side, OpenClaw supports platforms like WhatsApp and Telegram.

Each platform has its own connection process, typically generating a bot token or scanning a QR code, and the OpenClaw documentation walks through each one step by step.
Get at least one channel connected before moving on.
3) The Dashboard and Your First Commands
Once your LLM and messaging app are linked, open your browser and go to http://localhost:3000 (or whichever port your setup uses). The dashboard gives you a visual overview of connected services, active sessions, and logs.
Send a simple test command through your connected messaging app, something like asking it to list files in a directory or confirm it can reach the internet.
A working response means your setup is running end to end.
If nothing comes back, check the logs in the dashboard for where the breakdown is happening.
4) Running OpenClaw as a Service
Running OpenClaw manually through a terminal works fine for testing, but it will stop the moment you close the window.
To keep it running in the background, especially after a reboot, you want to set it up as a Windows service.
The cleanest way to do this on Windows is with a tool like nssm (Non-Sucking Service Manager). Install it, then run:
nssm install OpenClaw "C:\path\to\node.exe" "C:\path\to\openclaw\index.js"Set the startup type to automatic, and OpenClaw will start with Windows and stay running without you needing to intervene.
Securing Your OpenClaw Setup on Windows
Here is where a lot of people get sloppy, and it is worth slowing down for a moment.
OpenClaw is genuinely powerful. It can execute commands, read files, and interact with external services on your behalf. That is the whole point of it.
But it also means a poorly secured install is a real liability.

a) Keep It Off the Open Internet
Do not expose OpenClaw directly to the internet. Full stop!
By default, it should be bound to localhost only, meaning only your own machine can reach it.
Check your config file and confirm the host is set to 127.0.0.1, not 0.0.0.0. If it is set to 0.0.0.0, you are broadcasting it to every network interface on your machine, which is not what you want.
b) Use SSH Tunnels for Remote Access
If you need to reach your OpenClaw instance from another device or location, do it through an SSH tunnel rather than opening a port.
This is the command structure:
ssh -L 3000:localhost:3000 youruser@your-server-ipThis forwards port 3000 on your local machine through an encrypted SSH connection to the remote server.
You get access without ever exposing OpenClaw to the open web.
c) Firewall Rules and User Isolation
Set up a Windows Firewall rule that blocks inbound connections to OpenClaw’s port from anything outside localhost.
You can do this through Windows Defender Firewall with Advanced Security: create an inbound rule, set the protocol to TCP, specify the port, and restrict it to the local subnet only.
Running OpenClaw under a dedicated Windows user account rather than your admin account is also worth doing.
If something goes wrong, or if the agent is ever manipulated into doing something unintended, the damage is contained to what that user account can access, not your entire system.
d) Back Up Your Config
Your config.yaml (or equivalent) holds your API keys, channel connections, and preferences.
Back it up somewhere secure and not in the same directory as OpenClaw and not in plain text on a shared drive.
If you ever need to reinstall or move to a new machine, that file is what gets you back up and running quickly.
A Note on Capability
OpenClaw is not a toy. The same features that make it genuinely useful, that is, running commands, touching files, and connecting to services, are the same features that require you to take its security seriously.
Treat it the way you would treat any server-side application running on your machine, because that is effectively what it is.
A little discipline at setup time is far less painful than dealing with a problem after the fact.
Troubleshooting Common Issues on Windows 10 and 11
Even with a clean setup, a few issues can show up during or after installing OpenClaw on Windows. Most of them are simple to fix once you know where to look.
Common setup problems and fixes
1. Command not found errors
This usually happens when Node.js or OpenClaw is not added to your system PATH. Reinstall Node.js and restart PowerShell, or run the installation again after confirming PATH settings.
2. Node version errors
OpenClaw expects Node.js v22 or later. Running an older version will break installation or startup. Check with node -v and upgrade if needed.
3. WSL systemd issues
Some services inside WSL2 may fail if systemd is not enabled. Updating WSL and enabling systemd in the Ubuntu config usually resolves this.
4. Permission problems
Running PowerShell or Ubuntu without admin or sudo access can block installation steps. Always run elevated terminals during setup.
5. Gateway not starting
This is often caused by missing dependencies or incomplete onboarding. Re-run openclaw onboard and confirm all required services are selected correctly.
Kenya-specific considerations
1. Power interruptions
Frequent outages can interrupt long-running agents. A UPS helps keep your system running long enough to save work safely.
2. Data costs
Model downloads, updates, and package installs can consume a lot of bandwidth. It helps to schedule large downloads when internet bundles are cheaper or more stable.
OpenClaw on Windows 10 and 11 FAQs
What is the latest version of OpenClaw?
The latest version is listed in the official OpenClaw GitHub repository and updates frequently as new features are released. Currently, it’s openclaw 2026.6.1.
Is OpenClaw free?
Yes, OpenClaw is open-source. However, some AI providers you connect to (like OpenAI or Anthropic) may have usage costs.
What is the best OS for OpenClaw?
Linux environments perform best. On Windows, WSL2 gives the closest experience to Linux and is the recommended option.
What can I do with OpenClaw?
You can automate workflows, connect AI agents to messaging apps, run file-based tasks, and build custom automation systems for personal or business use.
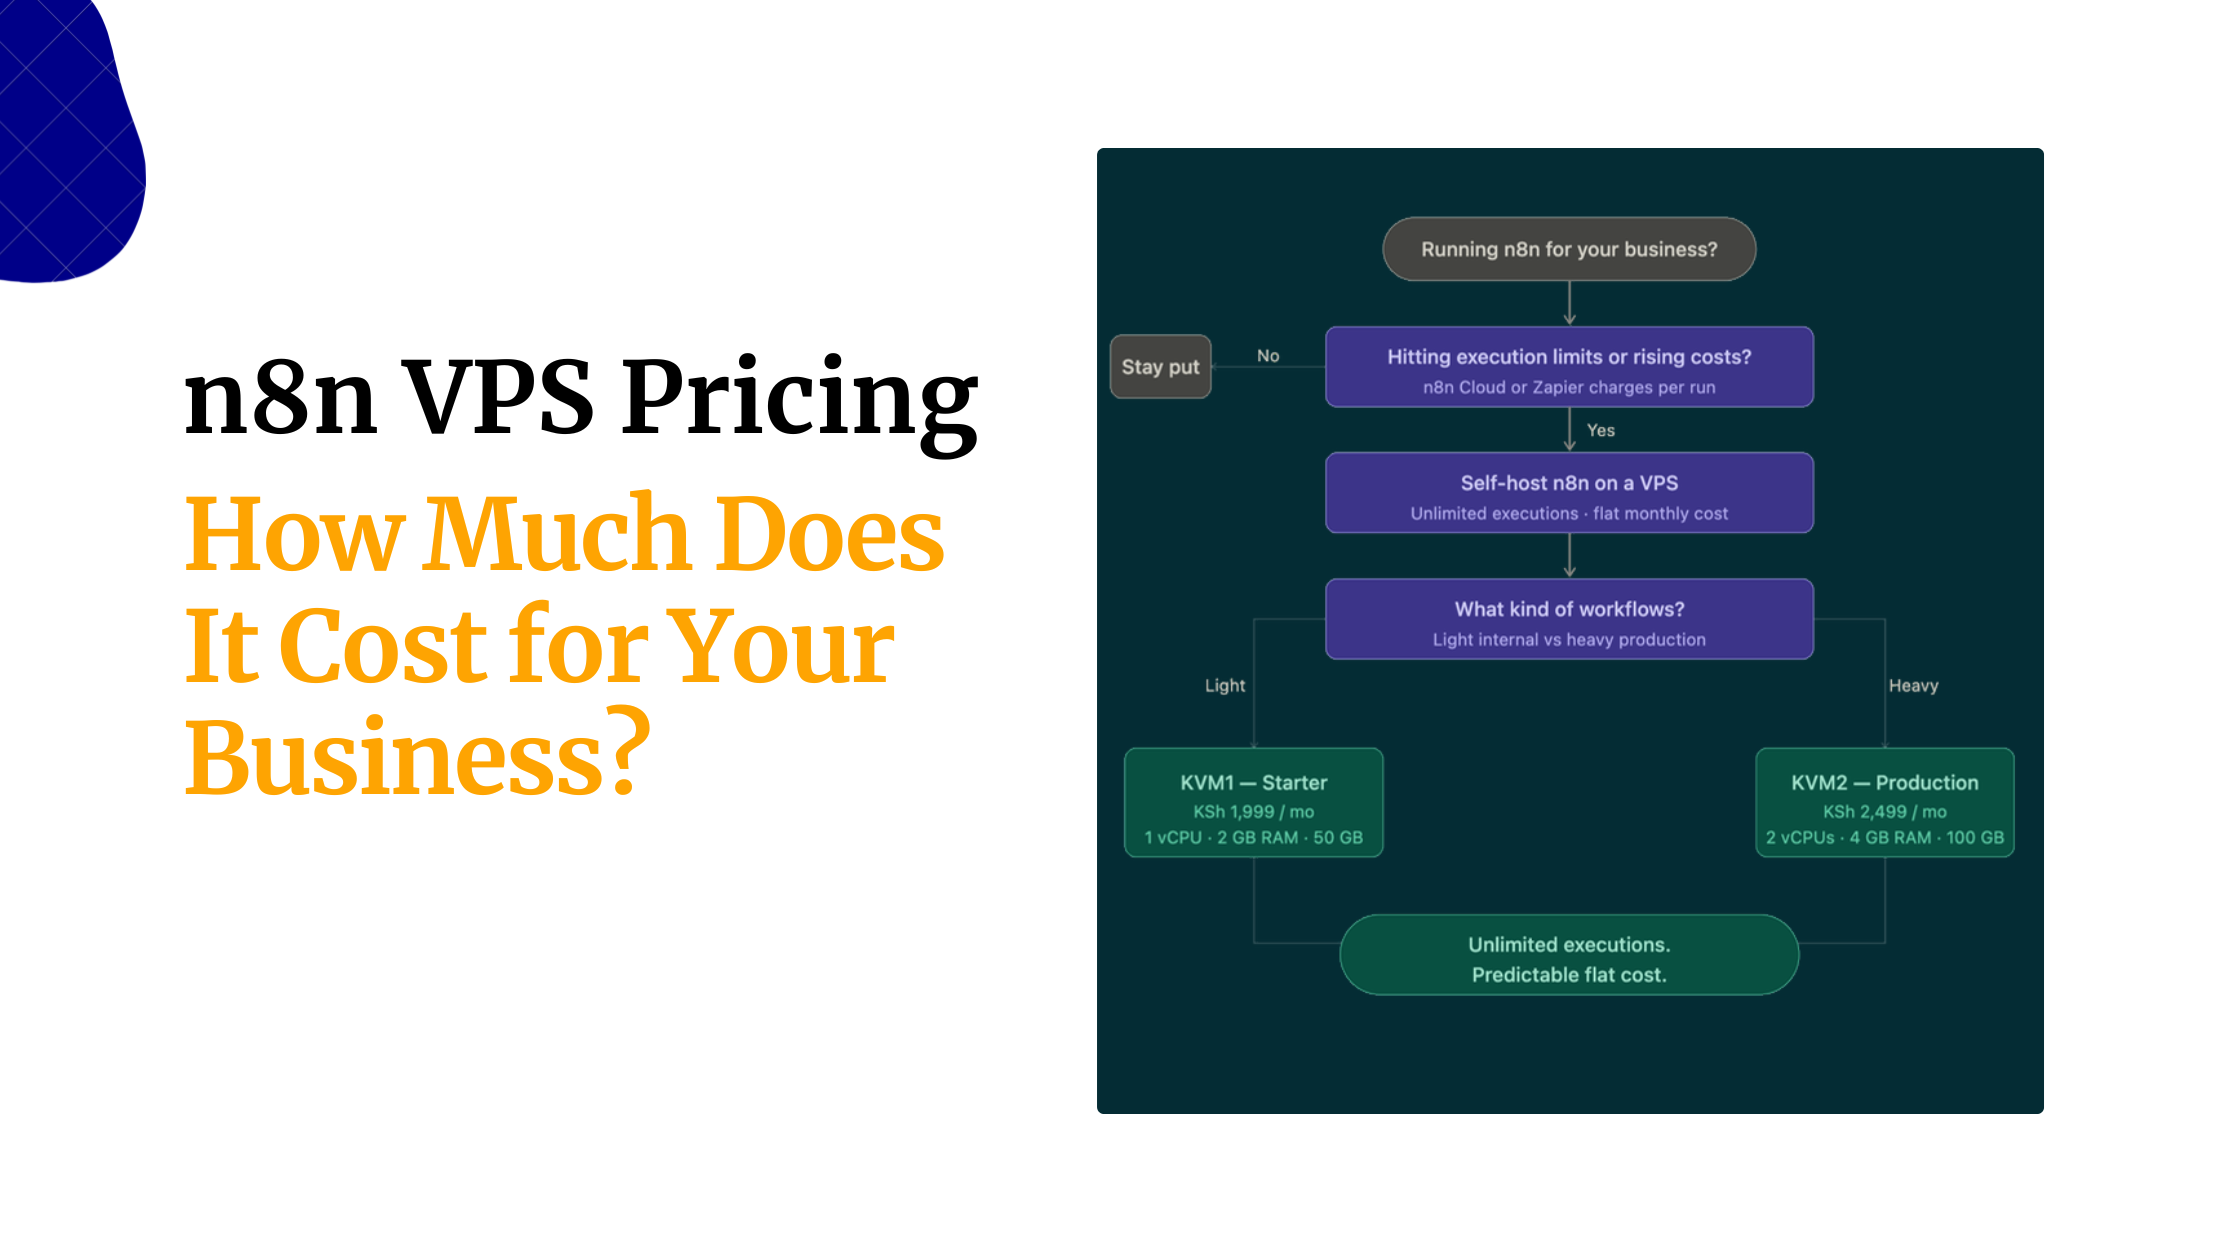
Try Truehost OpenClaw Hosting in Kenya Instead
Running OpenClaw on your own Windows machine is entirely doable, and this guide has walked you through how. But there is a real difference between getting it running and keeping it running.
Windows updates have a habit of breaking things at the worst moments.
Your machine needs to stay on, connected, and healthy for OpenClaw to stay available.
If you are using it for anything business-critical, a single power cut or failed update can take the whole thing offline. Managing that over the long term is a genuine ongoing commitment.
At Truehost, we remove that burden entirely for you.
Deployment takes minutes on our pre-configured VPS, with infrastructure based in Nairobi for low latency across Kenya. Plans come in managed and unmanaged options, we include free SSL, and our support is available around the clock.
Plus, your API keys and configuration stay private, so you are running your own OpenClaw instance, just without the hardware headaches.
The pricing is built for the Kenyan market, and the stability of a proper server environment means no update roulette, no power interruption surprises, and no heavy data costs on setup day.
If you have been on the fence about self-hosting, this is worth a look.