Domain SearchInstantly check and register your preferred domain name
 Web Hosting
 cPanel HostingHosting powered by cPanel (Most user friendly)
 KE Domains
 Reseller HostingStart your own hosting business without tech hustles
 Windows HostingOptimized for Windows-based applications and sites.
 Free Domain
 Affiliate ProgramEarn commissions by referring customers to our platforms
 Free HostingTest our SSD Hosting for free, for life (1GB storage)
 All DomainsBrowse and register domain extensions from around the world
 .Com Domain
 WhoisLook up domain ownership, expiry dates, and registrar information
 VPS Hosting
 Managed VPSNon techy? Opt for fully managed VPS server
 Dedicated ServersEnjoy unmatched power and control with your own physical server.
 SupportOur support guides cover everything you need to know about our services
This is how to set up a MySQL server on a VPS. You first connect to your server through SSH, update your package repositories, install MySQL, and then secure it using MySQL’s built-in security script.
Setting up a MySQL server on a VPS gives you complete control over your database environment.
Instead of sharing resources with other websites and applications, you get dedicated server resources, root access, stronger security, and the freedom to configure your database server according to your needs.
For WordPress sites, custom applications, or e-commerce stores, this setup gives you the control and speed your users will actually feel.
But before touching a single command, get your foundation right.
MySQL is only as good as the server it runs on, so a little planning here will save you headaches later.
You will need a VPS with at least 2GB of RAM and SSD storage. This is because MySQL can be memory-hungry under load, and SSD storage significantly improves database read and write speeds, helping your applications respond faster.
Also, make sure you have root or sudo access and that UFW is active on your server.
For the operating system, go with Ubuntu 22.04 or 24.04. Both are stable, well-documented, and the most common options on our Truehost VPS plans.
If you want help with ongoing maintenance and updates down the line, our managed VPS hosting is worth considering. Otherwise, a standard plan gives you everything you need.
With these requirements in place, you can move on to the installation process.
Steps to Set Up a MySQL Server on a VPS
Step 1: Connect to Your VPS via SSH
The first step is connecting to your VPS.
If you’re on Linux or macOS, open Terminal. If you’re on Windows, you can connect using PowerShell or PuTTY.
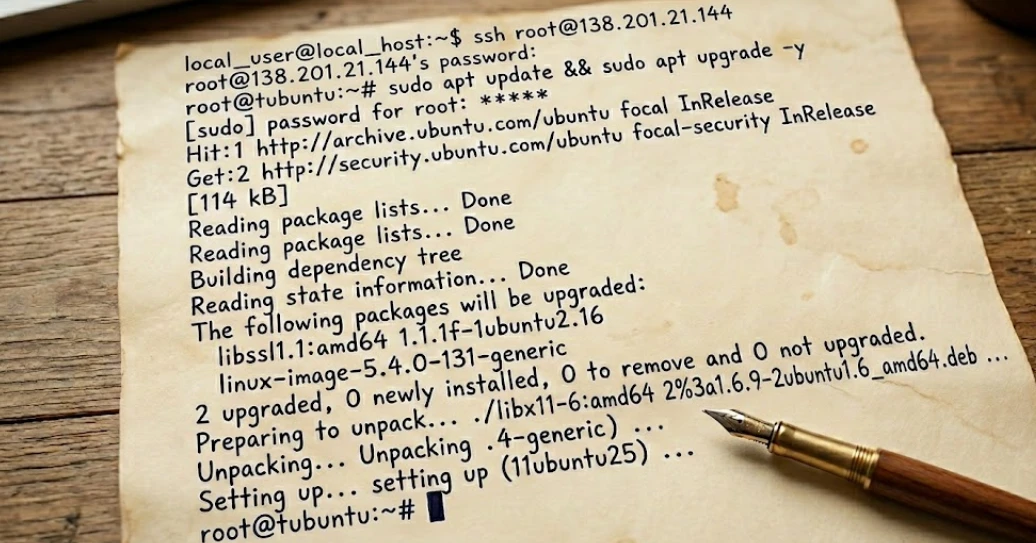
Use the following command, replacing your_vps_ip with your server’s actual IP address:
ssh root@your_vps_ipOnce connected, update your package repositories and install the latest system updates:
sudo apt update && sudo apt upgrade -yThis pulls in the latest security patches and ensures you are installing MySQL on a clean, current system. It only takes a minute, and skipping it is one of the most common mistakes people make when setting up a fresh VPS.
Step 2: Install MySQL Server
With your VPS updated and ready, it’s time to install MySQL Server.
Run the following command:
sudo apt install mysql-server -yThe installation may take a few minutes, depending on your server resources and internet connection.
Once the installation is complete, start the MySQL service and tell your server to launch it automatically every time it reboots:
sudo systemctl start mysql

sudo systemctl enable mysql
Next, confirm that MySQL is running correctly:
sudo systemctl status mysqlYou can also check the installed version:
mysql --versionIf everything has been installed successfully, you should see the service listed as active (running) and the MySQL version number printed below. If both show up, you are good to move on.
Note: On some Ubuntu setups, you may find MariaDB installed instead of MySQL. MariaDB is a community fork that works almost identically and is a perfectly solid alternative if you are comfortable with it.
Step 3: Secure Your MySQL Installation
Installing MySQL is only part of the process. A fresh installation includes several default settings that are too open for a public-facing server.
MySQL provides a built-in security script that helps you lock down the installation.
Run:
sudo mysql_secure_installationThe script will guide you through a series of security-related prompts.
1. Validate Password Component
One of the first prompts asks whether you want to enable the “Validate Password” component. This feature checks password strength and helps prevent weak passwords from being used.
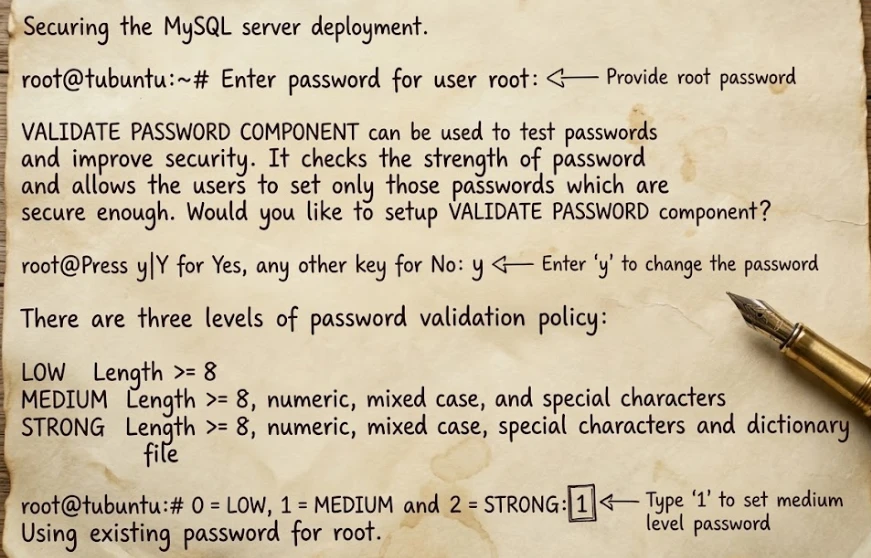
Choose Y and set a medium or strong level for better password security.
2. Set a Strong Root Password
You will be prompted to create or confirm a password for the MySQL root account.
Use a mix of uppercase and lowercase letters, numbers, and symbols. Aim for at least 12 characters. This is the master key to your database, so treat it accordingly.
3. Remove Anonymous Users
Default installations include a nameless user account that lets anyone log into MySQL without credentials. These accounts are unnecessary on a production system and can create security risks.
Select Y when prompted to remove them.
4. Disallow Remote Root Login
This one is critical. Leaving remote root access open means anyone on the internet could attempt to log directly into your database as the administrator.
Type Y when prompted to disable remote root logins. You can still manage MySQL securely through SSH when needed.
6. Remove the Test Database
MySQL ships with a test database that anonymous users can access by default. There is no reason to keep it on a live server.
Type Y when prompted.
Once you work through all the prompts, your MySQL installation is hardened and ready for real use. Skipping this step on a public VPS is one of the fastest ways to expose your server to attacks, so do not rush past it.
Step 4: Create a Dedicated Database and User
Now that MySQL is installed and secured, the next step is creating a dedicated database and user account for your application.
Never use the root account to connect your applications or websites to MySQL.
Root has unrestricted access to everything on your server, so with one compromised app credential, the entire database is exposed. Instead, create a dedicated user with access limited to only the database it needs.
Start by logging in to MySQL:
sudo mysqlOnce inside the MySQL console, run the following commands one by one:
CREATE DATABASE my_app_db;

CREATE USER 'appuser'@'localhost' IDENTIFIED BY 'StrongPassword123!';

GRANT ALL PRIVILEGES ON my_app_db.* TO 'appuser'@'localhost';

FLUSH PRIVILEGES;
Replace my_app_db, appuser, and the password with values that match your application requirements.
The main idea here is the least-privilege principle, where this user can only touch my_app_db and nothing else on your server. If something goes wrong at the application level, the damage stays contained.
Step 5: Configure Remote Access (Optional)
By default, MySQL only accepts connections from the same server it is installed on. That is the safest configuration, and you should leave it that way unless your application genuinely runs on a separate server.
If you do need remote access, begin by editing the MySQL configuration file:
sudo nano /etc/mysql/mysql.conf.d/mysqld.cnfFind the line that reads bind-address = 127.0.0.1.
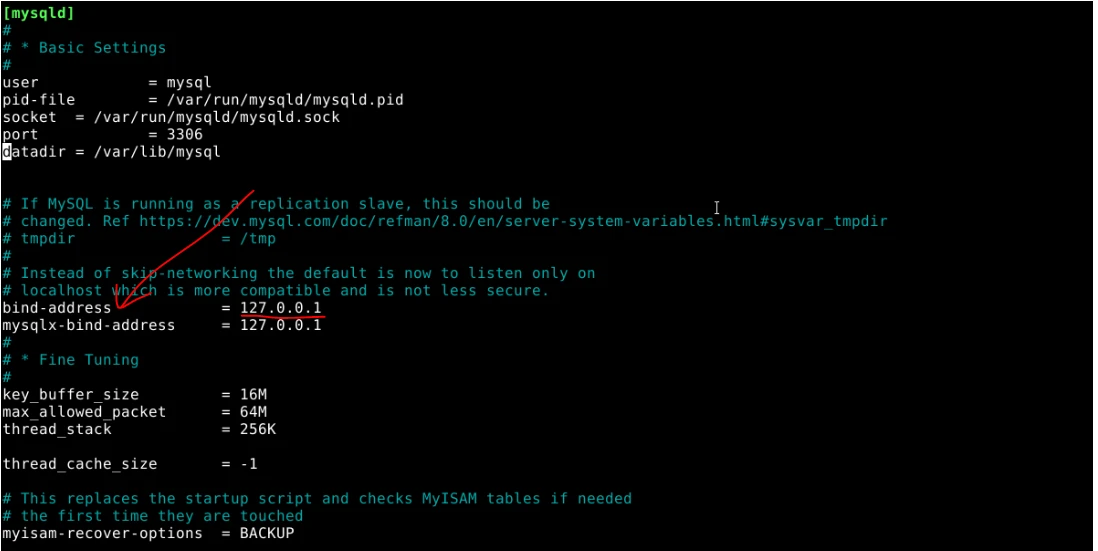
To allow connections from external systems, change the value to:
bind-address = 0.0.0.0Alternatively, you can specify a particular IP address if you want MySQL to listen only on a specific network interface.
In this case, change it to your specific client IP address:
bind-address = your_app_server_ipAvoid setting this to 0.0.0.0 on a production server. That opens MySQL to connection attempts from any IP on the internet, which is a significant security risk. If you must use it temporarily for testing, lock it down to a specific IP as soon as possible.
Next, allow MySQL traffic through the firewall:
sudo ufw allow 3306/tcpAfter making these changes, restart MySQL:
sudo systemctl restart mysqlYou can now test the connection from your other server.
At this point, remote clients should be able to connect, provided the appropriate MySQL user permissions have been configured.
If you ever stop needing remote access, revert the bind-address back to 127.0.0.1 and remove the firewall rule. Keeping open ports to a minimum is one of the simplest and most effective things you can do for server security.
Basic Management and Optimization Tips
Once MySQL is running, a handful of commands will cover most of your day-to-day needs. Keep these in handy:
1) Key MySQL Management Commands
| Task | Command |
|---|---|
| Start MySQL | sudo systemctl start mysql |
| Stop MySQL | sudo systemctl stop mysql |
| Restart MySQL | sudo systemctl restart mysql |
| Check status | sudo systemctl status mysql |
| Enable on boot | sudo systemctl enable mysql |
| View error logs | sudo tail -f /var/log/mysql/error.log |
2) Create Regular Backups with mysqldump
Backups should be part of your routine from day one. The mysqldump tool makes this straightforward:
mysqldump -u appuser -p my_app_db > backup.sqlRun this regularly and store the output somewhere safe, ideally off the server itself. A backup that lives on the same machine it is protecting is not much of a backup.
3) Performance Basics
Performance tuning does not require anything fancy to start. Open the MySQL configuration file:
sudo nano /etc/mysql/my.cnfUnder the [mysqld] section, add or adjust these values based on your VPS RAM:
innodb_buffer_pool_size = 1G     # aim for 50–70% of your available RAM

query_cache_size = 64M

max_connections = 150
The innodb_buffer_pool_size setting is the most impactful one here. InnoDB uses this pool to cache data and indexes in memory, which dramatically reduces disk reads on busy databases.
On a 2GB VPS, setting this to 1GB is a reasonable starting point.
Restart MySQL after any configuration change for it to take effect.
4) Improve Query Performance with Indexing
Indexes help MySQL locate data more efficiently. Without proper indexes, queries may scan entire tables, resulting in slower response times as your database grows.
Review frequently used queries and add indexes to columns commonly used in:
- WHERE clauses
- JOIN operations
- ORDER BY statements
- Search filters
Good indexing practices can significantly improve application performance without requiring additional server resources.
5) Enable the Slow Query Log
Beyond that, another habit will keep your database healthy over time. That is, enabling the slow query log to surface queries that are taking longer than they should.
These are usually the first sign that an index is missing or a query needs rewriting.
6) Optimize Tables Periodically
You can also run OPTIMIZE TABLE table_name; periodically on tables that see heavy inserts and deletes. It reclaims wasted space and keeps reads efficient.
7) Monitor Your MySQL Server
For monitoring, mysqladmin gives you a quick command-line view of server activity:
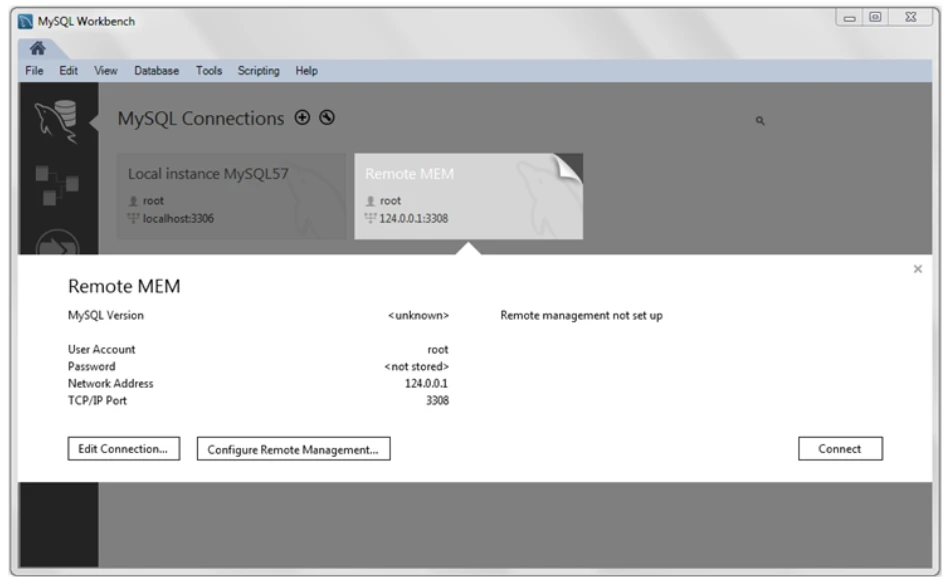
mysqladmin -u root -p statusIf you prefer a visual interface, MySQL Workbench connects to your server remotely and gives you a full dashboard for query analysis, user management, and performance metrics.
Troubleshooting Common Issues
Even with a proper setup, MySQL can occasionally run into issues during use or after configuration changes. Most problems are easy to trace once you know where to look.
Common Issues and Quick Fixes
a. Service not starting?
Start by checking what MySQL is reporting internally:
sudo journalctl -u mysqlThis log usually points directly to what is stopping the service from launching, such as a configuration error or missing file.
b. Connection refused?
This often comes down to two areas: firewall rules or MySQL’s network settings.
- Confirm that port
3306is open in UFW:
sudo ufw allow 3306/tcp- Check the
bind-addresssetting in MySQL configuration. If it’s set too restrictively, external connections will fail.
c. Permission errors?
These usually appear when a database user lacks the right privileges.
Run:
FLUSH PRIVILEGES;Then review the user’s access rights to confirm they match the required database actions.
d. Firewall blocking connections?
This comes up often in Kenya, particularly when connecting across different networks or cloud providers.
Run sudo ufw status to see your active rules and confirm port 3306 is open for the IPs that need it.
If you are on a Truehost VPS, also check whether any rules are set at the hosting panel level, as those sit outside UFW.
If things still feel stuck, checking the MySQL error log gives the clearest picture of what is happening:
sudo tail -f /var/log/mysql/error.logThis file records startup issues, authentication problems, and system-level errors in real time.
The error log plus sudo systemctl status mysql will point you in the right direction almost every time.
Next Steps to Deploy
At this stage, your MySQL server is fully installed, secured, and ready for real applications.
The setup you’ve completed is suitable for WordPress sites, custom web applications, and e-commerce systems that need reliable database performance.
Now, if you’re ready to deploy, hosting plays a big role in how smooth everything runs.
Truehost offers VPS Hosting in Kenya with local data centers, full root access, and SSD storage designed for performance-heavy applications like MySQL. You can explore available plans and launch your server in minutes.
For those who prefer a more hands-off setup, managed VPS hosting is also available. This option handles updates, security, and server maintenance so you can focus more on building your application.
So from here, the next step is simple: choose a VPS plan that fits your project, deploy your application, and connect it to your MySQL database.
If you need support along the way, our Truehost team is available to help with setup, migration, and optimization.