 Domain SearchInstantly check and register your preferred domain name
 Web Hosting
 cPanel HostingHosting powered by cPanel (Most user friendly)
 WordPress HostingHost your WordPress website with fast, secure, and affordable WordPress hosting in Kenya.
 KE Domains
 Reseller HostingStart your own hosting business without tech hustles
 Windows HostingOptimized for Windows-based applications and sites.
 Free Domain
 Affiliate ProgramEarn commissions by referring customers to our platforms
 Free HostingTest our SSD Hosting for free, for life (1GB storage)
 Domain TransferMove your domain to us with zero downtime and full control
 All DomainsBrowse and register domain extensions from around the world
 .Com Domain
 WhoisLook up domain ownership, expiry dates, and registrar information
 VPS Hosting
 Managed VPSNon techy? Opt for fully managed VPS server
 Dedicated ServersEnjoy unmatched power and control with your own physical server.
 Website Builder
 Online Store BuilderLaunch a professional e-commerce store without writing code.
 Web Design ServiceGet a custom-designed website tailored to your brand and goals. From just KES 15,600
 BlogRead our guides on web hosting, online business, digital marketing, and more
 SupportOur support guides cover everything you need to know about our services
 ContactContact us via chat or email
Your group chat just agreed on one thing. No more public Rust servers. You want your own base, your own rules, and no random raiders wiping your work overnight.
You have three ways to run a Rust server. You can host it from your own PC or pay for a dedicated machine. Each path fits a different situation.
Home hosting costs nothing beyond your normal internet bill. Your PC and router already exist, so the extra cost is only electricity. The catch shows up quickly for players in Kenya.
Home fiber and 4G plans often cap out around 5 to 10 players before lag sets in. Rust needs a steady upload speed for every connected player, not just download speed. A weak upload turns into rubberbanding and dropped connections during a raid.
A dedicated server removes that ceiling. The provider gives you a fixed upload speed built for the job. You pay monthly instead of upfront, but you gain stability that your home line cannot match.
Location also plays a part. A server based in or near Kenya keeps ping low for local players. A server sitting in Europe or the US adds noticeable delay, even with a strong connection. For a group spread across East Africa, a regional server keeps gameplay smooth for everyone.
Setting up a dedicated Rust server sounds hard at first. It really comes down to a handful of clear steps. This guide walks through each step. It covers picking hardware, installing the files, and fixing the errors that trip up most first-time owners.
Rust Dedicated Server Requirements (CPU, RAM, Storage, Bandwidth)
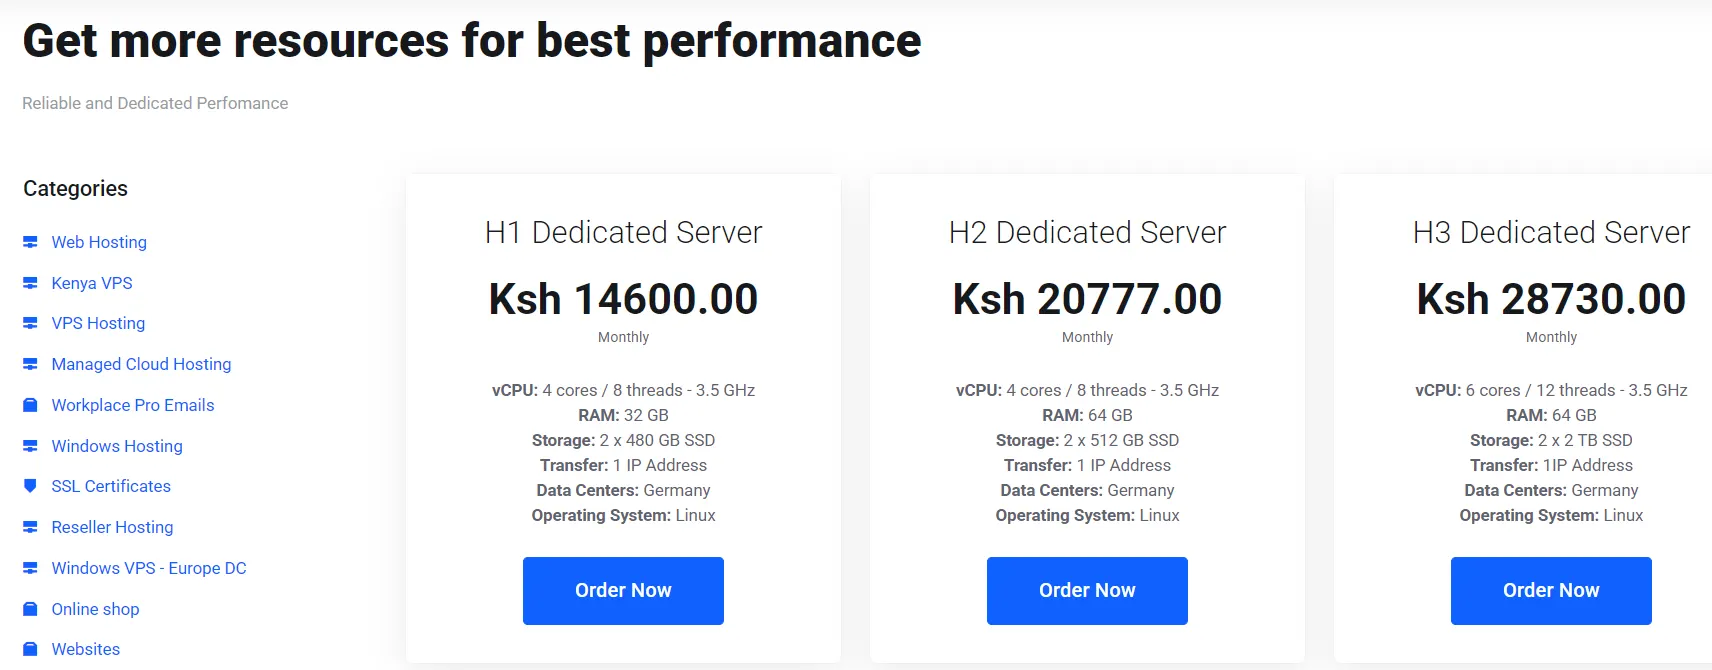
Rust asks a lot from hardware. Getting the specs right before you install anything saves you from a laggy launch day.
RAM needs to scale with player count. A small server with 10 to 20 players runs fine on 8GB of RAM. A server with 50 players needs 16-24GB. Anything past 100 players calls for 32-64GB.
CPU speed beats core count for Rust. The game relies on a single main thread for most of its logic. A quad-core running at a high clock speed will outperform a slow eight-core chip. Look for at least 3.5GHz per core if you can find it.
Storage should sit at 15 to 30GB free, minimum. An SSD or NVMe drive speeds up saves and wipes recovery. A slow hard drive can freeze the whole server during an autosave.
Install SteamCMD and Download the Rust Server Files
SteamCMD handles downloading and updating your Rust server files. The steps differ slightly between Windows and Linux, so pick the one that matches your setup.
Windows Installation Steps
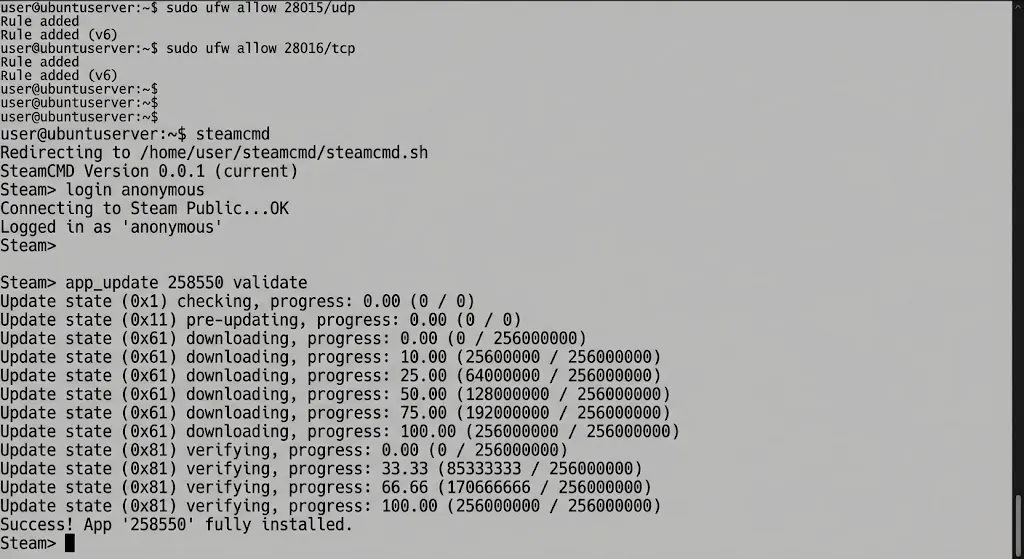
- Create a folder for
SteamCMD, such asC:\steamcmd. - Download
steamcmd.exefrom Valve’s official page and place it in that folder. - Run
steamcmd.exeonce. Let it finish its own update before typing anything else. - At the
SteamCMDprompt, type “login anonymous” and press Enter. - Set your install path with
force_install_dir C:\rust_server. - Type
app_update 258550validateand wait for the download to finish. - Type quit once the update completes.
- Check that
RustDedicated.exenow sits inside yourrust_serverfolder.
Linux (Ubuntu) Installation Steps
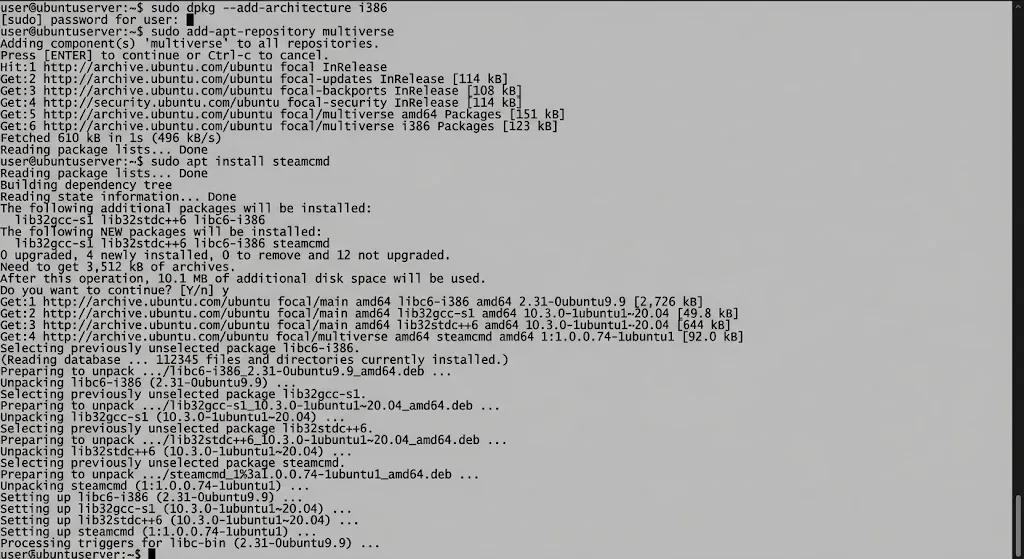
- Enable the i386 architecture with
sudo dpkg --add-architecture i386. - Add the multiverse repository, since
SteamCMDlives there on Ubuntu withsudo add-apt-repository multiverse. - Update your package list and install SteamCMD with
sudo apt install steamcmd. - Create a separate user for the server, such as
sudo adduser rust. - Switch to that user, then run
SteamCMD. - Log in and install the server files in one line:
steamcmd +login anonymous +force_install_dir /home/rust/rust_server +app_update 258550 validate +quit- Add the
steamclient.so symlinkso the server starts without a warning:
mkdir -p ~/.steam/sdk64ln -s ~/.local/share/Steam/steamcmd/linux64/steamclient.so ~/.steam/sdk64/steamclient.soThis symlink step is often skipped, which causes one of the most common startup errors. Add it now, before you move on.
Configure Your Rust Server (server.cfg and Launch Parameters)
With the files installed, the next task is your startup script. This script tells Rust how to name itself, which map to load, and how many players to allow.
A basic Linux startup script looks like this:
#!/bin/bash

cd /home/rust/rust_server

./RustDedicated -batchmode \

+server.port 28015 \

+server.level "Procedural Map" \

+server.seed 12345 \

+server.worldsize 4000 \

+server.maxplayers 50 \

+server.hostname "My Rust Server" \

+server.description "A private server for friends" \

+server.identity "myserver" \

+rcon.port 28016 \

+rcon.password "changethis" \

+rcon.web 1
A few of these flags deserve extra attention.
server.hostname, server.description, and server.identity control how your server shows up to players. Pick a clear name so friends can find it in the server browser.
The rcon settings let you manage the server without direct console access. rcon.web 1 turns on the web-based rcon that most panels expect.
Set a strong rcon.password, since a weak one leaves your server open to outside control.
server.seed and server.worldsize decides your map. A smaller worldsize loads quicker and runs lighter on the CPU. A larger map gives players more room but adds load during generation and saves.
Open Ports and Configure Your Firewall
Rust needs two ports open to work correctly. Port 28015 handles the main game connection overUDP. Port 28016 handles rcon.
If you are on a dedicated Linux box, open the same ports through your firewall. On Ubuntu, that usually means a couple of ufw commands:
sudo ufw allow 28015/udp

sudo ufw allow 28016/tcp
A static IP or a dynamic DNS service keeps your server address from changing after a router reboot. Without one, your friends may need a new IP every time your connection resets.
Launch and Test Your Rust Server
Once the ports are open, it’s time to start the server and check that everything works.
Run your startup script through screen, tmux, or a systemd service. Any of these keeps the server running after you close your terminal. A raw terminal session dies the moment you disconnect.
Test the connection locally first. Open Rust, press F1, and type:
client.connect 127.0.0.1:28015If that connects, your server is live. Next, have a friend search for your server name or connect with your public IP.
Watch the console for a failed to start message. That usually points to a missing port, a bad config line, or a hardware limit already hit.
Set your server to restart automatically after a crash or a Rust update. A simple cron job or a systemd restart policy handles this without extra software.
Add Mods and Plugins with Oxide or Carbon
Vanilla Rust works fine for a small group. Plugins add real value to admin tools and quality-of-life features.
Oxide, also known as uMod, remains one of the most common plugin frameworks for Rust. Carbon is a newer option built for speed and lower memory use. Both let you add plugins without touching the core game files.
To install either framework, download it and drop the files into your server folder. Restart the server once so it loads correctly. A new plugins folder appears after that first restart.
A few plugins cover most starter needs:
- Kits, for handing out starting gear
- Teleport, for moving players between bases quickly
- Admin tools for banning and muting players from inside the game
Back up your server folder before installing anything new. A bad plugin can crash the server or corrupt a save, so a backup gives you a way back.
Troubleshooting Common Rust Server Issues
Even a careful setup runs into problems. Here are the fixes for the most common errors.
“State 0x3” or “state 0x1” during a SteamCMD update. This usually points to a corrupted partial download. Delete the appmanifest_258550.acf file inside your steamapps folder, then run the update again.
“SteamAPI_Init() failed” on Linux. This means the steamclient.so symlink is missing or points to the wrong path. Recreate the symlink from the installation steps above, then restart the server.
Server hangs after “Waiting for user info.” This often traces back to missing i386 or multiverse dependencies on Linux. Recheck those packages, then run app_update again with the validate flag.
The server won’t show up for friends or in the public browser. Check that both TCP and UDP are forwarded on your game port. Some home connections sit behind a CGNAT, which blocks inbound traffic regardless of what you forward.
RCON connection refused. Confirm rcon.web is set to 1 in your startup script. Also, check that the rcon port is reachable from wherever you’re connecting, including any panel software.
Random crashes under load. This usually means your RAM falls short of your player count and map size. Go back to the requirements table and size up if needed.
Plugins break right after a Rust patch. Oxide and Carbon both need updates in step with the game itself. Update SteamCMD first, then update your plugin framework.
FAQs
Can I run a Rust dedicated server on Windows?
Yes. Windows works fine for small or local servers. Linux offers better process control for larger, always-on setups, but it isn’t a requirement.
How much does it cost to host a Rust server?
A starter dedicated server plan on Truehost starts at Kshs 13,140 per month for 10 to 20 players. Larger servers with more RAM and better CPUs run higher, are available for Kshs 25,875 a month.
How do I make myself an admin on my Rust server?
Add your SteamID64 to the ownerid or moderatorid list in your server’s users.cfg file. Restart the server, then press F1 in-game to access admin commands.
Should I disable EAC on my server?
Keep EAC on for a public server, since it catches most common cheats. Disabling it removes your server from the public browser and works best for private, testing setups only.
Do I need a whitelist, and how do I set one up?
A whitelist isn’t built into vanilla Rust, so you’ll need an Oxide or Carbon plugin for it. Install the whitelist plugin, then grant access to each player’s SteamID64.
Set up a Rust Dedicated Server Today
A dedicated Rust server comes down to a few things. Match your hardware to your player count. Get the config and ports right. Test everything before you invite anyone.
None of these steps requires a deep technical background. They just need to happen in the right order.
Your home connection may hit its ceiling once friends log in. A dedicated plan solves that problem for good.
Truehost Kenya offers dedicated server plans with local network routing, built for exactly this kind of setup. Check current plans and pick the size that matches your player count.