 Domain SearchInstantly check and register your preferred domain name
 Web Hosting
 cPanel HostingHosting powered by cPanel (Most user friendly)
 WordPress HostingHost your WordPress website with fast, secure, and affordable WordPress hosting in Kenya.
 KE Domains
 Reseller HostingStart your own hosting business without tech hustles
 Windows HostingOptimized for Windows-based applications and sites.
 Free Domain
 Affiliate ProgramEarn commissions by referring customers to our platforms
 Free HostingTest our SSD Hosting for free, for life (1GB storage)
 Domain TransferMove your domain to us with zero downtime and full control
 All DomainsBrowse and register domain extensions from around the world
 .Com Domain
 WhoisLook up domain ownership, expiry dates, and registrar information
 VPS Hosting
 Managed VPSNon techy? Opt for fully managed VPS server
 Dedicated ServersEnjoy unmatched power and control with your own physical server.
 Website Builder
 Online Store BuilderLaunch a professional e-commerce store without writing code.
 Web Design ServiceGet a custom-designed website tailored to your brand and goals. From just KES 15,600
 BlogRead our guides on web hosting, online business, digital marketing, and more
 SupportOur support guides cover everything you need to know about our services
 ContactContact us via chat or email
Your ASP.NET Core app runs fine on your laptop. Every route works, every test passes, and the demo looks great. Then you try to put it online, and the real work starts.
Most guides assume you already know IIS by heart, or they bury you in Azure-specific steps that do not apply to a plain Windows VPS.
So you end up piecing together five different tutorials, none of which match your setup.
This guide skips that. It walks through every step in order, from a blank Windows VPS to a live, secured ASP.NET Core site.
Each stage includes the exact commands and settings you need, plus the errors you are likely to hit along the way.
What You Need Before You Start
Before you touch anything, gather a few basics. This saves you from having to stop halfway through to find something.
- A Windows VPS running Server 2022 or Server 2025, since both support the current .NET releases cleanly.
- RDP access to that VPS, along with an admin username and password.
- An ASP.NET Core application that builds and runs without errors on your own machine.
- Basic comfort with PowerShell and the IIS Manager interface.
Sizing matters here, so pick a plan that fits your app rather than guessing. A small app runs fine on 1-2 vCPUs and 2 GB of RAM.
A busier production API with real traffic should start at 2 or more vCPUs and 4 GB of RAM. Watch your usage after launch, then scale based on what you see.
You might wonder why Windows instead of Linux. ASP.NET Core runs on both, but Windows makes more sense if:
- Your stack leans on SQL Server
- Active Directory
- IIS-specific tooling your team already knows.
If none of that applies, a Linux VPS with Nginx is worth a look too.
Truehost’s Windows VPS plans come in a few KES pricing tiers. So pick one that matches the specs above and use it as your starting point for the rest of this guide.
Step 1: Connecting to Your Windows VPS via RDP
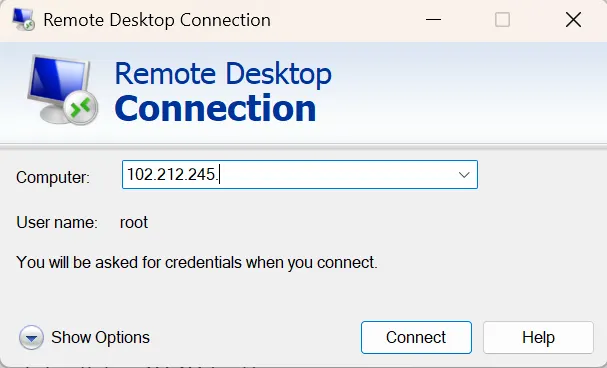
Once your VPS is active, log in to the Truehost client area and grab three things: the server IP, the admin username, and the temporary password.
On Windows, open Remote Desktop Connection, type in the IP address, and sign in with those credentials.
On macOS, install Microsoft Remote Desktop from the App Store first. Linux users can connect with Remmina or a similar RDP client.
After your first login, change the admin password right away. Then confirm the exact Windows Server version and build number, since this affects which .NET releases you can install later.
Step 2: Installing IIS on Your Windows VPS
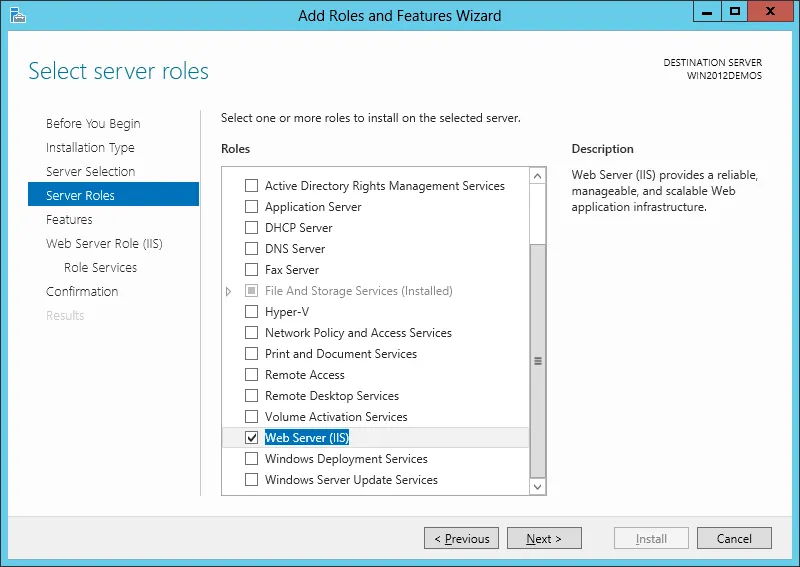
IIS is the web server that will sit in front of your ASP.NET Core app, so it needs to go first.
Open PowerShell as Administrator and run this single command:
Install-WindowsFeature -Name Web-Server -IncludeManagementToolsThis installs IIS along with the management tools you need for configuration later.
If you prefer a visual approach, open Server Manager, choose Add Roles and Features, and select Web Server (IIS) from the list.
Once the install finishes, open a browser on the VPS and go to http://localhost.
You should see the default IIS welcome page. That confirms the web server is running.
If the install fails partway through, check for pending Windows Updates first. A restart often clears whatever blocked the feature from finishing.
Step 3: Installing the .NET Core Hosting Bundle
IIS on its own cannot run ASP.NET Core apps. It needs the Hosting Bundle, which installs the .NET runtime.
It also instores the shared libraries, and the ASP.NET Core Module that lets ASP.NET Core apps run behind IIS.
Download the current Hosting Bundle installer directly from the official .NET site and run it on your VPS.
Pick the version that exactly matches your app’s target framework, since a mismatch here can cause startup failures later.
After installation, restart IIS, so it picks up the new module:
net stop was /ynet start w3svcSkipping this restart is one of the most common reasons a fresh deployment fails silently. Do not skip it.
STep 4: Publishing Your ASP.NET Core Application
With the server ready, it is time to prepare your app for transfer.
On your development machine or a separate build machine, not the production server, run:
dotnet publish -c ReleaseThis compiles your app and copies everything it needs into a publish folder.
Keeping build and production on separate machines keeps your live server clean and prevents compiler tools from being left where they do not belong.
Zip the contents of the publish folder, then move that zip to your VPS. You can drag it through the RDP clipboard, use a shared folder, or transfer it with an SCP client if one is available on your machine.
Once it lands on the server, unzip it and check the folder structure. Confirm the app’s .dll file, web.config, and appsettings.json all made it across.
A missing file here is a common cause of the errors covered later in this guide.
Step 5: Configuring IIS to Host the Application
Your app files are on the server, so now IIS needs to know how to run them.
Open IIS Manager and create a new Application Pool dedicated to your app. Set its .NET CLR version to No Managed Code, since Kestrel handles the runtime, not the app pool itself.
Next, create a new site. Point the physical path to the folder where you unzipped your published files, and assign the app pool you just created.
Set the site binding to port 80 for now. Test that the app loads over plain HTTP before adding HTTPS, so you can rule out SSL issues if something goes wrong.
Finally, check file permissions. The Application Pool identity needs read access to your app folder, and write access too if your app writes logs or temp files locally.
Step 6: Securing the Site With SSL
A live site without HTTPS is not something you want to launch, so this step comes early rather than as an afterthought.
You have two main paths for a certificate. Win-acme gives you a free Let’s Encrypt certificate and automates renewal, which works well for most production sites.
A commercial SSL provider is another option, useful if you need extended validation or a wildcard certificate for subdomains.
In IIS Manager, bind your certificate to port 443 on the same site you created earlier. Then add an HTTPS binding and confirm it points to the right certificate.
To force all traffic onto HTTPS, install the IIS URL Rewrite module and add a redirect rule from HTTP to HTTPS. This stops visitors from ever landing on the unencrypted version of your site.
Once that is done, open your site in a browser and check for the padlock icon. Run the address through an online SSL checker too, since it will flag any chain issues a browser might quietly ignore.
Step 7: Opening the Firewall and Testing the Live Site
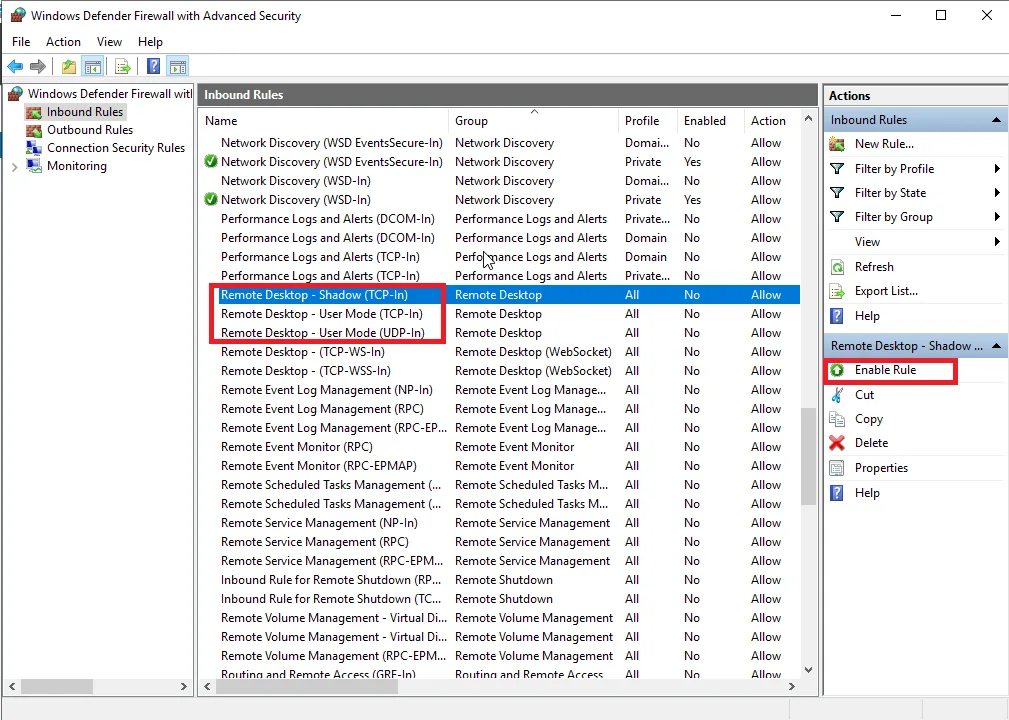
Your app is configured and secured, but outside traffic still needs a way in.
Open Windows Defender Firewall with Advanced Security and add inbound rules allowing traffic on ports 80 and 443.
Without these rules, visitors outside the VPS network will not be able to reach your site at all.
Test access from a device outside your VPS, not just from inside the server itself. A site that loads locally but not externally almost always points back to a missing firewall rule.
Once external access works, point your domain’s A record to the VPS IP address. DNS propagation can take a few hours, so give it time before assuming something is broken.
Fixing Common Deployment Errors
Even a careful deployment can hit a snag. Here are the errors you are most likely to run into, along with what actually causes each one.
1) HTTP Error 500.19, Internal Server Error
This one usually means IIS cannot read your web.config file. Often, the ASP.NET Core Module is missing entirely, or Windows Server Hosting was never installed on the server.
Start by opening Programs and Features and checking whether Windows Server Hosting appears in the list if it does not, install the .NET Hosting Bundle and restart IIS.
If Windows Server Hosting is already there, compare your deployed web.config against a known working copy. A malformed or corrupted config file also triggers this exact error.
Watch for the specific error code 0x8007000d alongside this message. That code points to a config file IIS cannot parse, rather than a missing module.
2) HTTP Error 500.30, ASP.NET Core App Failed to Start
This means your app started but wasn’t recognized by the host, then threw an unhandled exception before it could fully launch.
The fastest way to diagnose this is to enable stdout logging in web.config. That log will usually show you the exact exception that caused the app to crash.
Common triggers include a missing runtime version, a bad or missing connection string, or an environment variable your app expects that the server never received.
Add configuration validation at startup, so your app fails fast with a clear message. That turns a vague 500.30 into a readable error the next time something is missing.
3) HTTP Error 502.5, Process Failure
A 502.5 means the ASP.NET Core Module could not keep your app’s backend process running. Two causes explain most cases.
The first is an exception thrown inside your app’s startup code, which crashes the process before it can serve any requests. Check the app pool’s stdout log for the exact stack trace.
The second is a port conflict, where another process already holds the port your app tries to bind. Run netstat -ano | findstr :5000 (swap in your actual port) to spot the conflicting process, then either close it or change your app’s configured port through ASPNETCORE_URLS.
Dependency injection mistakes cause this error, too. Watch for messages like “unable to resolve service for type,” which usually points to a circular dependency or a missing constructor parameter in Program.cs.
4) Broken or Incomplete Deployment
Sometimes the app itself is fine, but the deployment did not fully copy across.
Confirm the app landed in the correct folder, that every file and subfolder transferred, and that web.config exists and is not empty or malformed. Any one of these breaks the site quietly.
When in doubt, do a clean redeploy. Delete everything from the deployment folder on the server, then republish and copy the files across again from scratch.
5) Application Pool Identity and Permission Errors
Permission problems often show up as a plain, unhelpful 500 error with no useful message attached.
Check that your Application Pool’s Process Model identity is set to ApplicationPoolIdentity, or that a custom identity has the correct rights on your deployment folder.
Grant read and execute permissions to IIS_IUSRS on the publish folder. You can do this through the folder’s Properties dialog in File Explorer, or with the icacls command in PowerShell.
Since this error rarely names the actual problem, treat permissions as an early check rather than something you only look at last.
6) Enabling and Reading the stdout Log
Most of the fixes above depend on stdout logging, so it is worth setting up properly.
Open web.config and find the aspNetCore element. Set stdoutLogEnabled to true, and point stdoutLogFile to a folder your app pool can write to.
Reproduce the error, then open the generated log file. A healthy startup shows normal request activity, while a failing one usually ends with a clear exception and stack trace.
Once you have found and fixed the issue, turn stdout logging back off. It adds constant disk writes and is meant for diagnosis, not for long-term production use.
Keeping the App Running and Updated
A deployed app still needs some care to stay reliable day-to-day.
Set your Application Pool to Always Running under its advanced settings. This keeps the app warm instead of letting it idle and cold-start on the next visitor.
For updates, build a simple redeploy routine. Publish a new version, briefly stop the app pool, swap in the new files, then start the app pool again. This keeps downtime short and predictable.
Check IIS logs and the Windows Event Viewer now and then, even when nothing seems wrong. Early warning signs, such as repeated app pool recycles, are easier to catch before they lead to an outage.
FAQs
Do I need IIS to run ASP.NET Core on Windows?
Technically, no, since Kestrel can serve requests on its own. In practice, Microsoft recommends placing IIS or another reverse proxy in front of it in production, since IIS adds SSL handling, improved security, and easier management of multiple sites on a single server.
What is Kestrel, and how does it work with IIS on Windows?
Kestrel is the lightweight web server built into every ASP.NET Core app. On Windows, IIS sits in front of Kestrel and forwards requests to it via the ASP.NET Core Module, while also handling tasks such as SSL termination.
Can I deploy ASP.NET Core to a Windows VPS without Visual Studio?
Yes. You can publish from the command line with dotnet publish, then manually move the files to your VPS or via a script. Visual Studio is convenient, but nothing in this process actually requires it.
What is Web Deploy, and do I need it for VPS deployment?
Web Deploy, also known as MSDeploy, automates publishing directly from Visual Studio to a remote IIS server. It is useful for frequent deployments, but a manual copy or a script-based transfer works just as well for most VPS setups.
Deploy Your ASP.NET App Today
A Windows VPS gives you full control over IIS, SQL Server, and every security setting your app depends on, control that shared hosting never offers.
You choose the operating system, the runtime version, and how the whole stack fits together.
Now that your app is live, secure, and easier to troubleshoot, the next step is to pick the right server to run it on.
Check out Truehost’s Windows VPS plans and get a server provisioned in minutes so that you can put everything in this guide into practice today.