Domain SearchInstantly check and register your preferred domain name
 Web Hosting
 cPanel HostingHosting powered by cPanel (Most user friendly)
 KE Domains
 Reseller HostingStart your own hosting business without tech hustles
 Windows HostingOptimized for Windows-based applications and sites.
 Free Domain
 Affiliate ProgramEarn commissions by referring customers to our platforms
 Free HostingTest our SSD Hosting for free, for life (1GB storage)
 All DomainsBrowse and register domain extensions from around the world
 .Com Domain
 WhoisLook up domain ownership, expiry dates, and registrar information
 VPS Hosting
 Managed VPSNon techy? Opt for fully managed VPS server
 Dedicated ServersEnjoy unmatched power and control with your own physical server.
 SupportOur support guides cover everything you need to know about our services
OpenClaw is an open-source AI agent that connects to leading LLM providers such as OpenAI, Anthropic, and Groq, allowing you to interact with AI through familiar platforms like Telegram and WhatsApp.
Hosting it on a VPS ensures better privacy, full control, and reliable 24/7 availability compared to running it on a personal computer.
In this guide, you’ll learn two ways to deploy OpenClaw on a VPS: a quick one-click installation on Truehost and a manual setup for greater customization.
We’ll also cover configuration, security, performance optimization, and common troubleshooting tips.
By the end, you’ll have a fully functional AI assistant running on your own server.
Prerequisites
Before getting started, make sure you have:
- An API key from a supported LLM provider (OpenAI, Anthropic, Groq, or another compatible service).
- A domain name (optional but recommended for a custom URL and SSL setup).
- A Truehost account for one-click deployment or SSH access to a VPS for manual installation.
- Basic familiarity with terminal commands or the ability to follow command-line instructions.
- A VPS running Ubuntu 22.04 or 24.04 LTS with at least 1–2 vCPUs and 2 GB RAM (4 GB recommended for better performance).
For simple Telegram-based use, 2 GB RAM is usually sufficient. If you plan to use browser automation, multiple integrations, or heavier workloads, 4 GB or more is recommended.
One-Click Deployment on Truehost (Recommended)
Most users should start here. Truehost’s one-click OpenClaw packages handle the heavy lifting pre-configured server, dependencies, and easy management.
Why this is the best option for most users:
- Managed infrastructure means less maintenance.
- Fast provisioning (often under a minute).
- Local support and Kenya-optimized billing via M-PESA.
- Pre-loaded OpenClaw with room to grow.
Step-by-step guide:
1. Go directly to the OpenClaw page
Visit the Truehost OpenClaw hosting page. If you don’t have an account yet, you’ll be prompted to sign up or log in.
2. Select and configure your plan.
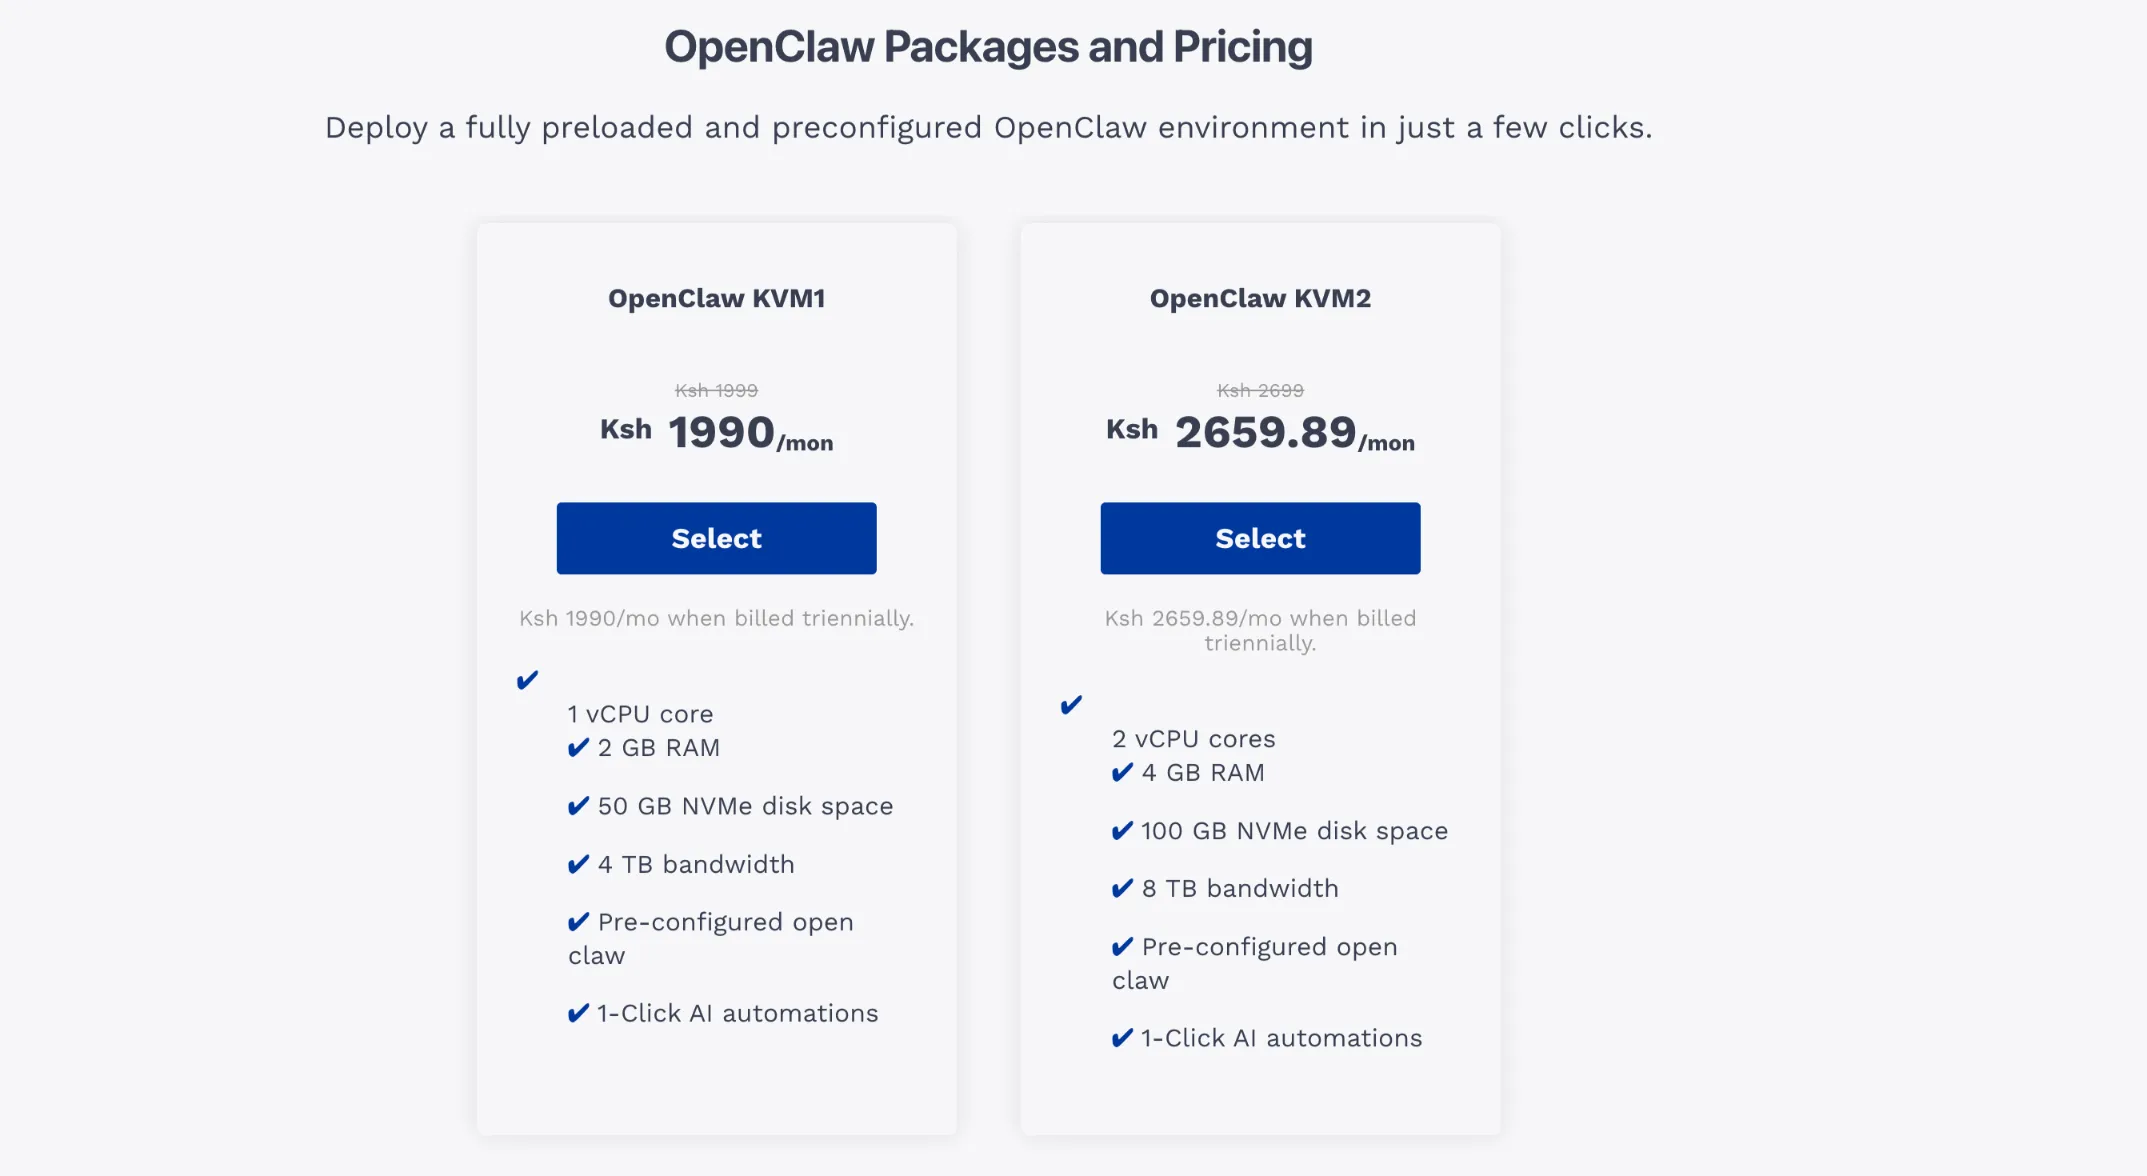
Both plans run on KVM virtualization with NVMe SSD storage, meaning your OpenClaw environment gets dedicated resources with no shared CPU cycles or memory contention from other users on the same server.
The KVM1 is the practical starting point for solo developers, freelancers, or small teams deploying a single AI agent or running light web automation.
With 1 vCPU, 2 GB RAM, and 50 GB NVMe storage, it handles standard OpenClaw workloads without paying for headroom you don’t need.
The KVM2 doubles every core resource. It comes with 2 vCPU cores, 4 GB of RAM, 100 GB of NVMe storage, and 8 TB of bandwidth.
This makes it a better choice for running multiple agents at the same time. It is also well-suited for parallel scraping tasks.
In addition, it can handle workflows that continuously process large volumes of data.
Pricing is billed annually or triennially, which locks in the discounted monthly rate over a 3-year term.
You can upgrade your resources anytime from the Truehost dashboard without downtime.
3. Deploy your instance.
Select your plan, add any extras you want (such as a custom domain name for a clean URL and SSL), and complete your payment using M-PESA, card, or bank transfer.
The system will automatically provision your VPS, install OpenClaw, and configure the basic settings.
You’ll receive an email with your server login credentials and dashboard details within minutes.
Once your server is ready, log into the OpenClaw dashboard, enter your LLM API key (from OpenAI, Anthropic, Groq, etc.), and connect your first messaging platform, usually Telegram.
Your private AI assistant will be live and ready to use.
Manual Setup on Any VPS
Prefer full control or using another provider? Follow these steps on a fresh Ubuntu VPS.
This approach gives you complete ownership of every configuration decision from which Node.js version you run to how your service restarts after a crash. It takes about 15–20 minutes on a clean server.
Step 1: Provision a fresh VPS
Choose Ubuntu 22.04 or 24.04 LTS. Minimum: 1 vCPU / 1 GB RAM (2 GB+ recommended).
Ubuntu LTS releases are the safest choice because they receive security updates for five years, have the widest community support, and are what most OpenClaw documentation assumes.
Avoid non-LTS versions, as they reach end-of-life quickly and can leave your server unpatched.
On RAM: 1 GB is workable for testing, but if you plan to run OpenClaw alongside other services (a database, Nginx, monitoring agents), allocate at least 2 GB from the start.
Migrating to a larger plan later is possible, but it disrupts uptime unnecessarily.
Step 2: Update system and install dependencies
SSH into your server and run:
sudo apt update && sudo apt upgrade -y
sudo apt install curl git build-essential -y
The apt update && apt upgrade combination ensures your package index is fresh and any existing packages are patched before you add new software.
Skipping this step on a brand-new VPS is one of the most common causes of subtle version conflicts later.
build-essential pulls in gcc, make, and related compilation tools that some Node.js native modules require during npm install.
Even if OpenClaw itself doesn’t need them today, having them pre-installed prevents cryptic errors when you add integrations later.
Install Node.js via nvm (recommended for the latest version):
curl -o- https://raw.githubusercontent.com/nvm-sh/nvm/v0.39.7/install.sh | bash
nvm install 24
Using nvm rather than apt install nodejs gives you version flexibility. The system package manager often ships an outdated Node.js version, sometimes two or three major versions behind.
With nvm, switching Node versions for different projects or upgrading to a new LTS release is a one-line command, with no risk of breaking system-level dependencies.
After running the nvm install script, either open a new terminal session or run source ~/.bashrc to make the nvm command available in your current shell.
Step 3: Install OpenClaw
Clone the official repo and install:
git clone https://github.com/openclaw/openclaw.git
cd openclaw
npm install
npm run build
npm install downloads all dependencies listed in package.json into the local node_modules folder.
npm run build compiles TypeScript (or whatever build step the project defines) into runnable JavaScript.
You must run the build step; skipping it and trying to start OpenClaw directly will result in missing file errors that can be confusing to diagnose.
If npm install throws peer dependency warnings, read them but don’t panic. Most are informational. Errors that block installation will be clearly marked.
Step 4: Configure environment variables
cp .env.example .envEdit .env with your LLM API key, port, and app secret. Never commit this file to Git.
The .env.example file is a template that lists every variable OpenClaw expects, with placeholder values.
Copying it to .env gives you a checklist; fill in your actual values one by one. Pay attention to:
- LLM API key: This is your OpenAI, Anthropic, or other provider key. Treat it like a password.
- PORT: Defaults to
3000. If another service is already using that port, change it here. - APP_SECRET: Used to sign sessions. Generate a long random string a simple option is
openssl rand -hex 32run in your terminal.
Adding .env to your .gitignore file is non-negotiable if you ever push this project to a repository. A leaked API key can result in unexpected charges or account suspension within minutes of being exposed.
Step 5: Set up as a systemd service
Create a service file so OpenClaw starts automatically on boot. Enable and start it with systemctl.
A systemd service file tells your Linux system how to manage OpenClaw as a background process.
Without this, you would need to manually restart the application after every server reboot or crash.
Your service file should define the working directory, the startup command (node dist/index.js or whatever your build outputs), the user it runs as, and a restart policy (Restart=always is sensible for a production bot).
Place the file at /etc/systemd/system/openclaw.service, then run systemctl daemon-reload to register it before enabling and starting.
Step 6: Connect to messaging platforms
- Telegram (easiest): Create a bot with BotFather, add the token to
.env, and restart the service.
- WhatsApp: Set up via Meta Developer account (more steps, check official docs).
Telegram is the recommended starting point. BotFather walks you through the entire process in a single conversation you’ll have a token in under two minutes.
Paste it into the TELEGRAM_BOT_TOKEN variable in your .env, restart the service, and the bot is live.
WhatsApp requires a Meta Developer account, a verified phone number, and passing through Meta’s app review process before you can message non-test users at scale.
Budget extra time if WhatsApp is your primary channel, and keep an eye on Meta’s messaging policy, which updates frequently.
Step 7: Test your first automation
Message your bot and visit http://YOUR_SERVER_IP:3000 for the dashboard. Verify it responds.
Send a simple test message first, even just ‘hello,’ to confirm the webhook or polling loop is working.
A non-response at this stage usually points to one of three things: the service isn’t running (systemctl status openclaw will tell you), the API key in .env is incorrect, or a firewall rule is blocking the port. Work through them in that order.
Check our guide on VPS use cases and workloads
Post-Installation: Configuration & Optimization
Getting OpenClaw running is step one. Hardening it, persisting your data, and keeping it maintainable are what separate a reliable production deployment from a fragile demo setup.
Security
- Set up UFW firewall: Allow only your SSH port and OpenClaw port.
- Get a free SSL certificate with Certbot and update your APP_URL to HTTPS.
- Install fail2ban to protect against brute-force attacks.
These three measures cover the most common attack vectors on a public-facing VPS.
UFW (Uncomplicated Firewall) closes every port except the ones your services actually need to run sudo ufw allow 22 and sudo ufw allow 3000 (or your chosen port), then sudo ufw enable.
Certbot automates free SSL certificate issuance and renewal from Let’s Encrypt; after setup, update APP_URL in .env to your https:// domain and restart the service.
fail2ban monitors your auth logs and temporarily bans IPs that repeatedly fail SSH login attempts.
None of these tools requires advanced Linux knowledge to configure, and together they significantly raise the cost of a successful attack.
Storage & Memory
Default in-memory storage resets on reboot. Switch to SQLite for simple persistence or PostgreSQL/MongoDB for heavier use.
In-memory storage is fine for development and quick tests, but any conversation history, flow state, or user data stored in memory disappears the moment your server restarts or the process crashes.
SQLite requires no separate server process and writes to a single file on disk it’s the right call for low-traffic deployments or single-server setups.
PostgreSQL or MongoDB are worth the added complexity if you anticipate concurrent users, need to run queries against your data, or plan to scale to multiple servers in the future.
Whichever you choose, set your database path or connection string in .env and confirm OpenClaw is reading it correctly before going live.
Connecting Multiple Chat Apps
Add credentials for each platform in .env and restart. OpenClaw handles them simultaneously.
Each platform credential lives in its own set of .env variables. After adding them, a single service restart is all it takes.
OpenClaw spins up separate listeners for each configured platform. There is no need to run multiple instances of the application.
Dashboard & Monitoring
Use the built-in dashboard for live status and logs. Key commands:
- Check service:
systemctl status openclaw - View logs:
journalctl -u openclaw
systemctl status openclaw gives you a quick health snapshot of whether the service is active, how long it has been running, and the last few log lines.
For a full log stream (useful when debugging a new integration), journalctl -u openclaw -f tails the logs in real time. Add --since "1 hour ago" to narrow output to a specific window.
The built-in dashboard at http://YOUR_SERVER_IP:3000 complements these command-line tools with a visual overview, and uses both, especially in the early days after deployment.
Staying Updated
Regularly run:
git pull
npm install
npm run build
systemctl restart openclaw
Run these commands in sequence, not individually at different times, pulling new code without rebuilding, or rebuilding without restarting the service, are common causes of version mismatch errors.
Schedule a maintenance window for updates so users aren’t affected mid-conversation.
Before updating a production instance, it’s worth pulling and testing on a staging server or a local environment first, especially for major version bumps.
Check out this guide on how to upgrade to a VPS
Common Issues & Troubleshooting
| Problem | Fix |
| npm install fails | Verify Node.js installation, re-run nvm steps |
| Port already in use | Change PORT in .env to an unused port |
| Service won’t start | Run journalctl -u openclaw -n 100 to diagnose |
| API key errors | Check for stray spaces or quotes in .env, restart after fixing |
| Can’t reach the dashboard | Confirm UFW allows the configured port |
| Telegram bot not responding | Verify token and that a conversation has been started |
| High memory usage | Switch to database-backed storage or upgrade RAM |
For anything else, check the official OpenClaw GitHub issues.
Performance tuning tips: Monitor with htop, limit concurrent browser sessions, and use efficient models for your tasks.
Set Up OpenClaw on Truehost VPS Today
Running OpenClaw on a VPS gives you a private, always-on AI assistant that truly belongs to you.
Whether you choose the quick one-click path or manual setup, you gain control and reliability that local setups can’t match.

We at Truehost make the one-click route especially smooth for Kenyan users with local servers, fast support, and flexible plans.
Ready to get your AI assistant working 24/7? Pick your path, follow the steps, and start automating today.