 Domain SearchInstantly check and register your preferred domain name
 Web Hosting
 cPanel HostingHosting powered by cPanel (Most user friendly)
 WordPress HostingHost your WordPress website with fast, secure, and affordable WordPress hosting in Kenya.
 KE Domains
 Reseller HostingStart your own hosting business without tech hustles
 Windows HostingOptimized for Windows-based applications and sites.
 Free Domain
 Affiliate ProgramEarn commissions by referring customers to our platforms
 Free HostingTest our SSD Hosting for free, for life (1GB storage)
 Domain TransferMove your domain to us with zero downtime and full control
 All DomainsBrowse and register domain extensions from around the world
 .Com Domain
 WhoisLook up domain ownership, expiry dates, and registrar information
 VPS Hosting
 Managed VPSNon techy? Opt for fully managed VPS server
 Dedicated ServersEnjoy unmatched power and control with your own physical server.
 Website Builder
 Online Store BuilderLaunch a professional e-commerce store without writing code.
 Web Design ServiceGet a custom-designed website tailored to your brand and goals. From just KES 15,600
 BlogRead our guides on web hosting, online business, digital marketing, and more
 SupportOur support guides cover everything you need to know about our services
 ContactContact us via chat or email
Meet Wanjiru. She runs an online shop in Nairobi, and she is a made-up example. Her week, however, looks familiar to many owners.
On Monday, she moved her store to a new VPS. By Thursday, customers were paying through M-Pesa. That evening, her developer opened the server’s login log. Dozens of unknown addresses had already tried to sign in as the administrator.
Nobody had broken in. Still, the log made one point clear. Every public server is tested, and testing starts on day one.
Here is the part many owners miss. Your provider protects the data center, the hardware, and the virtualization layer. You protect everything on top. That covers logins, software, customer data, and your team’s access.
This guide gives you a prioritized plan to secure a VPS for your business. You can finish the core steps in an afternoon. After that, a few small habits keep the server safe.
Here is the plan:
- Lock down server access
- Configure a firewall
- Block brute-force attacks
- Patch on a schedule
- Control team access
- Encrypt traffic and protect customer data
- Back up off the server
- Monitor logs and set alerts
After the eight steps, you will verify your work. Then you will see what Kenyan data protection rules mean for your server. Finally, you will learn what to do if an attack succeeds.
What You Are Responsible for on a Business VPS

A VPS follows a shared responsibility model. The provider runs the hardware and the hypervisor. You run the operating system, the applications, and every login.
A new VPS arrives with a few advanced protections switched on. So treat the default setup as a starting point, not a finished job.
Four mistakes give attackers an easy way in:
- Weak credentials. Short or reused passwords fall to automated guessing.
- Exposed services. A database open to the internet invites attention.
- Missed patches. Old software has flaws that attackers already exploit.
- Shared logins. One shared root password means nobody can say who did what.
The stakes are real for a business. A breach can cost you customer records, payment details, and days of sales. In addition, it can damage the trust you spent years building.
Step 1: Lock Down Server Access
Access is the front door. Attackers try it first, so you secure it first.
Work in this order. Create an admin account, install your key, test the key, and then close the door on passwords and root.
Replace Passwords with SSH Keys
Bots try password after password, all day and all night. They can’t guess a properly generated key. For that reason, keys beat passwords for server logins.
Generate an Ed25519 key pair on your own computer. Never create it on the server.
ssh-keygen -t ed25519 -C "[email protected]"Next, copy the public key to your admin account. The following section shows how to create that account.
ssh-copy-id deploy@YOUR_SERVER_IPThen open a second terminal window and log in with the key. Keep your first session open during this test. If the key fails, you can still fix the problem. Without that open session, a mistake locks you out.
Disable Root Login and Create a Sudo User
The root account is the most attractive target on the server. Attackers already know its name, so they only need the password. Take that advantage away.
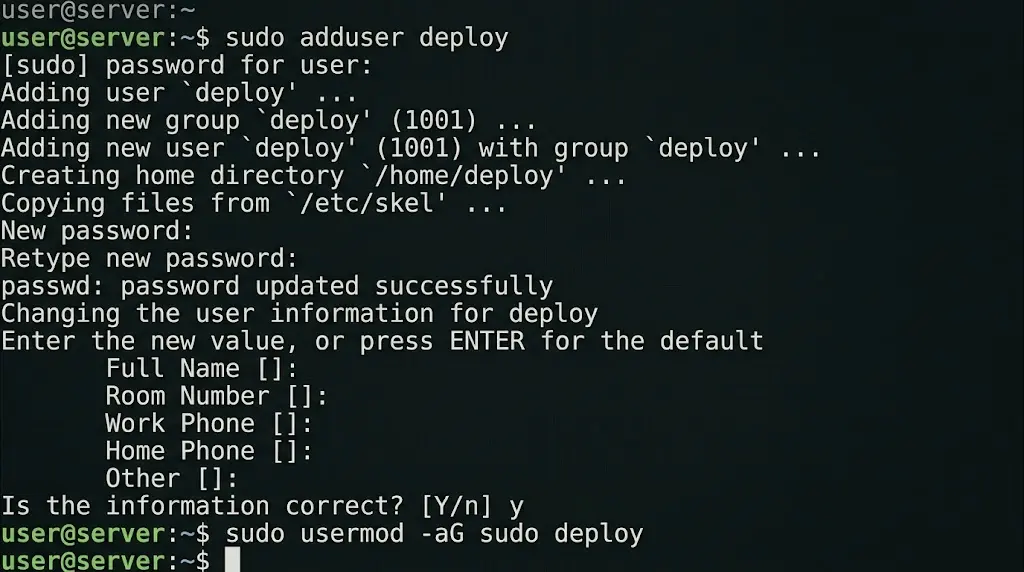
Create a named admin account with sudo rights:
sudo adduser deploysudo usermod -aG sudo deployOn AlmaLinux or Rocky Linux, add the user to the wheel group instead.
Now open the SSH configuration file at /etc/ssh/sshd_config and set these three lines:
PermitRootLogin no

PasswordAuthentication no

PubkeyAuthentication yes
Check the syntax before you reload. A typo here can lock you out.
sudo sshd -t

sudo systemctl reload ssh
On RHEL-family systems, the service name is sshd.
One more check saves a lot of headaches. Some cloud images add a file in /etc/ssh/sshd_config.d/ that overrides your changes. This command shows the settings the server actually uses:
sudo sshd -T | grep -E "passwordauthentication|permitrootlogin"Both lines should say no.
What about changing port 22? It cuts log noise, which is nice. However, it won’t stop a determined attacker, since a port scan finds the new port with little effort. Treat it as housekeeping, not protection.
Step 2: Configure a Firewall That Opens Only What Your Business Needs
A firewall decides which doors exist at all. Start with every door shut. Then open only the ones your business uses.
Most business servers need three. SSH serves your admins, port 80 serves web traffic, and port 443 serves secure web traffic. Anything else stays closed until someone can explain why it must open.
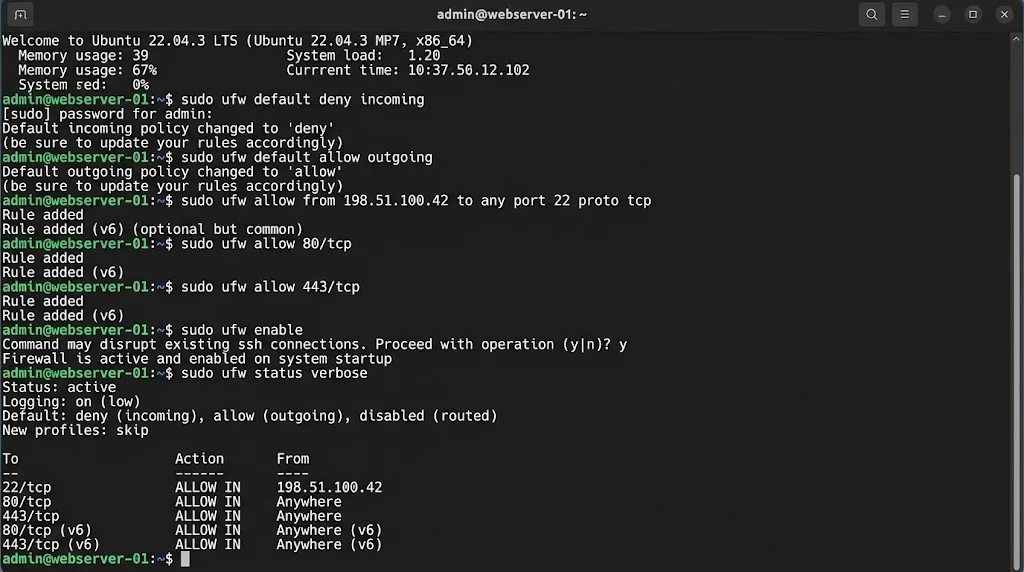
On Ubuntu or Debian, UFW makes this simple. Allow SSH before you enable the firewall, or you will cut off your own session.
sudo ufw default deny incoming

sudo ufw default allow outgoing

sudo ufw allow from YOUR_OFFICE_IP to any port 22 proto tcp

sudo ufw allow 80/tcp

sudo ufw allow 443/tcp

sudo ufw enable

sudo ufw status verbose
Limiting SSH to your office IP is a strong move. However, some offices use connections where the IP address changes. If that sounds like yours, a VPN with a fixed address solves the problem. Otherwise, you may lock yourself out.
On AlmaLinux, Rocky Linux, or other RHEL-family systems, use firewalld instead. The same rules apply. Open the web ports and restrict SSH.
Add a second layer at the provider level. Many hosts offer a network firewall in the control panel. It blocks traffic before that traffic reaches your server.
Keep databases off the internet entirely. In MySQL or MariaDB, set bind-address = 127.0.0.1. Only apps on the same server can access the database. Your website still works, and outsiders can’t touch your data.
Step 3: Block Brute-Force Attacks with Fail2ban
A firewall can’t tell a good login from a bad one on an open port. Fail2ban fills that gap. It reads your logs, spots repeated failures, and bans the offending address.
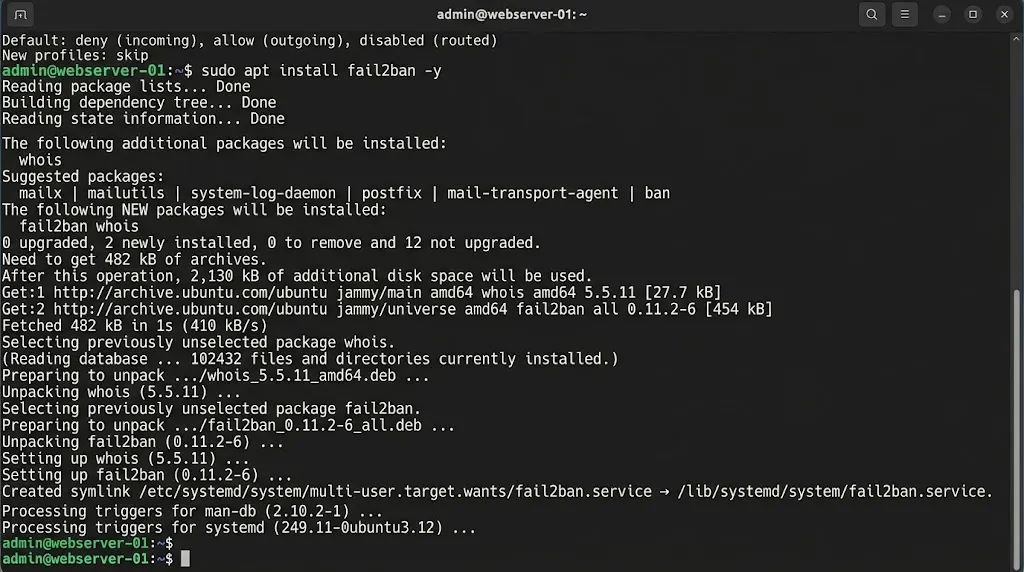
Install it:
sudo apt install fail2ban -yCreate a local config, so updates don’t overwrite your settings. Add this to /etc/fail2ban/jail.local:
[sshd]

enabled = true

maxretry = 5

findtime = 10m

bantime = 1h

ignoreip = 127.0.0.1/8 YOUR_OFFICE_IP
Here is what those settings do. After five failures within ten minutes, the address gets banned for an hour. Your office IP stays on the allowlist so that a typo won’t lock your own team out.
Start the service and check the jail:
sudo systemctl enable --now fail2ban

sudo fail2ban-client status sshd
Sooner or later, a teammate will get banned by accident. Free them with one command:
sudo fail2ban-client set sshd unbanip THEIR_IPOnce your keys are in place, password guessing can’t succeed anyway. So why bother with Fail2ban? The answer is simple. It cuts log noise, lowers server load, and shows you who keeps probing.
Teams that want shared threat intelligence can look at CrowdSec. It does a similar job and shares ban lists across its users.
Step 4: Patch the OS and Business Applications on a Schedule
Attackers love old software. When a flaw becomes public, they scan the internet for servers that still carry it. Patching closes that door.
Turn on automatic security updates for the operating system. On Ubuntu or Debian:
sudo apt install unattended-upgrades -y

sudo dpkg-reconfigure --priority=low unattended-upgrades
On AlmaLinux or Rocky Linux:
sudo dnf install dnf-automatic -y

sudo systemctl enable --now dnf-automatic-install.timer
Some updates require a reboot, and kernel updates are a common example. On Ubuntu, the file /var/run/reboot-required tells you when one is waiting. Pick a quiet hour, such as late Sunday night, and restart then. Warn your customers if the store will go offline.
Operating system patches are only half the job. Your CMS, plugins, control panel, and database also need updates. A single outdated plugin can undo all your server hardening.
Use a simple rhythm:
- Daily: automatic security patches.
- Monthly: a manual review of application updates, tested on a staging copy first.
- Right away: fixes for critical flaws announced in the software you run.
Step 5: Control Who on Your Team Can Reach the Server
Many breaches start with a person, not a piece of software. A leaked password, a stolen laptop, or a former employee with live access can do the damage.
Follow these rules:
- Give each person an individual account. Never share the root login. Shared accounts erase accountability.
- Apply least privilege. Give sudo rights only to people whose jobs need them. A content editor doesn’t need server admin rights.
- Require MFA. Turn on multi-factor authentication for your provider account and hosting control panel. Whoever controls those can rebuild or delete your server.
- Log admin actions. Sudo commands are logged in the authentication log so that you can trace every change.
Then build an offboarding checklist. The day someone leaves, remove their SSH key from ~/.ssh/authorized_keys and lock the account:
sudo usermod -L former_employeeContractors and agencies deserve the same care. Give them time-limited access, and remove it when the project ends. Also, change any shared secrets they knew, such as database passwords and API keys. This last step is easy to miss.
Step 6: Encrypt Traffic and Protect Customer Data
Encryption protects data in two places. It guards data while it travels and while it rests.
For travel, install a TLS certificate and force HTTPS. Certbot can issue and renew free certificates automatically:
sudo certbot --nginx -d yourdomain.co.ke -d www.yourdomain.co.keApache users swap --nginx for --apache. Then allow only TLS 1.2 and 1.3 in your web server settings.
Replace FTP with SFTP. FTP sends passwords in plain text. SFTP runs inside SSH, so it uses the keys you already set up.
For data at rest, encrypt database dumps and backups before they leave the server. Protect any disk that holds customer records, too. Keep secrets out of web folders and code repositories. An .env file sitting in a public folder has leaked many a database password.
If you take M-Pesa payments, your Daraja consumer key and secret act like cash. Store them outside the web root, and limit who can read them. Restrict callback endpoints to the paths you actually need. Ask your developer to review how these credentials are stored.
Step 7: Back Up Off the Server and Test Your Restores
A backup is your only fix for ransomware, a deleted database, or a failed upgrade. However, a backup you never test is a hope, not a plan.
Follow the 3-2-1 rule in plain terms. Keep three copies of your data. Store them on two different types of media or services. Keep one copy off-site, away from your VPS provider if you can.
Provider snapshots help, yet they don’t replace backups. A snapshot often lives in the same account and data center as your server. If an attacker takes over the account, they can delete both.
Encrypt every backup. Tools like restic and BorgBackup encrypt by default and keep multiple versions. Versions help, since ransomware can quietly corrupt the newest copy.
Then schedule a restore test each quarter. Restore to a spare server and open the site. Record how long it took. That number tells you how much downtime to expect on a bad day.
Step 8: Monitor Logs and Set Alerts
Hardening blocks most attacks. Monitoring catches the rest. Without it, you may not learn about a breach for weeks.
Watch three logs: authentication, web server access and errors, and the firewall. On Ubuntu or Debian, the authentication log lives at /var/log/auth.log.
Set alerts for these events:
- A spike in failed logins
- A new user account
- A new open port
- A sudden jump in CPU use or outbound traffic
Lightweight tools handle this well. Logwatch emails you a daily log summary. Netdata shows live server health. Uptime Kuma tells you when the site goes down.
Add scheduled malware and rootkit scans with ClamAV and rkhunter. For file changes, AIDE alerts you when system files change unexpectedly.
Monitoring also supports compliance. Kenyan law gives you a short window to report a breach. You can’t report one you never detected.
How to Verify Your VPS Is Actually Hardened
Finish with proof. Don’t assume the steps worked. Test them.
Run these checks on the server:
# SSH settings that actually apply
sudo sshd -T | grep -E "passwordauthentication|permitrootlogin"# Ports the server is listening on
sudo ss -tulpn# Firewall rules
sudo ufw status verbose# Fail2ban jail status
sudo fail2ban-client status sshd# Full security audit
sudo apt install lynis -y

sudo lynis audit system
Next, scan your server from a different computer. Only scan servers you own.
nmap -Pn YOUR_SERVER_IPOnly your web ports and restricted SSH should respond. Anything else needs an explanation.
Lynis ends with a hardening index and a list of warnings. Read the warnings first. Then work through the suggestions. Don’t chase a perfect score. Fix the biggest gaps first, and run the audit again.
Print this checklist and keep it near your desk:
Password login is refused, and key login works
Root login over SSH is blocked
Only ports 80, 443, and restricted SSH respond to an outside scan
The Fail2ban jail shows as active
Automatic security updates are on
Every team member has a named account
MFA is on for the provider account and control panel
HTTPS works, and FTP is switched off
The latest backup restored successfully, with the date noted
Alerts reach an inbox that someone actually reads
Meeting Kenyan Compliance Requirements on a VPS
Good security and legal compliance overlap heavily in Kenya. Your server settings feed directly into your legal duties.
Kenya’s Data Protection Act 2019
Start with a simple question. Does the Act apply to you? If your business handles personal data, such as names, phone numbers, or order histories, the answer is probably yes.
Here are the points to know:
- Registration. Businesses that act as data controllers or processors must register with the Office of the Data Protection Commissioner (ODPC). Without registration, you can’t lawfully act in either role.
- The 72-hour breach clock. A controller must notify the ODPC within 72 hours of learning about a breach. A processor must tell the controller within 48 hours.
- Risk of harm. The law ties notification to the risk of harm for the people affected. If you are unsure, ask a lawyer.
- Late notices. If you miss the window, you must explain the delay. Good logs make that explanation possible.
- Data location. Some personal data processing must happen on a server in Kenya, or a serving copy must be kept there. The Data Protection (General) Regulations 2021 set the scope. Read them before you pick a server location.
Penalties apply for breaking the rules. Check current amounts and registration fees on the ODPC website at odpc.go.ke.
PCI DSS and Other Obligations
PCI DSS applies whenever card numbers are stored or processed on your server. The hardening steps in this guide map to its main themes. Access control comes from Steps 1 and 5. Encryption comes from Step 6. Patching comes from Step 4, and logging comes from Step 8.
The easier route is to avoid card data altogether. Let a compliant payment provider host your payment page. Then card numbers never reach your VPS, and your scope shrinks.
Kenya’s Computer Misuse and Cybercrimes Act 2018 also covers attacks on computer systems. Ask the ODPC and the Communications Authority of Kenya which channels currently accept cyber incident reports.
This section gives general information, not legal advice. For your own situation, talk to a lawyer.
Should Your Team Secure the VPS or Hand It to a Managed Provider?
On an unmanaged VPS, you handle security yourself. On a managed VPS, the provider handles agreed tasks, such as patching, monitoring, and support.
Use this four-question test:
- Skills. Does someone on your team know Linux well enough to fix a midnight emergency?
- Hours. Who is on call in the middle of the night, East Africa Time?
- Compliance. Do you hold customer data or card payments that bring legal duties?
- Downtime cost. How many shillings do you lose for each hour offline?
If the answers to the first two are “nobody” and the last two numbers are high, choose managed if you have a skilled admin and a high risk tolerance; unmanaged works fine.
Managed plans usually cover patching, monitoring, backups, and support. You still own your application code, your user accounts, and your content. Always ask in writing what a plan includes.
Ask any provider three questions before you sign:
- Where does my server physically sit?
- When does support answer, in East Africa Time?
- What exactly does patching cover?
A hybrid works too. Keep control of your application while the provider handles operating system patches and monitoring. You get a safety net without handing over everything.
What to Do If Your VPS Is Compromised
Know the warning signs:
- Unknown user accounts
- Strange processes are eating CPU
- Traffic spikes you can’t explain
- Files that changed without your input
- Customers are reporting spam from your domain
If you see them, move in this order.
Contain first. Block all traffic except your own IP. Take a snapshot of the disk before you change anything. Save copies of the logs somewhere safe. This evidence helps you later.
Rotate every credential. Change server passwords, SSH keys, database logins, control panel access, API keys, and M-Pesa Daraja credentials.
Rebuild, don’t clean. Cleaning a hacked server leaves doubt, since you can’t prove you found everything. Instead, build a fresh server, restore data from a backup dated before the breach, then patch and harden it again.
Next, work on the 72-hour plan:
- Hour 0 to 1: contain the damage and preserve evidence.
- Hours 1 to 24: find out what data the attacker touched.
- Hours 24 to 72: decide whether the breach is reportable, draft the ODPC notice, and inform affected customers where required.
Name three roles before an incident happens. One person decides, one drafts the notice, and one speaks to customers. Panic is a poor time to assign jobs.
Agencies face a tighter clock. If you run a client’s server as a processor, you have 48 hours to tell the client. Write that duty into your contract.
Finish with a short review. Ask what failed, what you will fix, and which checklist item would have caught it.
FAQs
Is VPS hosting secure enough for a business?
Yes, when you configure and maintain it. No, when you leave the defaults. A VPS isolates you from other customers on the same hardware. However, it also places responsibility for the operating system and your apps on you. Follow the eight steps above, and a VPS can serve a serious business well.
What is the first thing to do to secure a new VPS?
Create a named sudo user and switch to SSH keys. Do that before anything else. Access is the first door attackers try, so close it first. Then set up your firewall. Step 1 shows the exact commands.
Is a VPS more secure than shared hosting?
Usually, yes. On shared hosting, many sites share one server, so one weak neighbor can cause trouble for everyone. A VPS gives you your own isolated resources. Still, you take on more responsibility. A neglected VPS can be less safe than a well-run shared plan.
Make Your Business VPS Hard to Break Into
You don’t need a security team to stop most attacks. You need SSH keys and a firewall, and you need them today. Set aside thirty minutes and complete Steps 1 and 2. Your server stops being an easy target.
This week, run the verification checklist. Write down the date and every failed check. Fix those items first.
If you would rather hand routine server work to a team, compare Truehost Kenya VPS plans. Ask which security tasks each plan covers, and get the answer in writing.