Domain SearchInstantly check and register your preferred domain name
 Web Hosting
 cPanel HostingHosting powered by cPanel (Most user friendly)
 KE Domains
 Reseller HostingStart your own hosting business without tech hustles
 Windows HostingOptimized for Windows-based applications and sites.
 Free Domain
 Affiliate ProgramEarn commissions by referring customers to our platforms
 Free HostingTest our SSD Hosting for free, for life (1GB storage)
 All DomainsBrowse and register domain extensions from around the world
 .Com Domain
 WhoisLook up domain ownership, expiry dates, and registrar information
 VPS Hosting
 Managed VPSNon techy? Opt for fully managed VPS server
 Dedicated ServersEnjoy unmatched power and control with your own physical server.
 SupportOur support guides cover everything you need to know about our services
Uploading a website to cPanel for the first time can seem complicated but i promise it’s not.
If you’ve built your site locally, maybe a clean HTML/CSS project, a custom PHP app, or a full WordPress installation, uploading a website is a walkover.
So before the upload, ensure you have these essentials:
- A web hosting account with cPanel access (most shared, VPS, and reseller plans include it).
- Your website files are neatly organized in a folder on your computer (HTML, CSS, JS, images, PHP files, etc.).
- For dynamic sites like WordPress: An exported database (usually a .sql file) and your configuration details.
- Configuration files ready, such as .htaccess or wp-config.php.
- A stable internet connection large uploads can take time.
For anything beyond a few files, zip your entire website folder first. This speeds up the upload dramatically and reduces errors.
Take a moment to double-check that your files work perfectly in your local environment. Test everything now so you catch issues early.
Now lets get to how to upload a website to cPanel.
The Process of Uploading a Website to cPanel
Step 1: Log in to cPanel
Open your browser and go to your cPanel login URL.
It’s usually one of these formats:
https://yourdomain.com/cpanelhttps://yourdomain.com:2083
Your hosting provider sends you these credentials when you sign up. Enter your username and password, and you’re in.
If you’re hosting with us at Truehost, you can also access cPanel directly from your client area dashboard, no need to remember the URL separately.
Step 2: Open File Manager
Once you’re inside cPanel, look for the Files section.
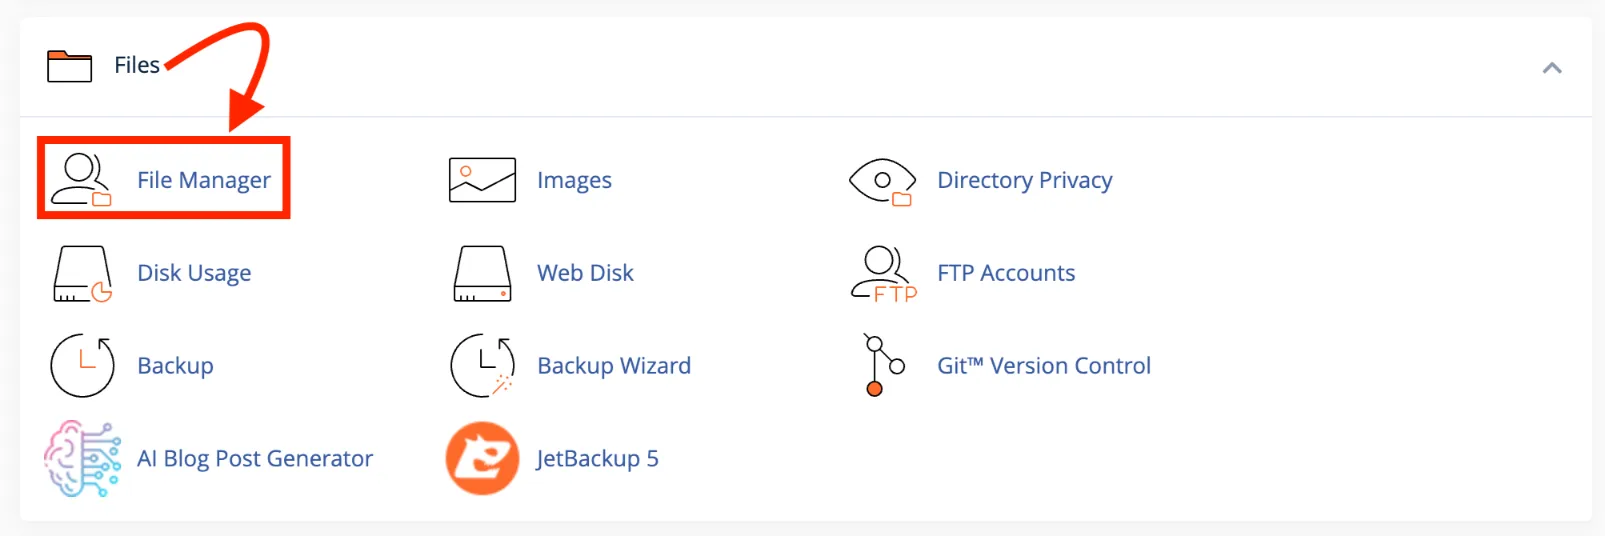
Click File Manager. This opens a full browser-based interface that shows all the files and folders on your server.
Step 3: Scroll to Find the Public Folder
Inside File Manager, you’ll see a directory tree on the left side.
You need to scroll to public_html. This is your website’s root folder. It’s where any files you want visitors to see need to live.
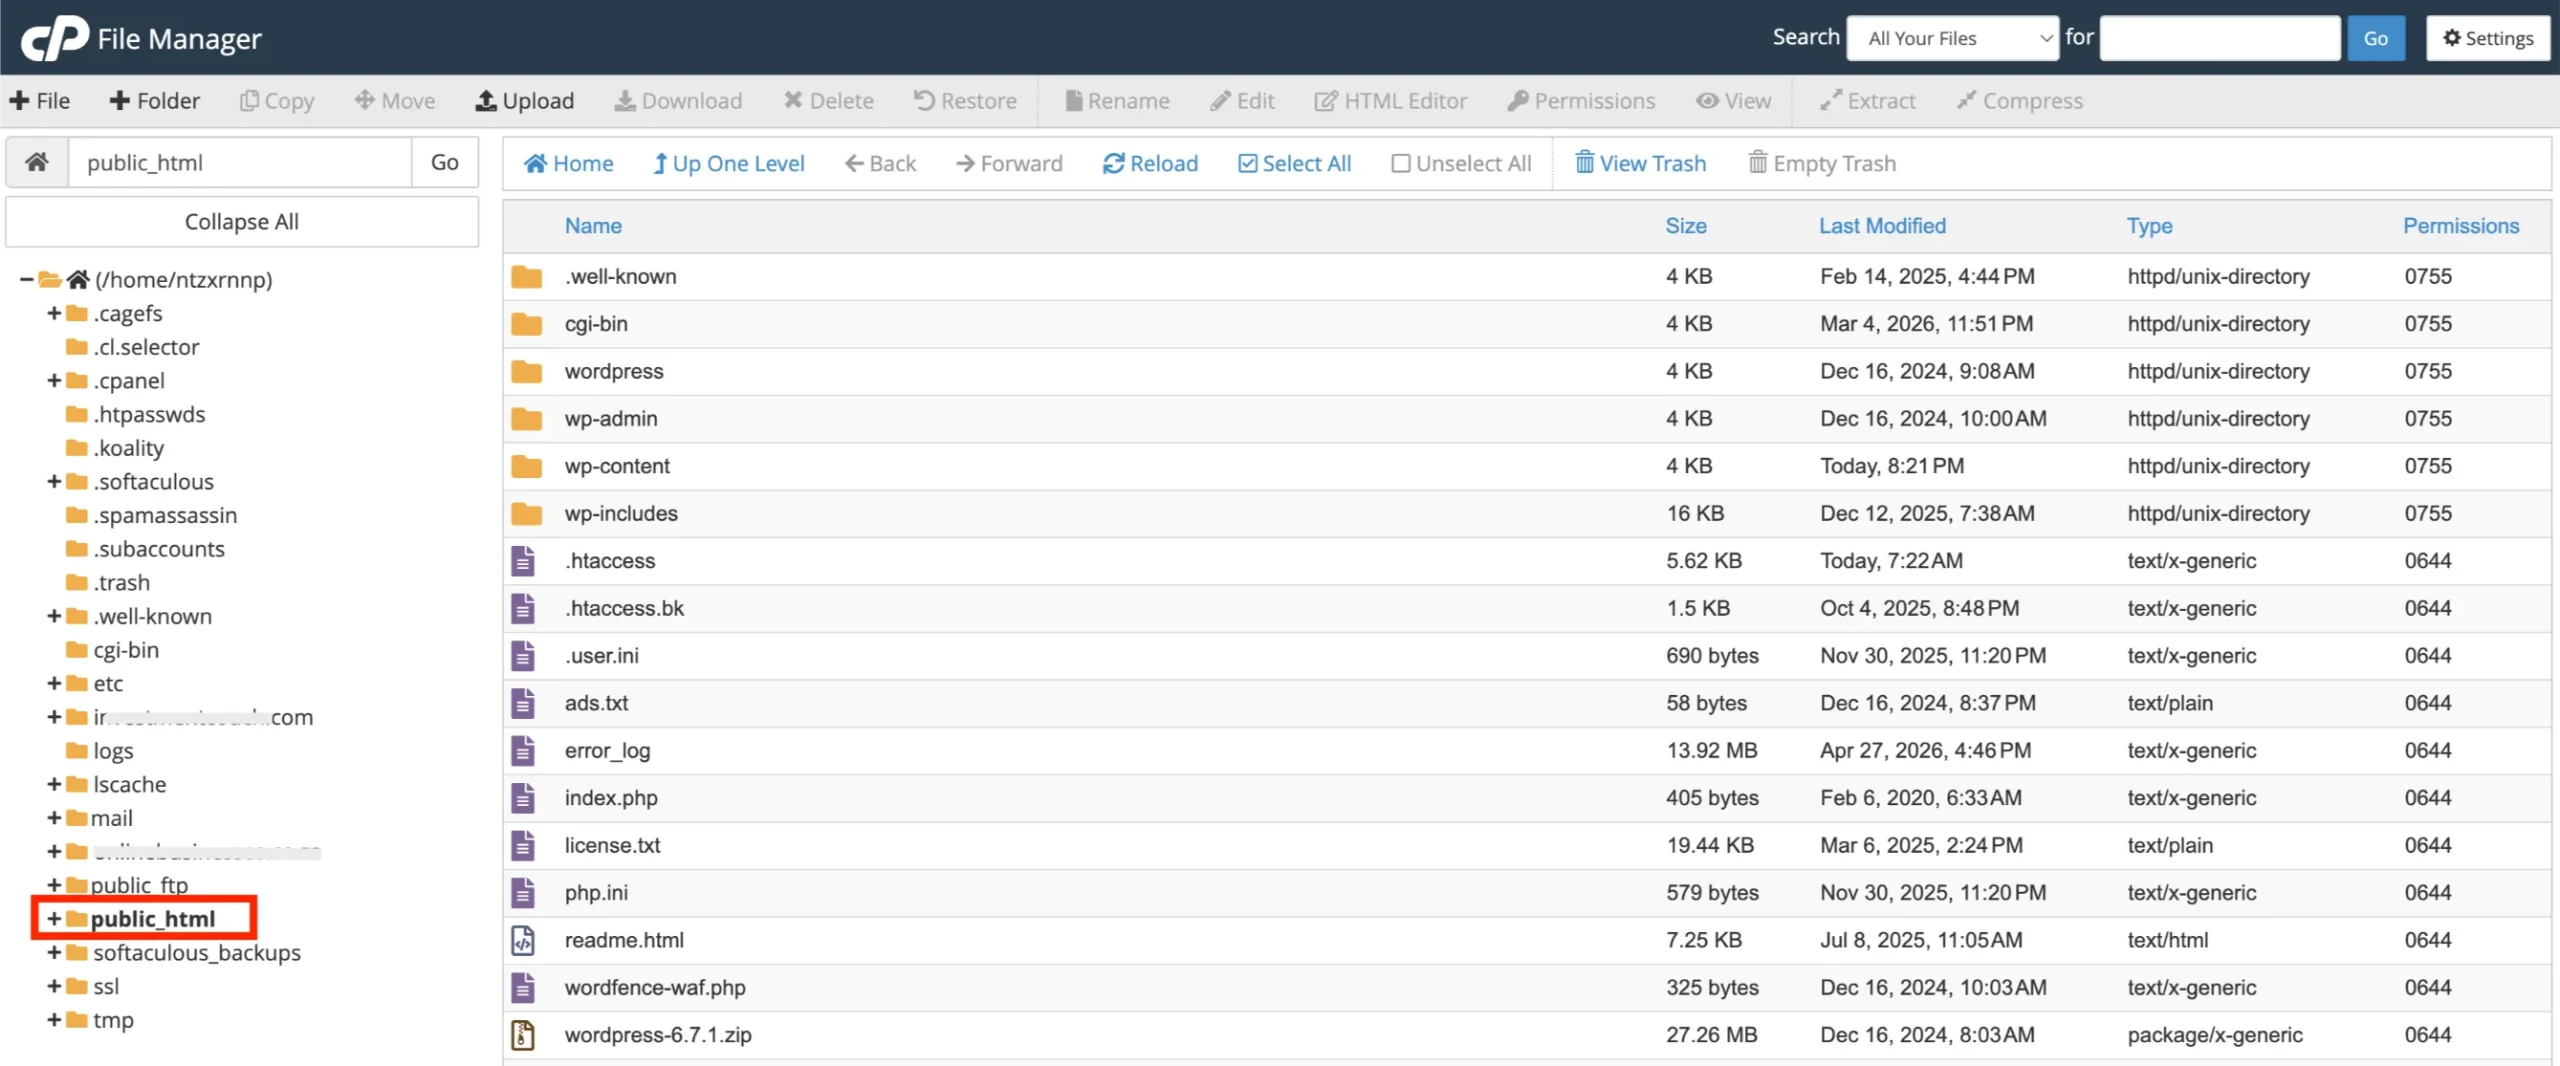
A quick heads up: if you’re uploading your site for your primary domain, upload directly inside public_html. If it’s for an addon domain or subdomain you’ve set up separately, scroll to the specific folder created for that domain.
When in doubt, public_html is where you start.
Step 4: Upload Your Website Files
Now, the actual upload.
If you compressed your files into a ZIP (recommended):
- Click the Upload button in the top toolbar of File Manager (under public_html).
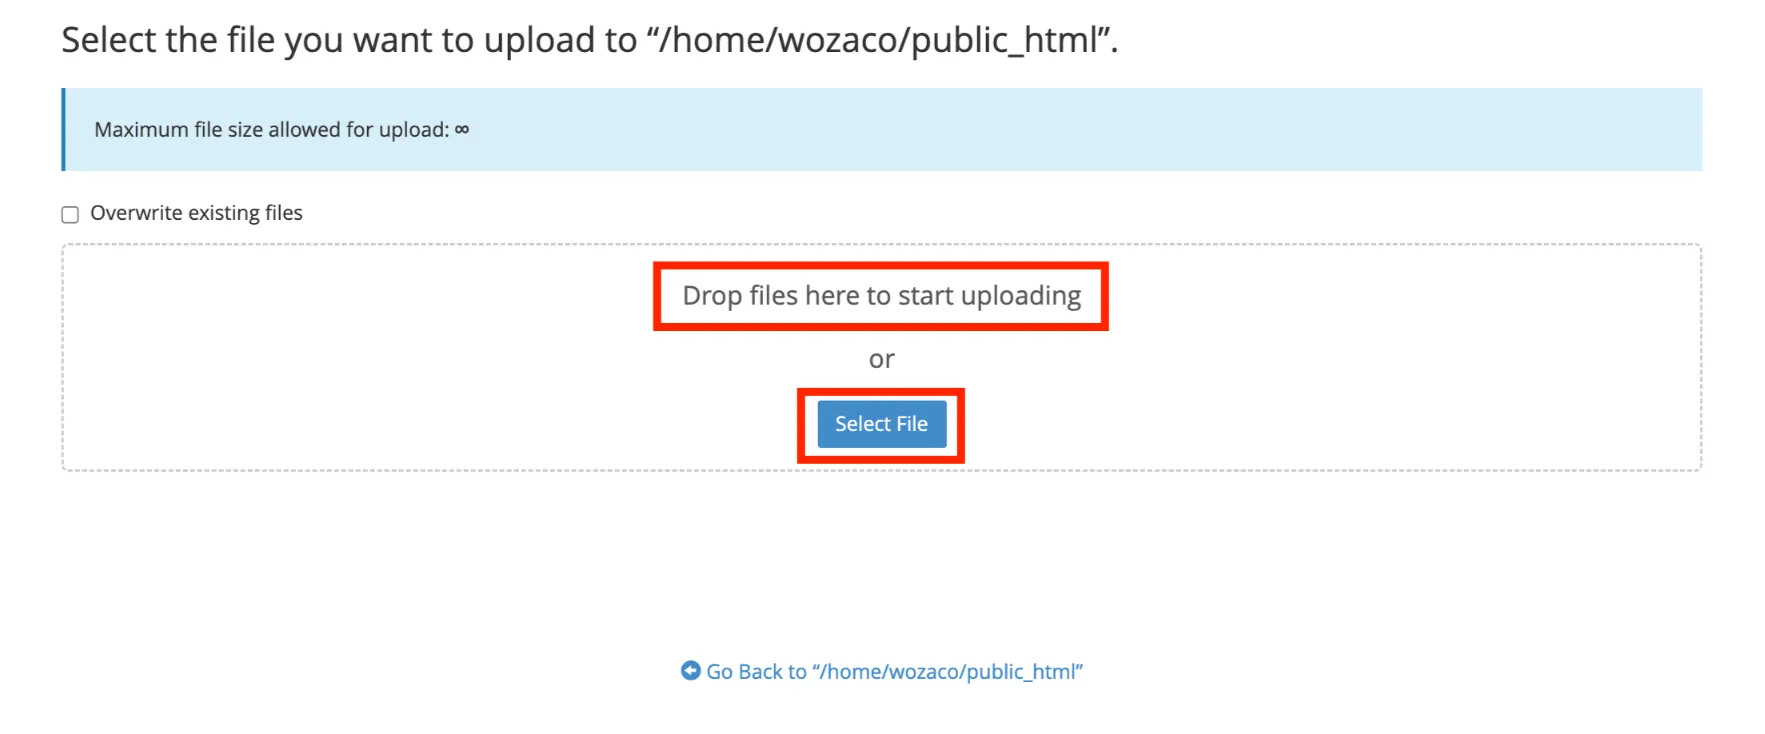
- A new upload tab opens. Drag and drop your .zip file, or click Select File and browse to it on your computer.
- Wait for the upload to reach 100%. Don’t close the tab.
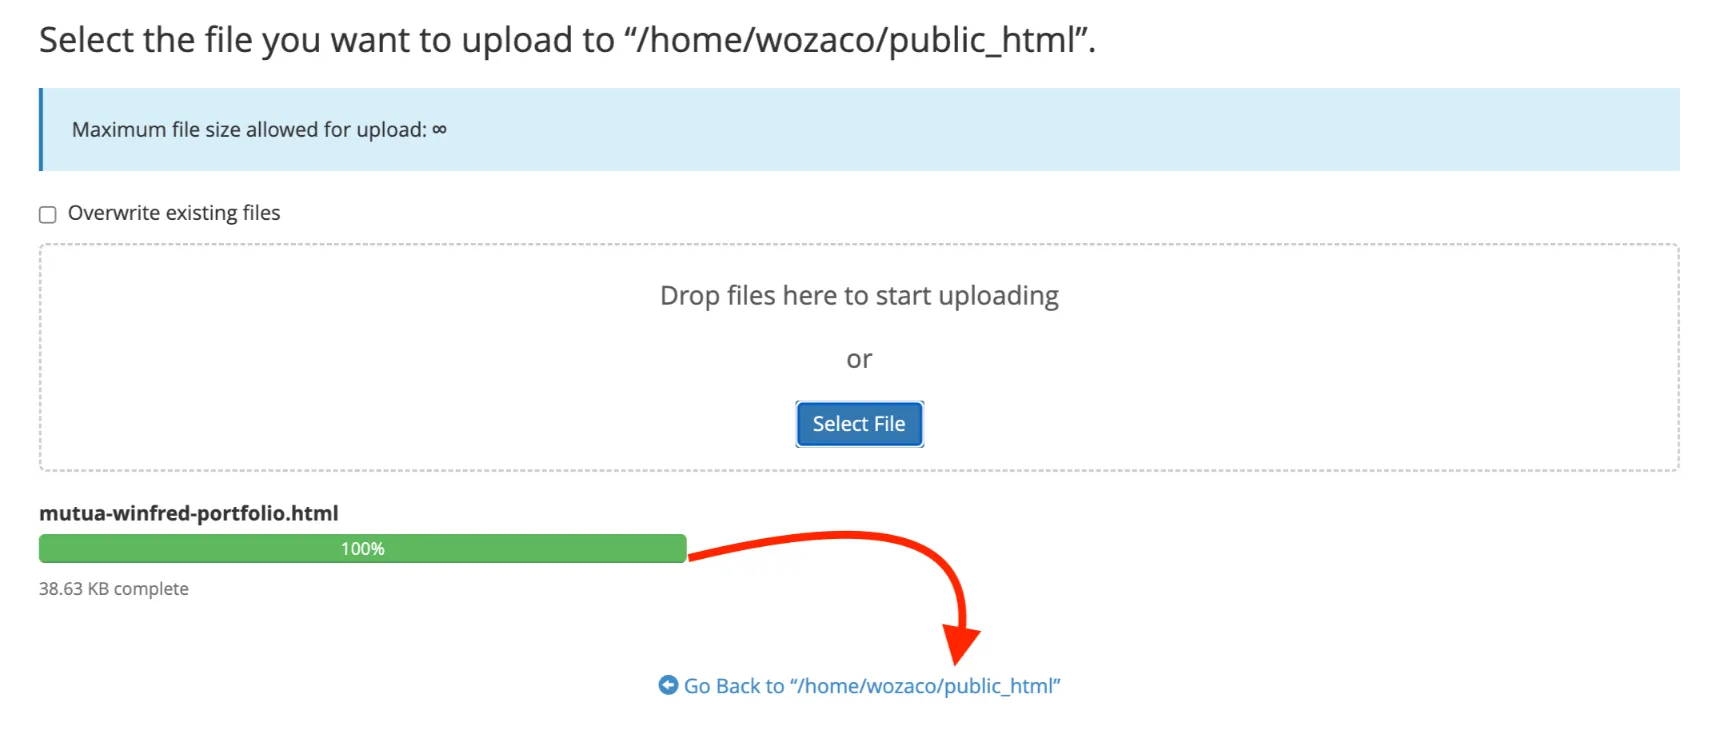
- Once done, click the link at the bottom to go back to public_html.
- Right-click your .zip file and select Extract.
- Confirm the extraction path, make sure it’s extracting directly into public_html, not into a nested subfolder.
- Once extracted, delete the .zip file to keep things clean.
If you’re uploading files individually (smaller sites):
- Click Upload.
- Select all your files and upload them. Note File Manager can only upload files, not folders, directly. Folders need to be inside a ZIP or created manually first.
Step 5: Create a Database (If Applicable)
If your site is a static HTML/CSS site, you can skip Steps 5–7. But if you’re running WordPress, Joomla, or any CMS, you need a database.
Here’s how to create one in cPanel:
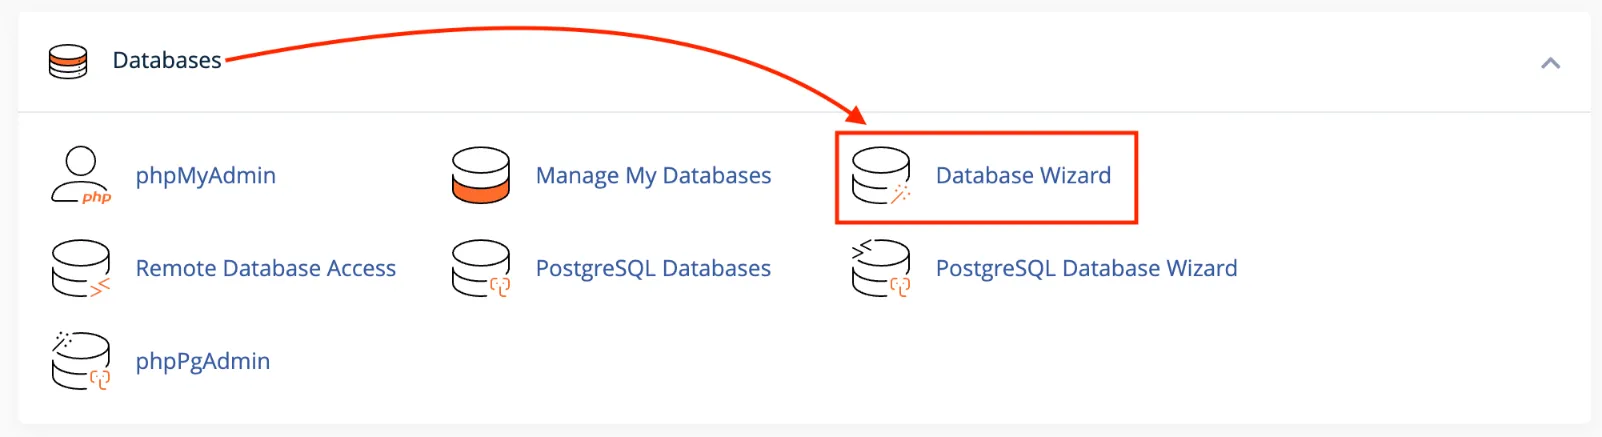
- Go back to the cPanel home screen.
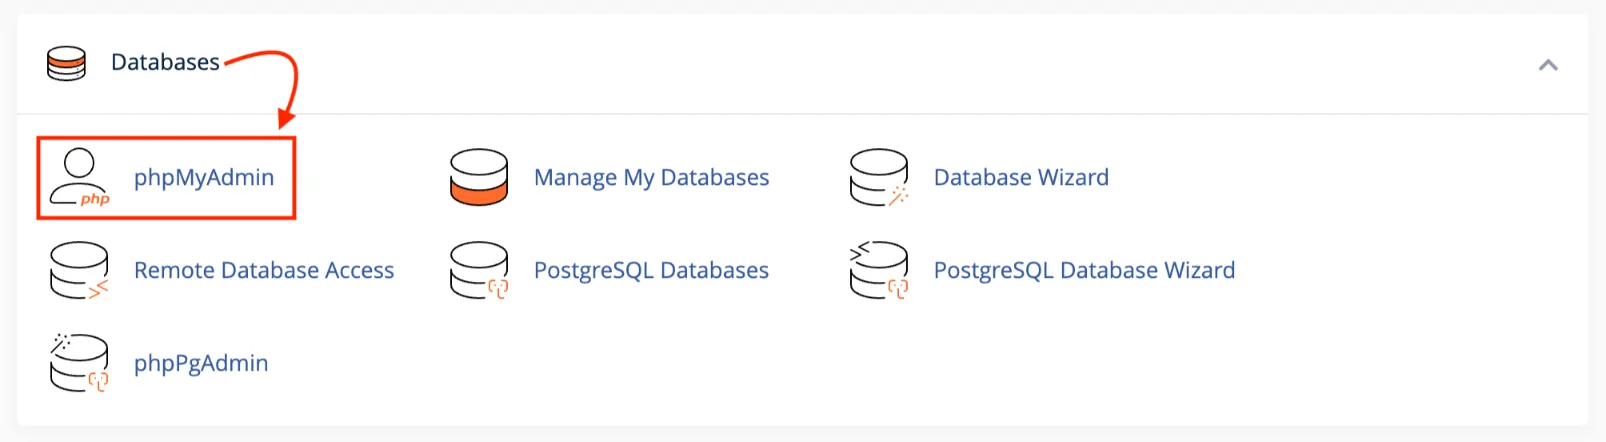
- Scroll to the Databases section and click MySQL Database Wizard or Database Wizard.
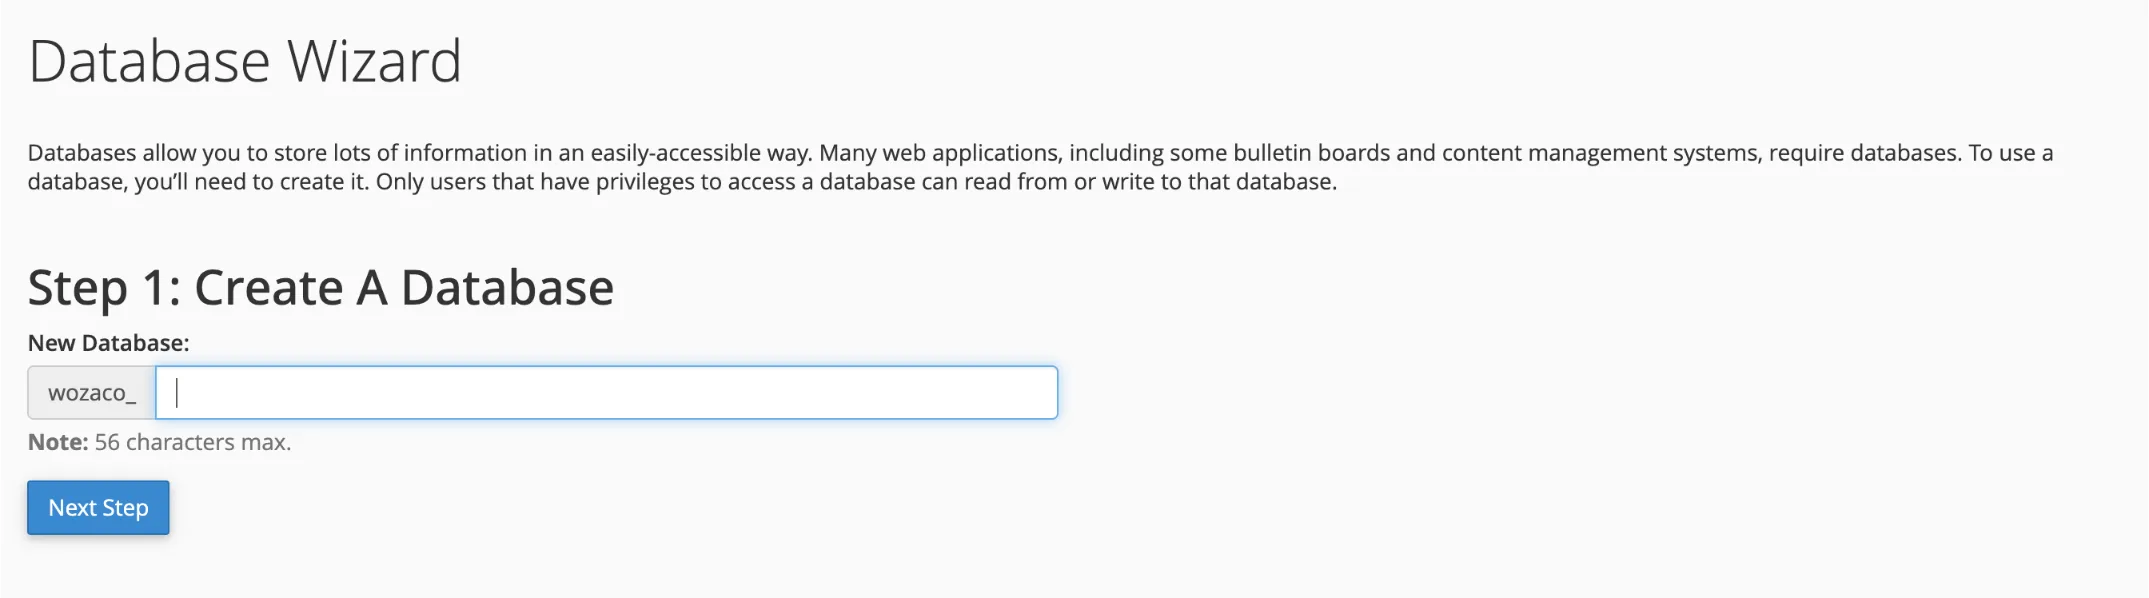
- Enter a name for your database and click Next Step. (cPanel will automatically add your account username as a prefix write down the full name.)
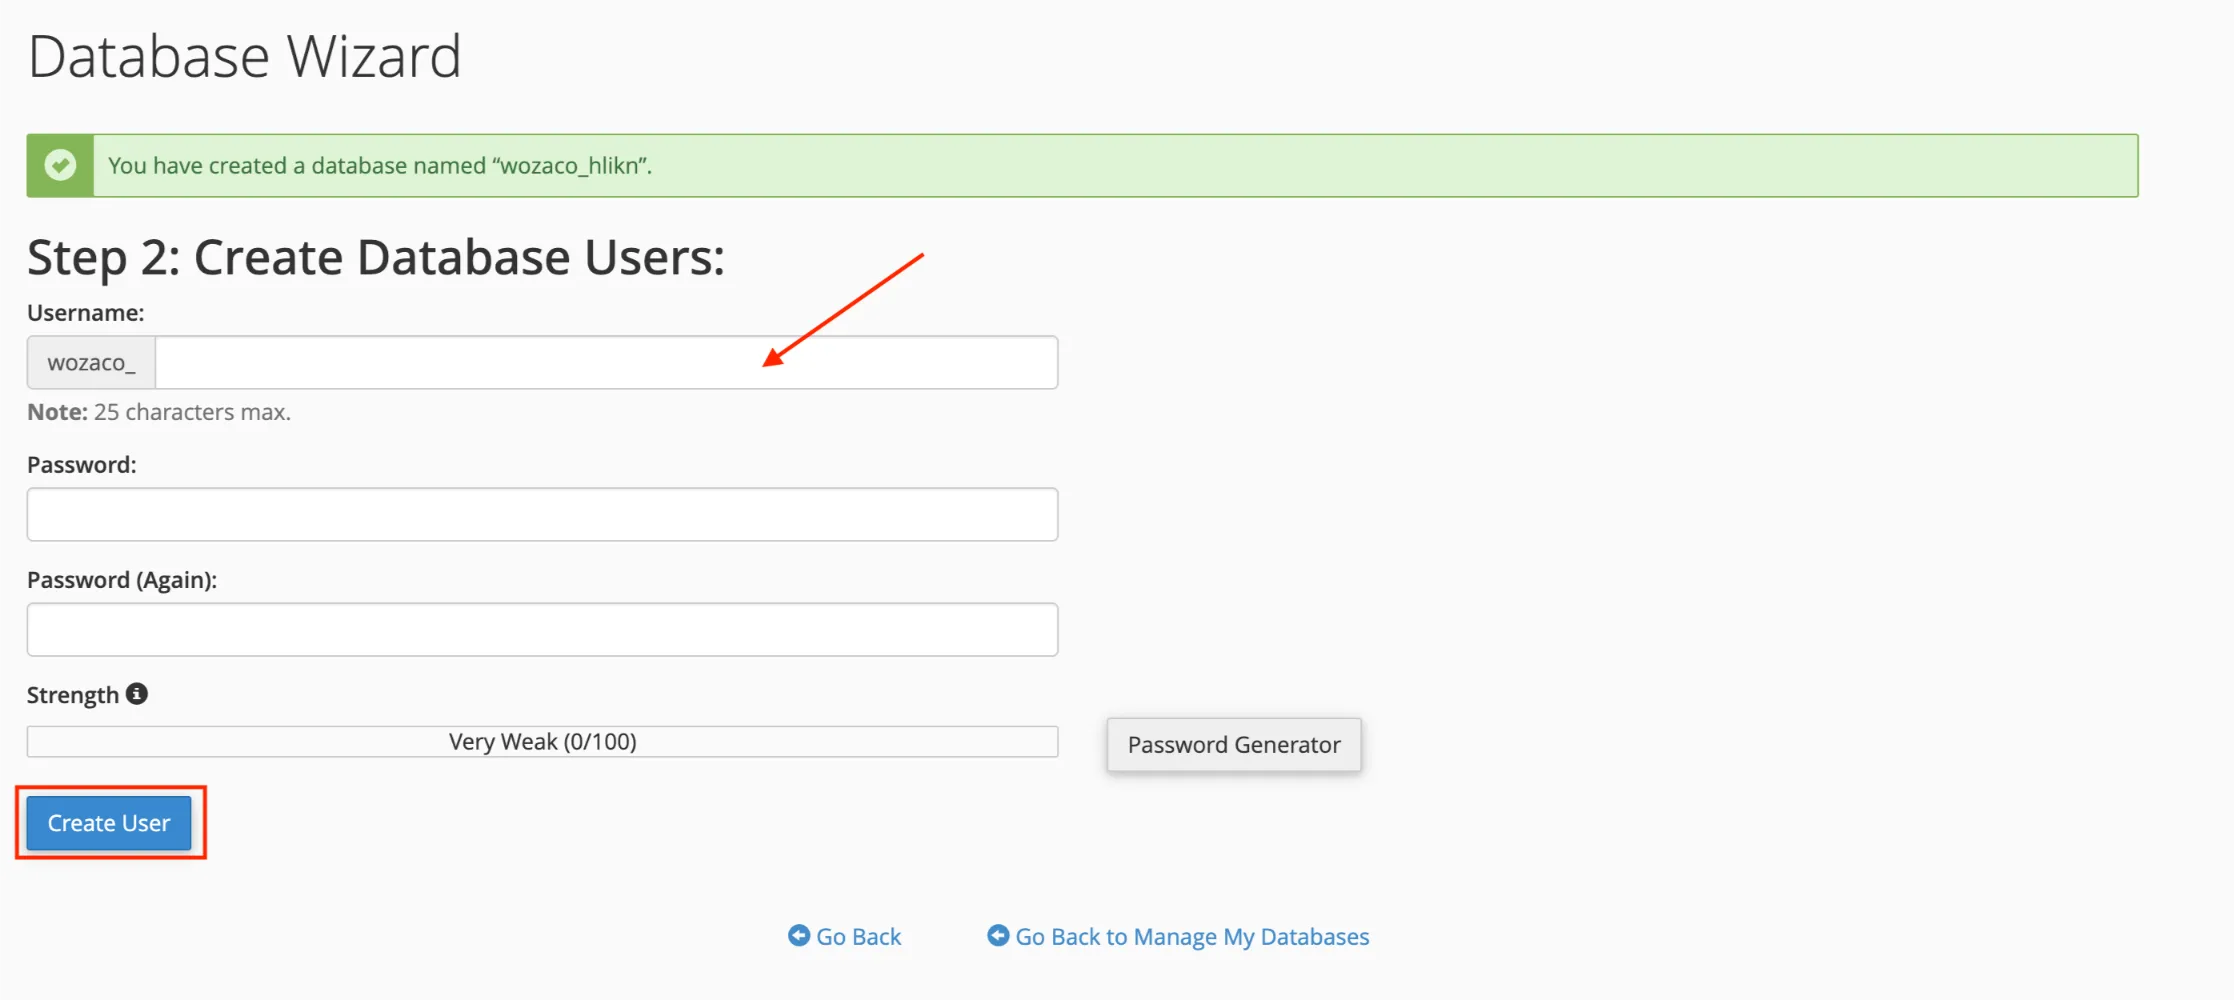
- Create a database user. Enter a username and a strong password. Click Create User.
- On the next screen, check All Privileges and click Next Step.
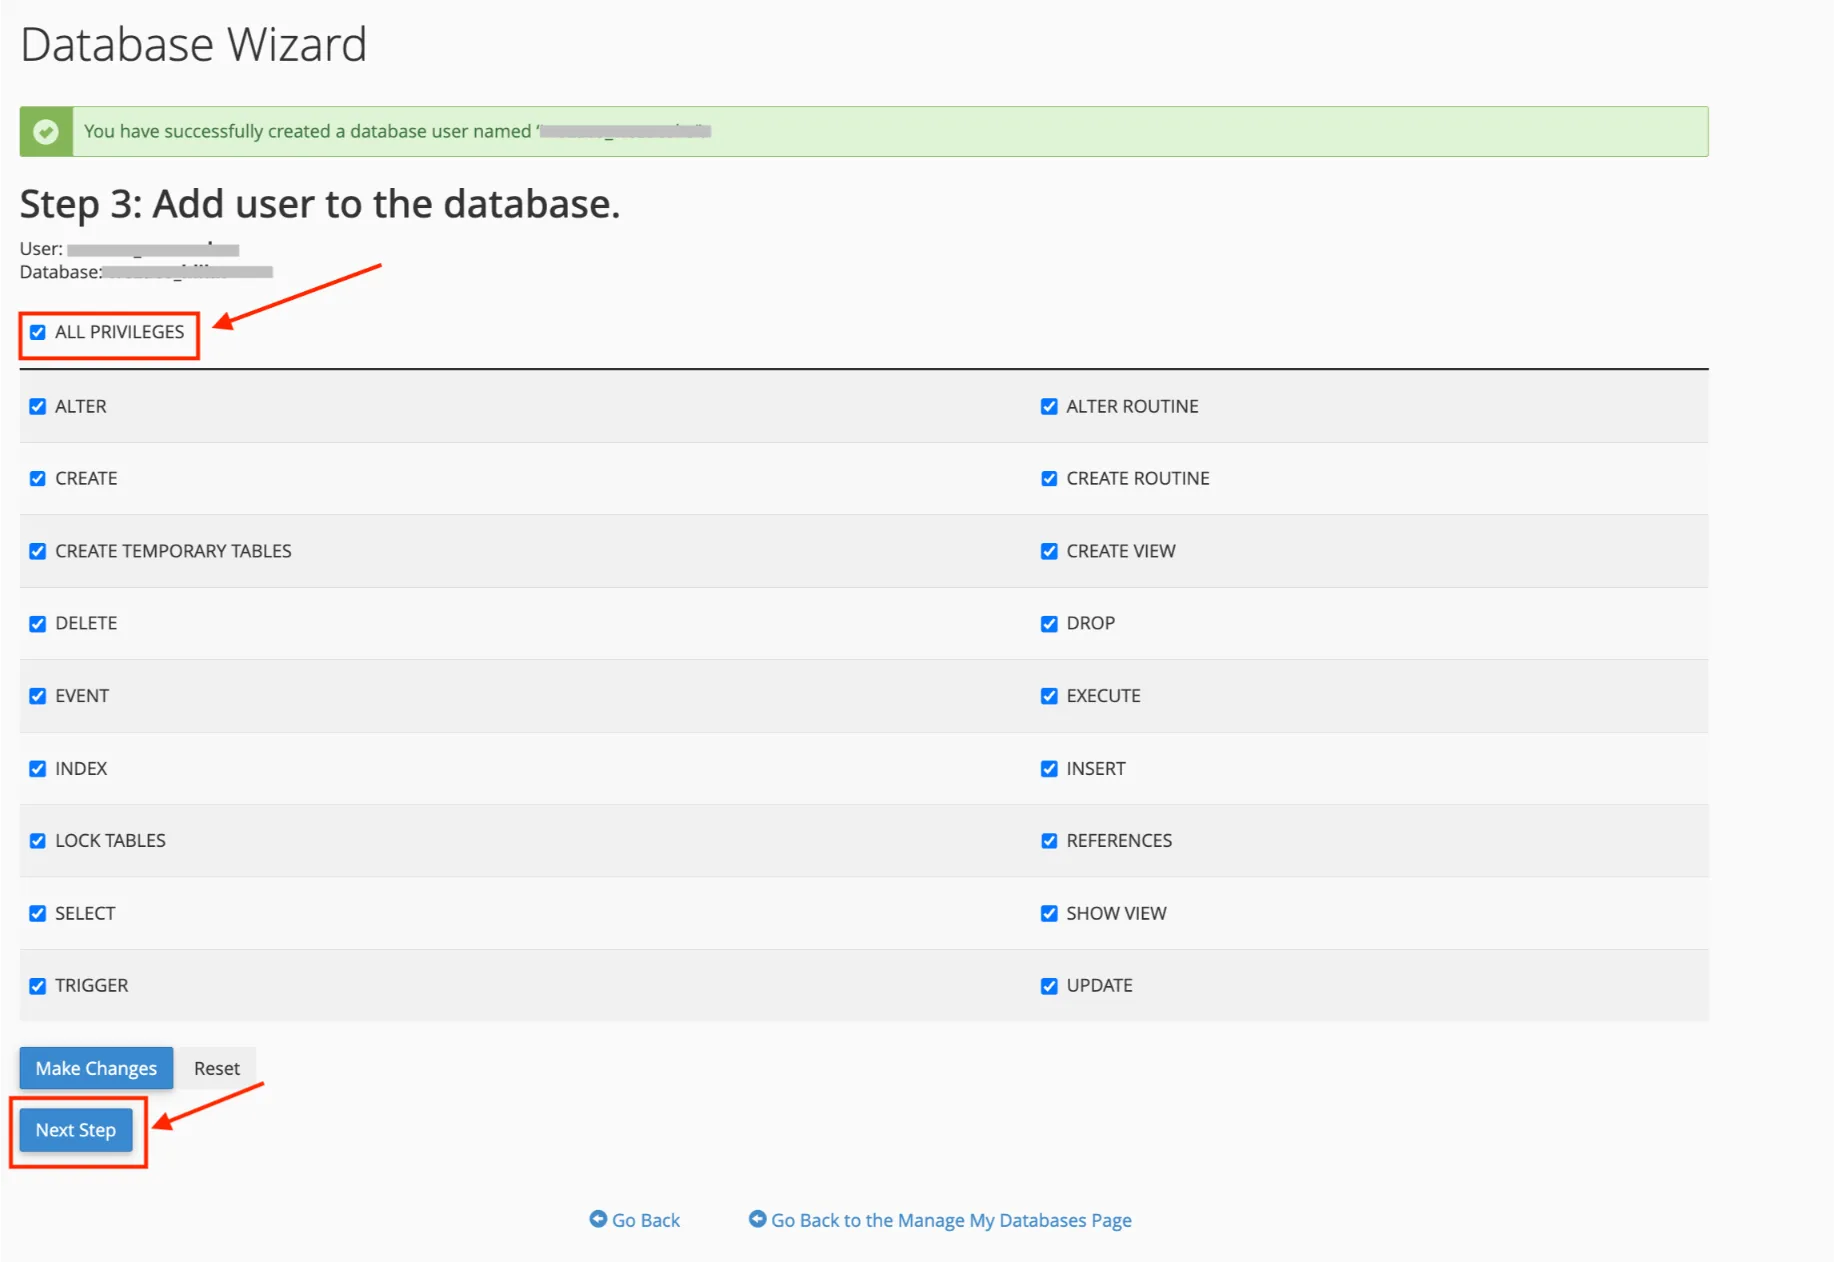
- Done. Your database is created, and your user is linked to it.
Write down these three things you’ll need them in Step 7:
- Database name (with the prefix, e.g.,
username_dbname) - Database username (e.g.,
username_dbuser) - Database password
Step 6: Import Your Database (If Applicable)
You’ve created an empty database. Now you need to fill it with your data.
- In cPanel, go to Databases → phpMyAdmin.
- In the left panel, click on the database you just created.
- Click the Import tab at the top.
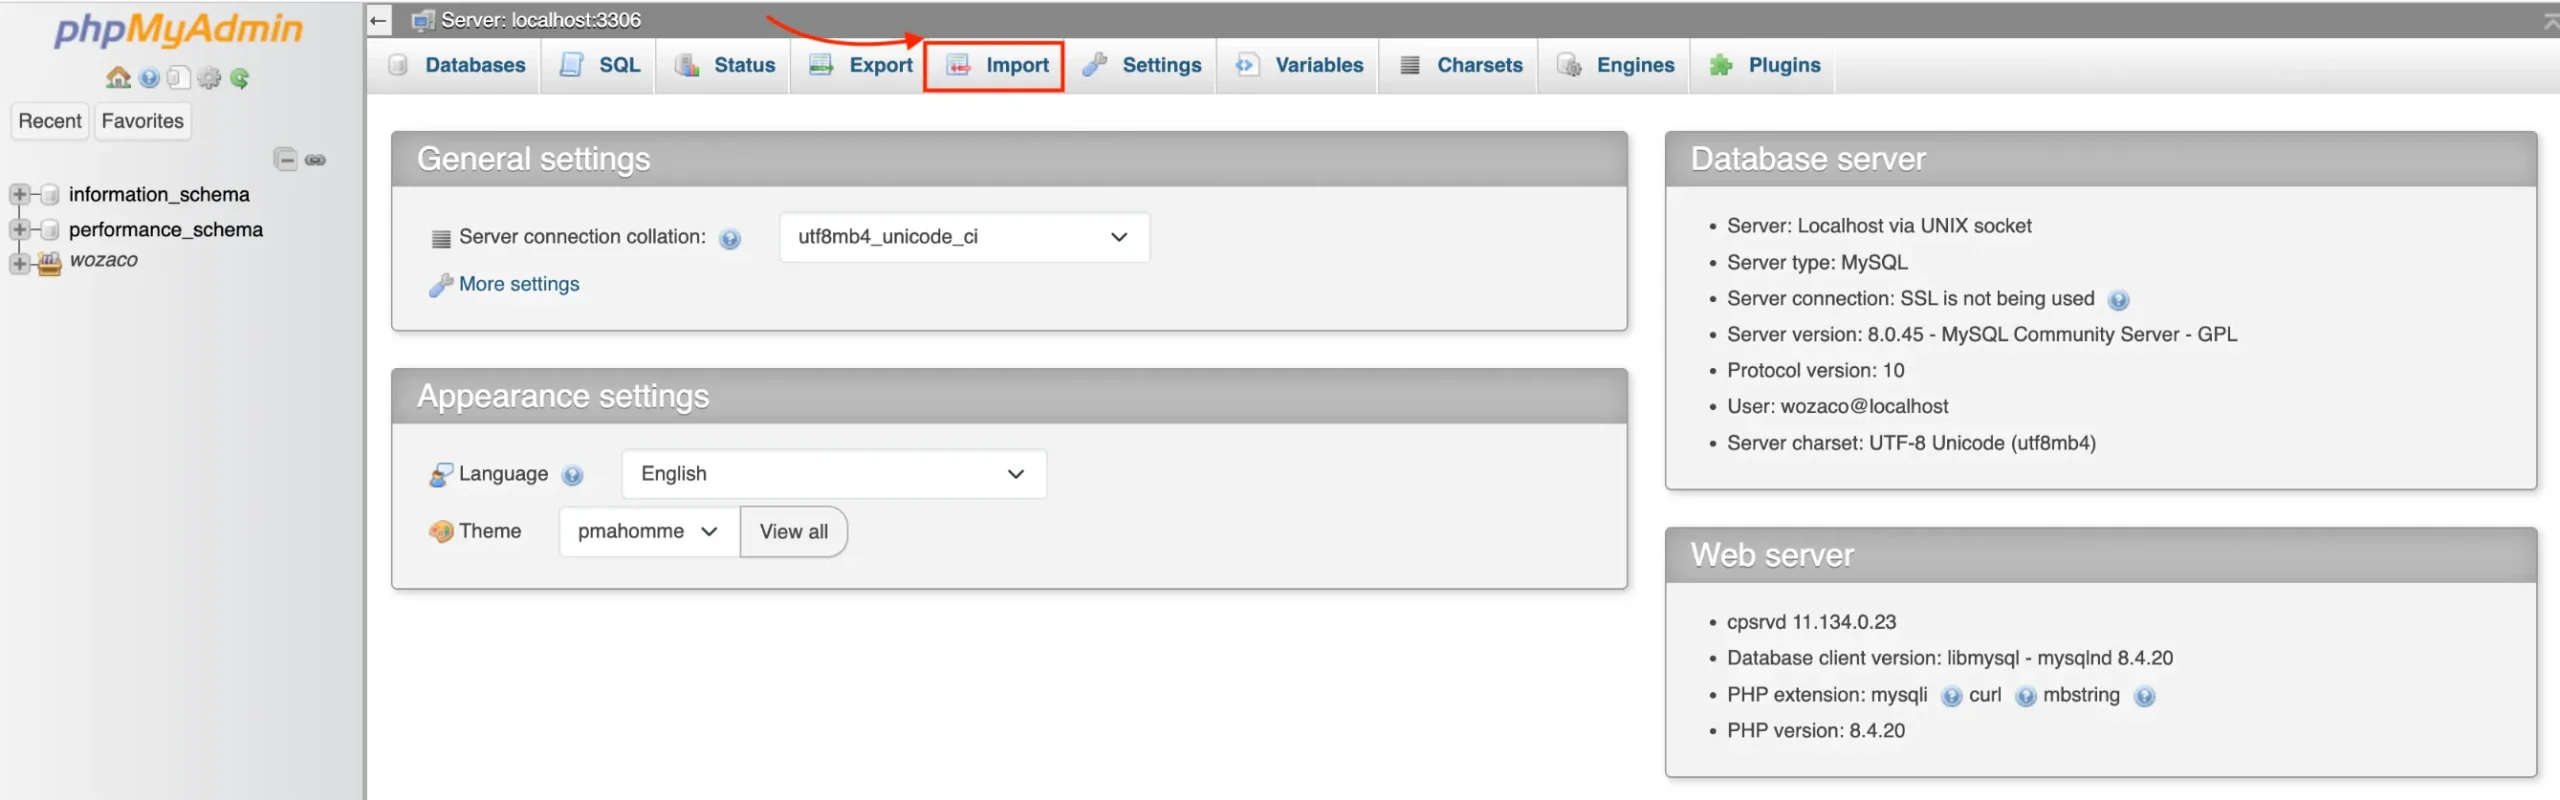
- Click Choose File and select your .sql file (or
.sql.zipif it’s compressed). - Click Go at the bottom.
The import runs automatically. For large databases, this can take a minute or two. When it finishes, you’ll see a success message and your tables will appear in the left panel.
Related: How to Access Webmail Through cPanel
Step 7: Update Configuration Files
Your files are uploaded. Your database is set up. But your website doesn’t know where to find that database yet.
That’s what the configuration file is for.
For WordPress:
- In File Manager, go to public_html (or wherever you uploaded WordPress).
- Find
wp-config.php, right-click it, and select Edit. - Update these four lines with your new database details:
- Click Save Changes.
define('DB_NAME', 'your_new_database_name');
define('DB_USER', 'your_new_username');
define('DB_PASSWORD', 'your_new_strong_password');
define('DB_HOST', 'localhost');
DB_HOST is almost always localhost on shared hosting. If you’re unsure, check with your host.
For custom PHP sites:
Look for a file named config.php, database.php, connect.php, or similar. Open it in the editor and update the database name, username, and password fields to match what you created in Step 5.
If you’ve migrated from one domain to another, also check your config file for any hardcoded old URLs and update them to your new domain.
Step 8: Update WordPress Permalinks
This step is WordPress-specific. If you’re on a static HTML site, skip ahead.
After uploading and connecting the database, WordPress sometimes loses track of its URL structure. Pages start returning 404 errors even though everything looks correct.
The fix is quick:
- Log in to your WordPress dashboard (
yourdomain.com/wp-admin). - Go to Settings → Permalinks.
- Don’t change anything just scroll down and click Save Changes.
That’s it. This regenerates your .htaccess file, which is what actually controls how WordPress handles URLs. It takes about ten seconds and fixes most post-migration link errors.
Read also: How to Host an HTML Website in cPanel
Step 9: Test Your Website
Don’t assume everything is working. Test it properly.
Check for Errors:
Open your domain in a browser. Does the homepage load? Click through a few pages. Try any forms or interactive elements. If you get a white screen, a 500 error, or a database connection error, something in your config file is likely off go back and double-check the database credentials.
Make Sure Permissions are Correct:
File and folder permissions control who can read, write, or execute your site files. Wrong permissions are a common cause of 500 errors.
The standard rules:
- Folders: 755
- Files: 644
wp-config.php: 600 (more restrictive is better for security)
To check or change permissions in File Manager: right-click any file or folder, select Change Permissions, and set the correct value.
Clear Cache:
If you see an old version of your site or pages don’t load as expected, clear your browser cache and any caching plugin you’re running. On WordPress, go to your caching plugin’s settings and flush the cache. This forces everything to reload fresh from the server.
Step 10: Finalize Your Live Website
Almost there. Two final things to take care of before you call it done.
SSL/HTTPS:
Your site should load over HTTPS, not HTTP. Most cPanel hosts, including Truehost, provide free Let’s Encrypt SSL certificates you can activate with a few clicks.
In cPanel, find the SSL/TLS section (or look for Let’s Encrypt or AutoSSL, depending on your host). Enable and install the certificate for your domain.
After activating SSL on WordPress, go to Settings → General and make sure both the WordPress Address and Site Address start with https://. Then re-save your permalink settings to regenerate .htaccess with HTTPS rules.
Backup:
Now that your site is live, back it up.
In cPanel, use the Backup Wizard under the Files section to download a full account backup. This gives you a copy of both your files and your database. Store it somewhere safe, like a local drive, Google Drive, or an external backup service.
A backup right after going live means you have a clean, working restore point from day one.
Related: How to Access a Subdomain in cPanel
Your Website is Live
That’s the complete process from raw files on your computer to a fully working website on the internet.
To recap what you’ve done:
- Logged into cPanel and used File Manager to upload and extract your site files
- Created a MySQL database and imported your data via phpMyAdmin
- Updated your configuration file with the correct database credentials
- Fixed permalink settings and tested everything thoroughly
- Activated SSL and created your first backup
If something doesn’t work as expected, the most common culprits are: a typo in the config file, files extracted into the wrong folder, or a missed database import.
Go back through the steps methodically; the answer is usually in one of those three places.
Need reliable cPanel hosting to get started or move your site?
Our hosting plans at Truehost come with full cPanel access, free SSL, and local support. It’s a straightforward way to get your site running without the headaches.
Good luck, your site is live. That’s the hard part done.