Domain SearchInstantly check and register your preferred domain name
 Web Hosting
 cPanel HostingHosting powered by cPanel (Most user friendly)
 KE Domains
 Reseller HostingStart your own hosting business without tech hustles
 Windows HostingOptimized for Windows-based applications and sites.
 Free Domain
 Affiliate ProgramEarn commissions by referring customers to our platforms
 Free HostingTest our SSD Hosting for free, for life (1GB storage)
 All DomainsBrowse and register domain extensions from around the world
 .Com Domain
 WhoisLook up domain ownership, expiry dates, and registrar information
 VPS Hosting
 Managed VPSNon techy? Opt for fully managed VPS server
 Dedicated ServersEnjoy unmatched power and control with your own physical server.
 SupportOur support guides cover everything you need to know about our services
So you’ve built a Python app, maybe it’s your first Flask project, maybe it’s a Django site you’ve been working on for weeks, and now you’re staring at your screen wondering how to get it online?
That feeling is totally normal. Many developers who reach us talk of hitting this exact wall. The code works perfectly on your laptop, but getting it live on a real server feels like a completely different challenge.
The good news is that if you’re using cPanel, you’re already in a pretty good spot. cPanel is a dashboard that lets you manage your hosting account without typing complex server commands. And once you understand how to host Python web application in cPanel, the whole process becomes straightforward and repeatable.
Let’s walk through it together, one step at a time.
Before we dive in. A quick note for anyone brand new to this.
A Python web application is a project that runs on a server and shows content in a browser. It could be built with:
- Flask (a lightweight framework, great for smaller apps)
- Django (a more powerful framework, great for bigger ones)
cPanel gives you built-in tools to upload and run that app without needing deep server knowledge. That’s exactly what makes it beginner-friendly.
So, how do you host a Python web application in cPanel?
Step 1: Log in to Your cPanel Account
Start by logging in to your cPanel dashboard. This is the control center where you manage your website files, email, databases, and server settings all in one place.
Once you’re inside, look around for a section called “Software” or “Setup.” That’s the area where Python tools are typically found.
Every cPanel layout looks slightly different depending on your hosting provider, but the sections are generally labeled the same way.
Step 2: Open the Setup Python App Tool
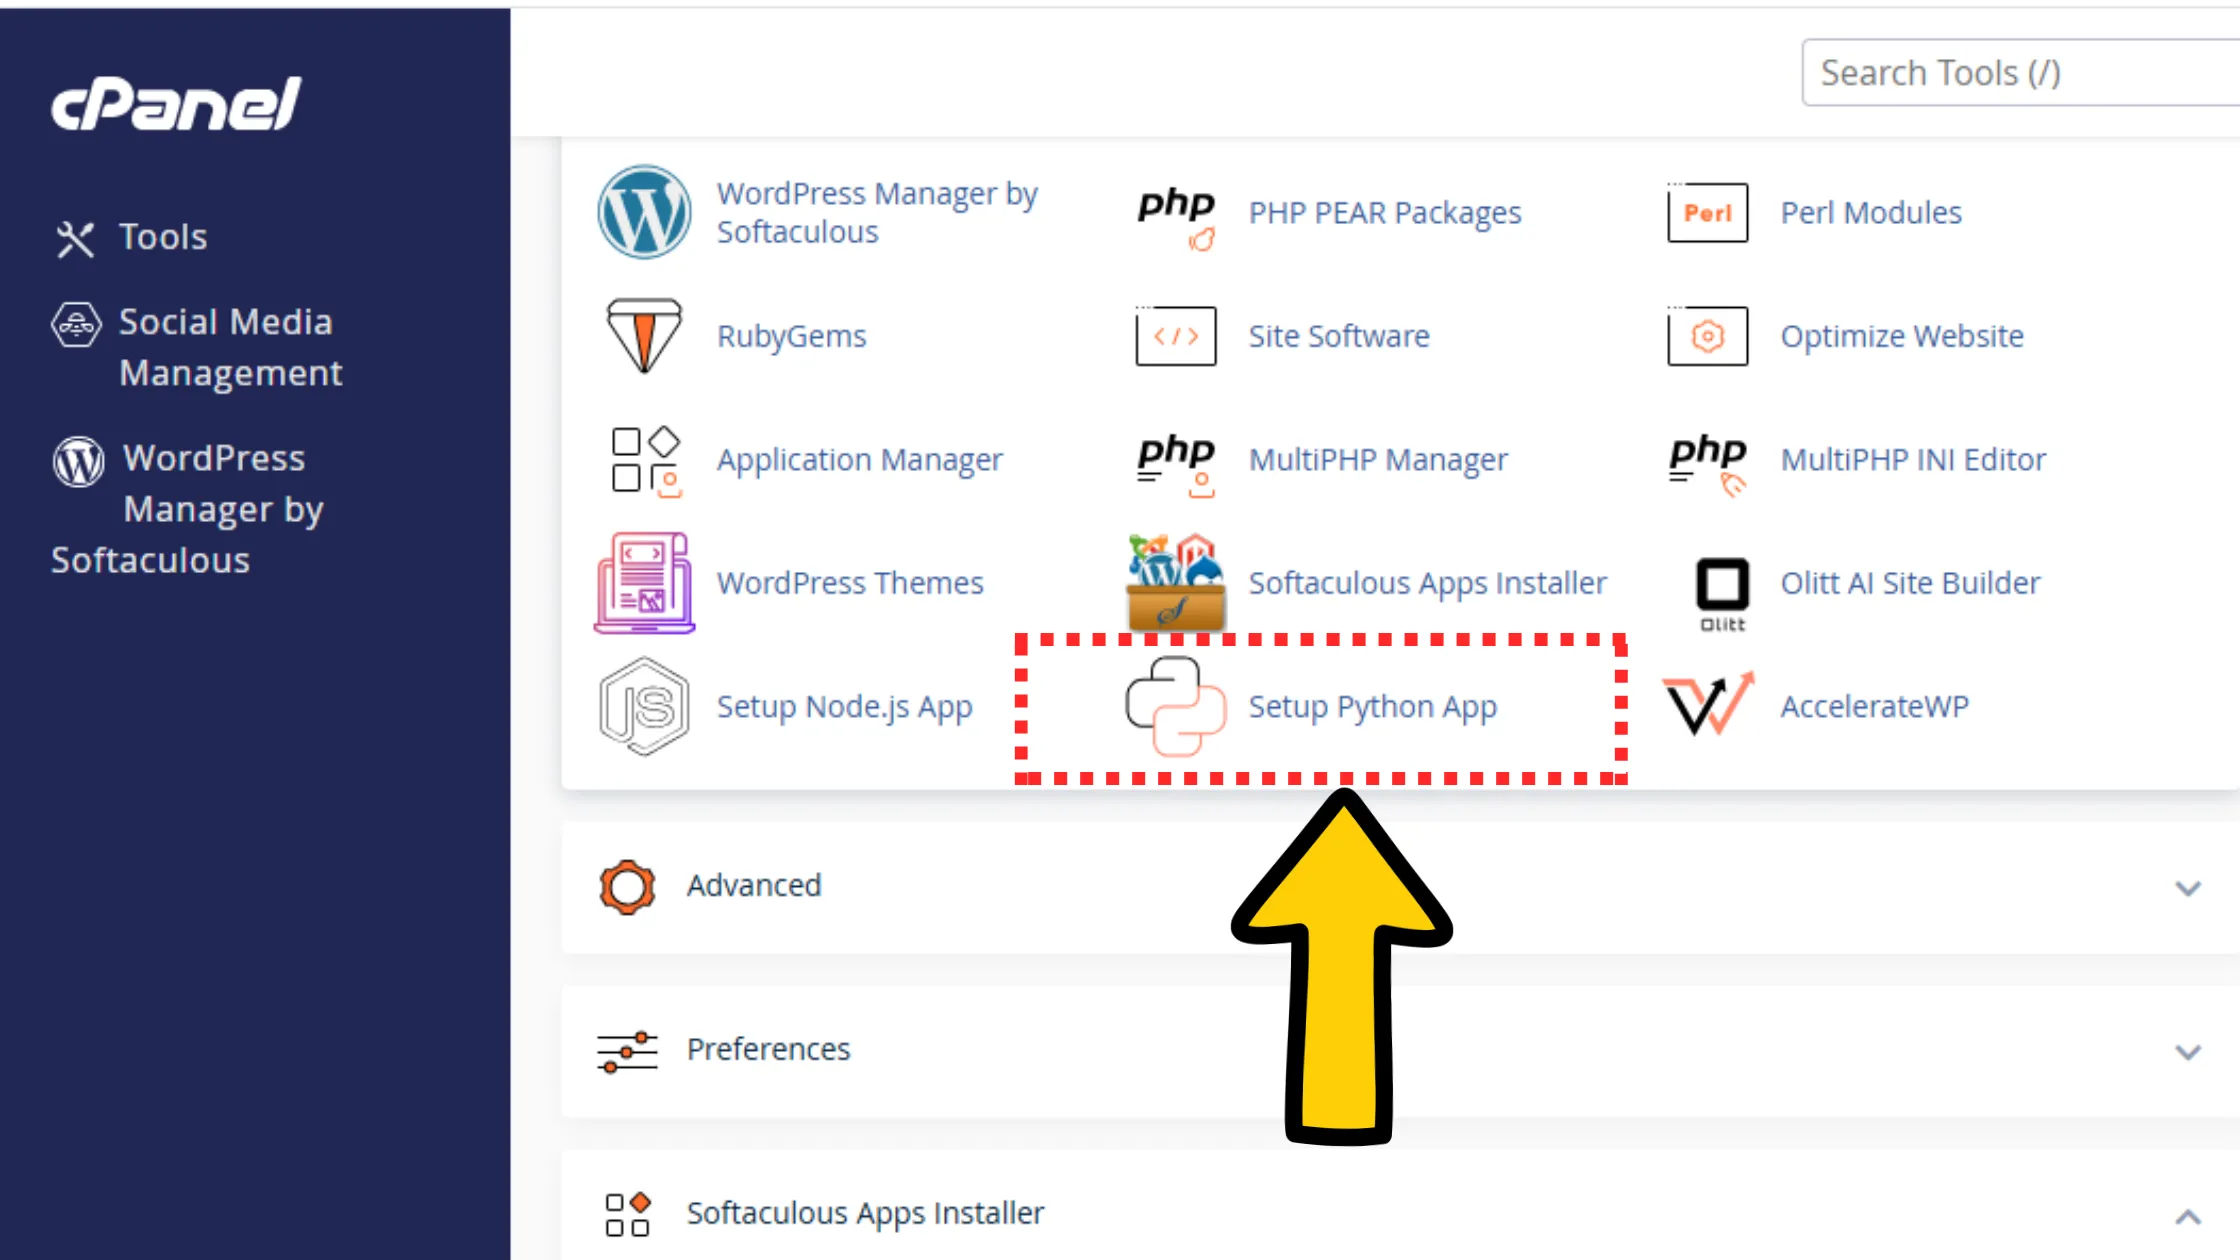
Once you find the Software section, click on “Setup Python App.” This is the built-in cPanel tool that lets you create and manage Python applications directly from your browser. No command line needed at this stage.
If you don’t see it, your hosting plan may not support Python apps. More on that in the troubleshooting section later.
But for now, assuming it’s there, click it and move on.
Step 3: Create a New Python Application
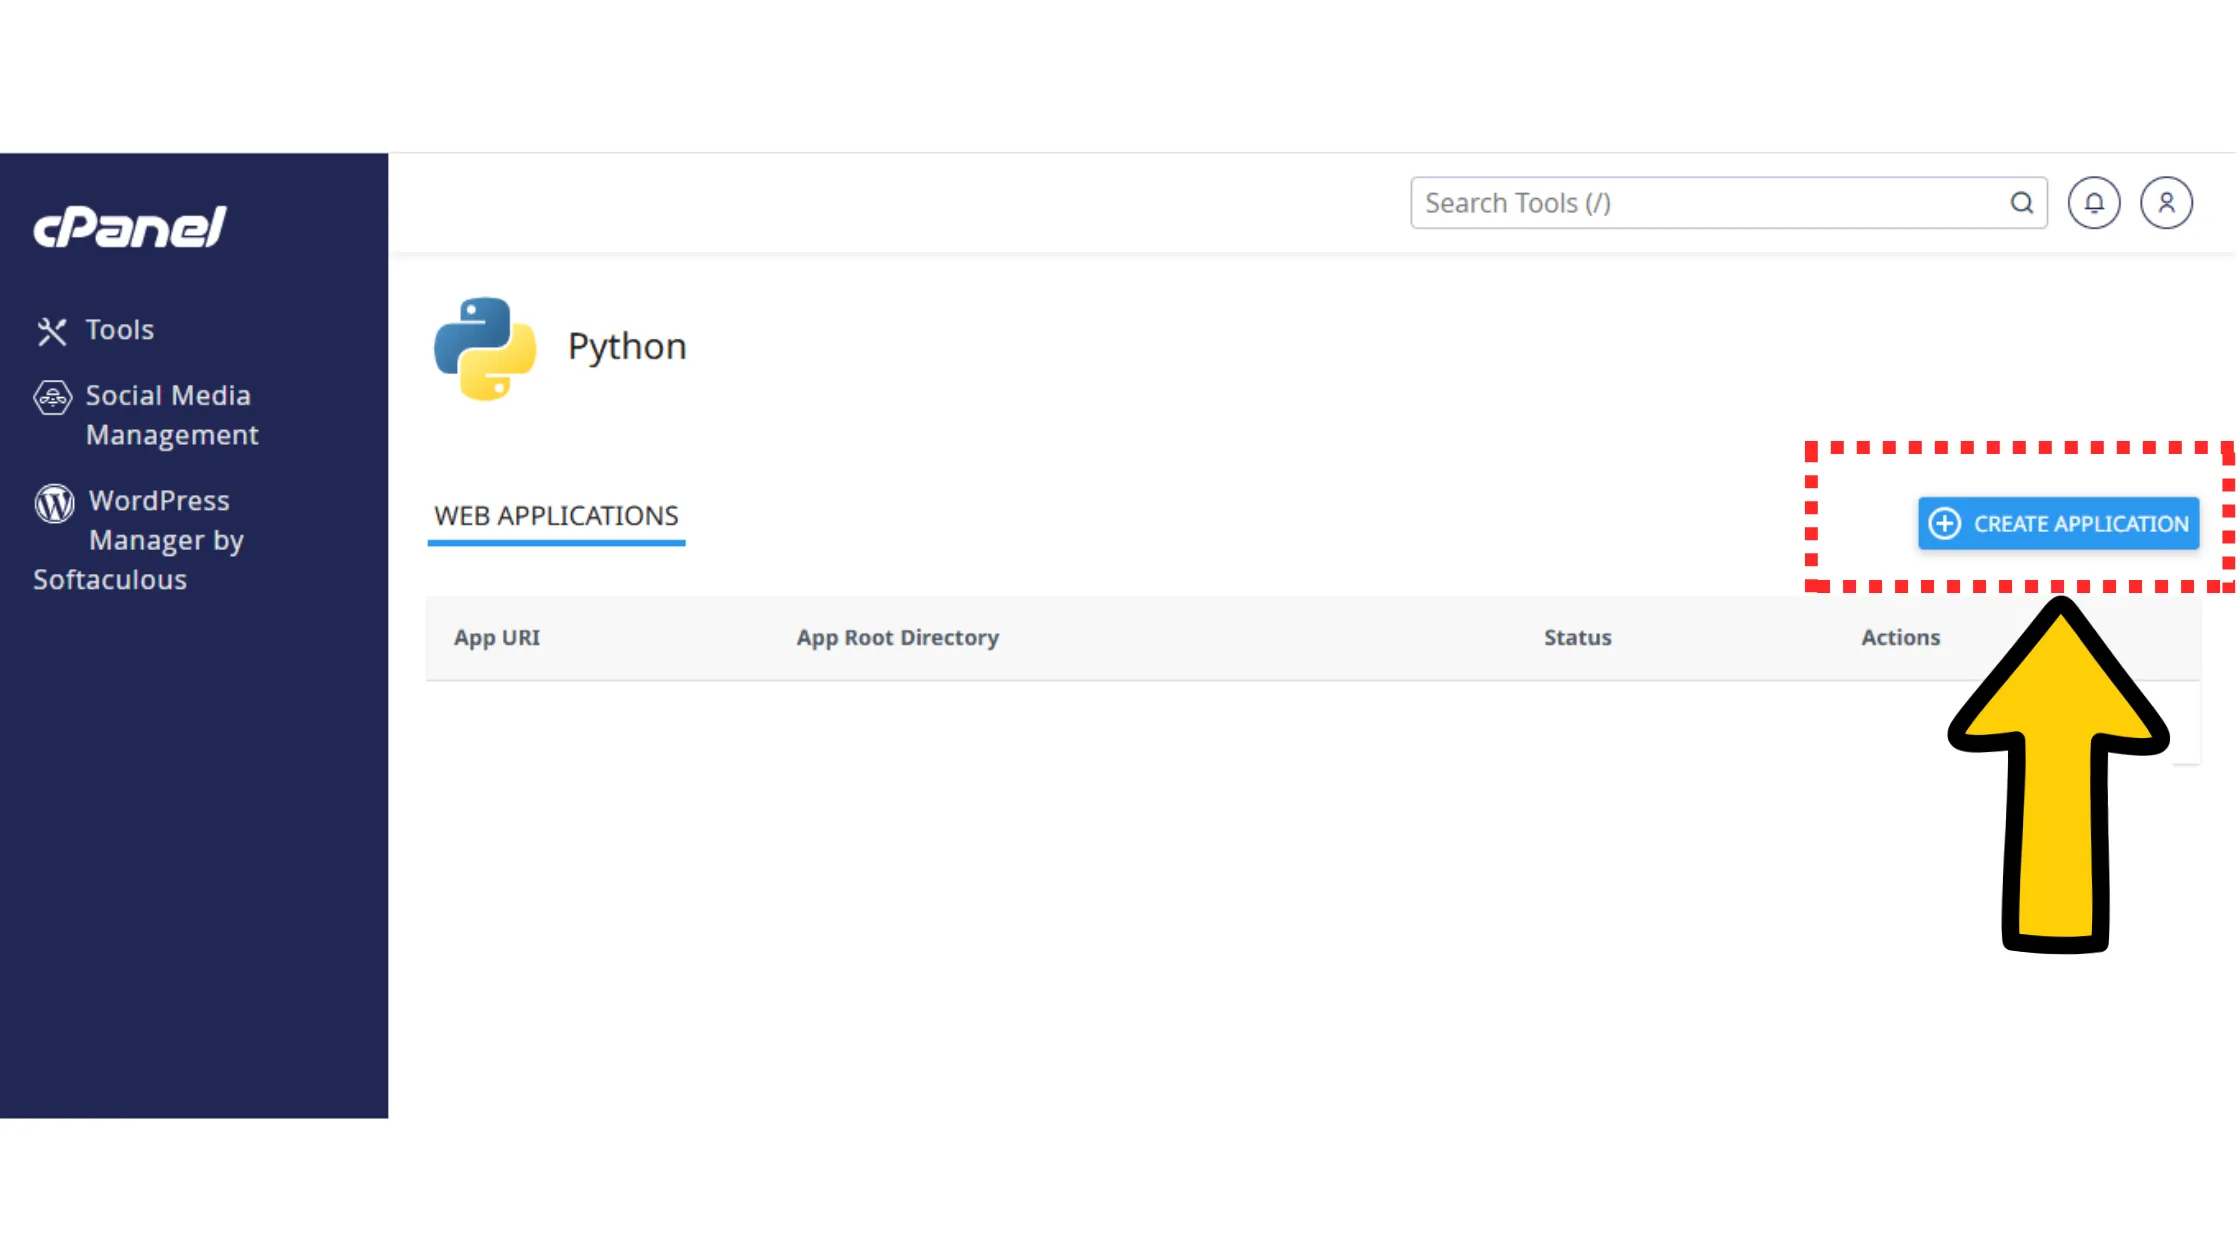
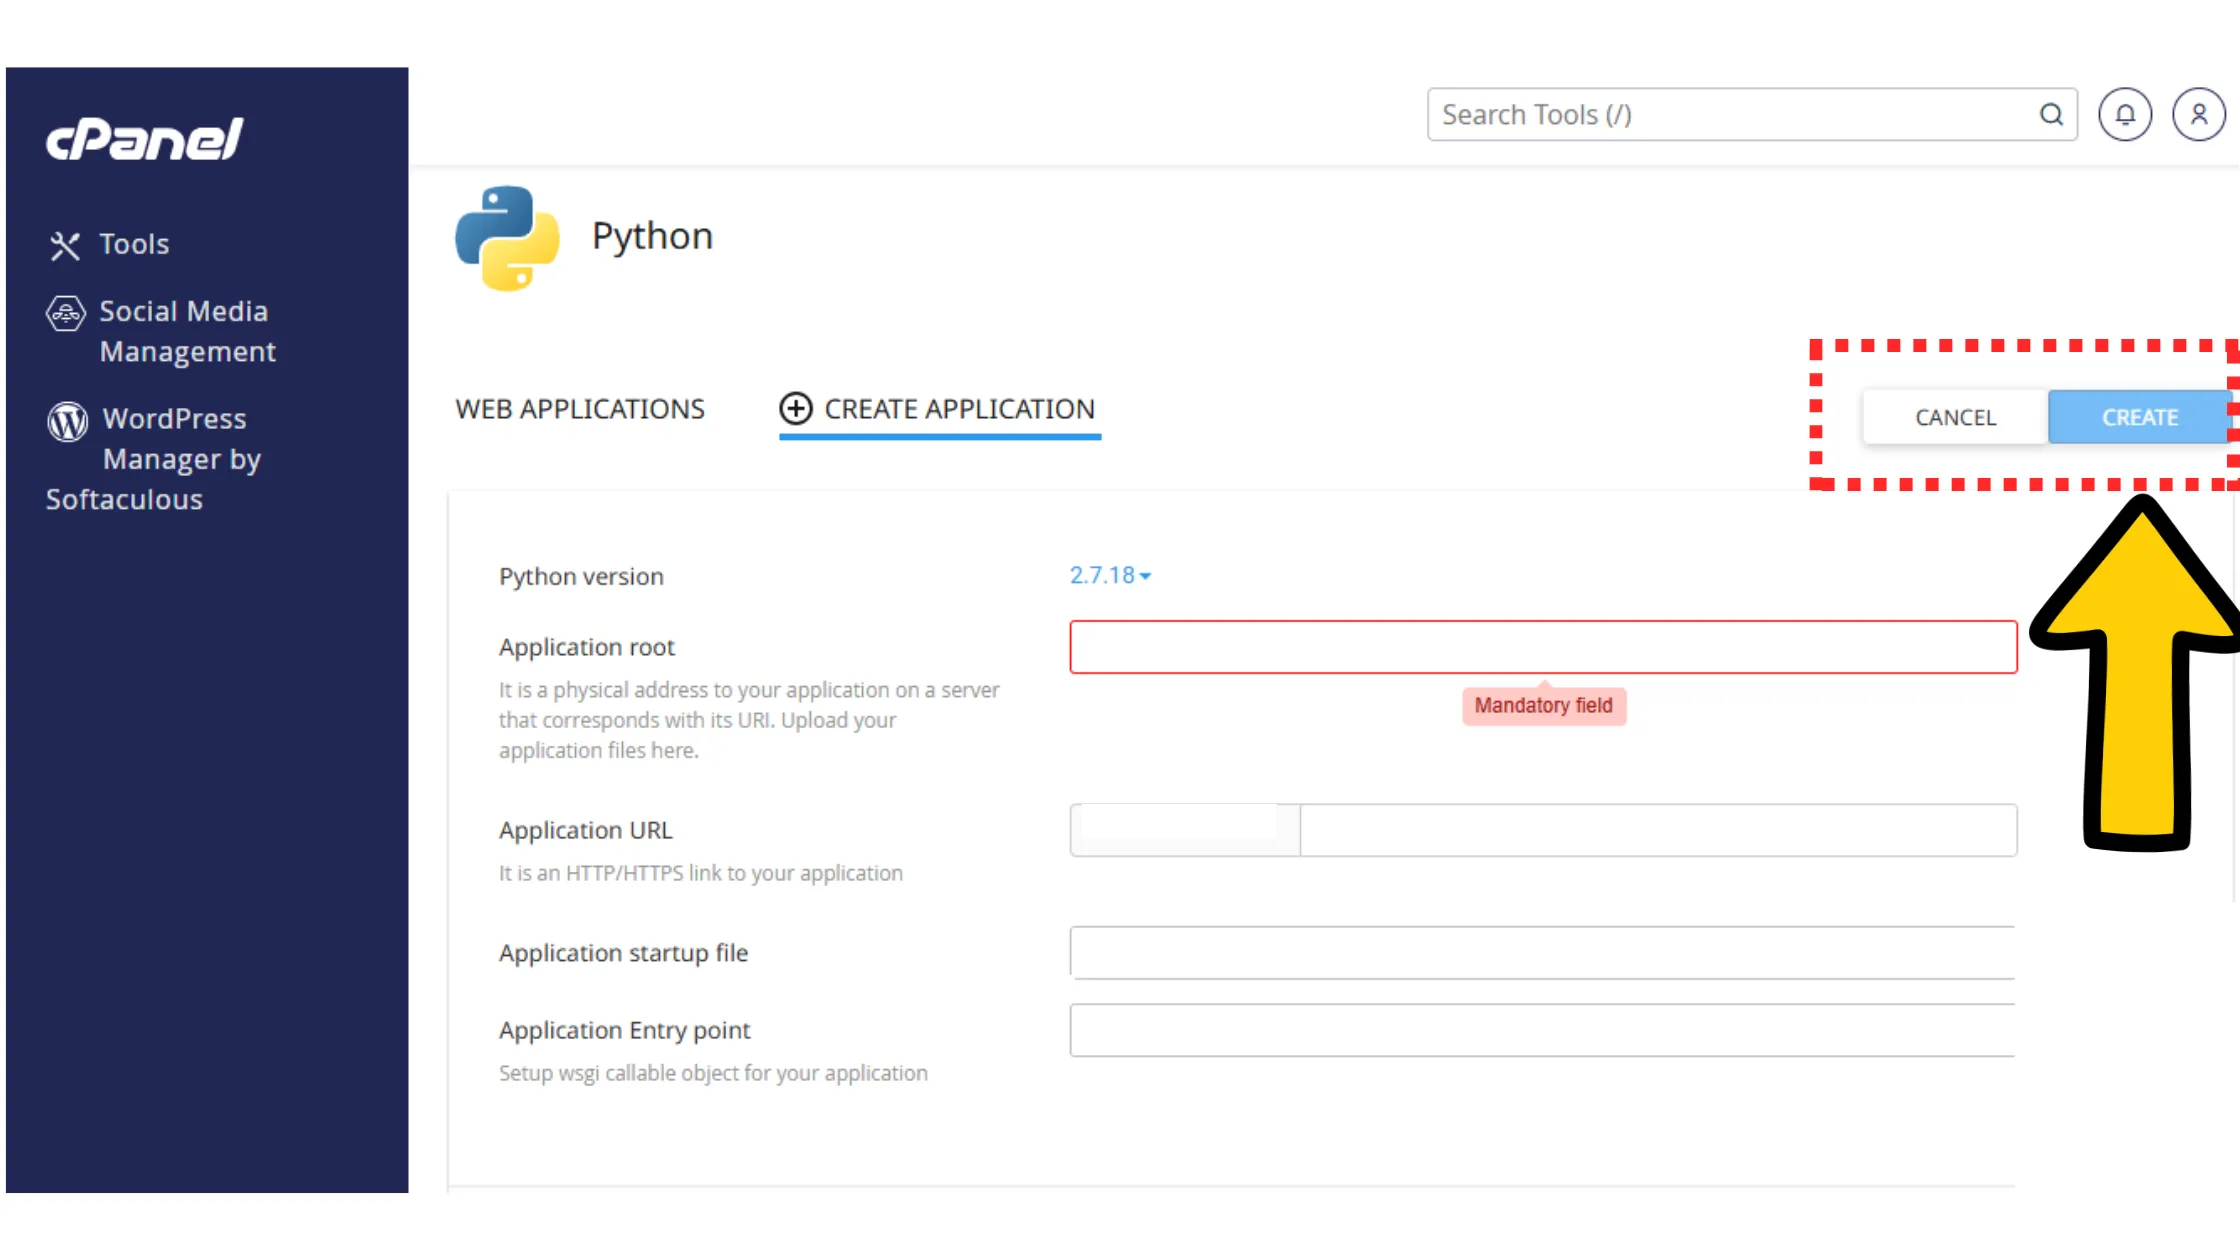
Click “Create Application.” A form will appear asking you to fill in a few details. Here’s what each field means in plain language:
Python version: This is the version of Python your app was written with. If your code uses Python 3.10, pick Python 3.10. Picking the wrong version can break things.
Domain or subdomain: This is the web address where your app will live. It could be your main domain or a subdomain like app.yoursite.com.
Application root: This is the folder on your server where your app files will be stored. Think of it like the home base for your project.
Application URL: This is how users will access your app through a browser.
Fill those in and click Create.
cPanel will then automatically set up a virtual environment for your app. We’ll explain what that means in just a moment.
Step 4: Manage Dependencies with a Virtual Environment
When you clicked Create in the previous step, cPanel did something important behind the scenes: it created a virtual environment for your app.
Here’s what that means in simple terms.
Imagine two different apps on the same server. One needs version 1 of a library, and the other needs version 2 of the same library. If they both shared the same space, they’d constantly conflict with each other. A virtual environment solves that by giving each app its own private space where it installs and runs its own packages, completely separate from everything else on the server.
To install your app’s dependencies inside that virtual environment, open the terminal or command box in cPanel and run:
pip install -r requirements.txtThis tells the server to read your requirements.txt file, which lists every library your app depends on, and install all of them in one go. This step is a key part of knowing how to host Python web application in cPanel properly, because skipping it is one of the most common reasons apps fail to load.
Step 5: Upload Your Python Application Files
Now it’s time to get your actual project files onto the server.
Go to File Manager in cPanel. This is essentially a file browser that lets you navigate your server’s folders, upload files, and organize your project, all from inside your browser.
Open the folder you set as your application root back in Step 3. Then upload your project files into that folder. This includes your main Python file (usually something like app.py) and any subfolders your project uses, like templates, static files, or configuration files.
One important thing: keep the same folder structure you had on your local machine.
If your templates folder was inside the main project folder on your laptop, it should be in the same place on the server. Changing the structure is one of the quickest ways to break things.
Step 6: Configure the Application Entry Point
Your server needs to know exactly where to start when someone visits your app. That starting point is called the entry point.
cPanel typically uses a file called passenger_wsgi.py as the entry point. WSGI, by the way, stands for Web Server Gateway Interface. It’s basically the bridge between your Python app and the web server.
You don’t need to memorize that definition; just know that this file is what connects your code to the outside world.
For a Flask app, this file needs to point to your Flask app object. For a Django app, it needs to point to your Django WSGI file.
The exact contents will depend on your framework, but this step is what tells the server exactly what to run when a visitor arrives.
Step 7: Publish Your Python Application
Here’s where things get exciting.
Once everything is configured, your app is ready to go live. Publishing simply means making your app accessible through your domain.
If you connected your domain correctly during setup in Step 3, and your app files are in the right folder, and your entry point is configured, then your app is already linked to your domain.
You just need to make sure everything is running correctly, which leads us to the next step.
Step 8: Restart the Application
Go back to the Setup Python App section in cPanel and click Restart on your application. This is a step that a lot of people skip, and then they wonder why nothing is working.
Restarting the app forces the server to reload everything:
- Your new files
- Your installed packages
- Your configuration settings
Think of it like pressing refresh on the server itself. Any time you update your code or install new packages, you need to come back here and restart.
Step 9: Test and Fix Errors if Needed
Open your domain in a browser and see if your app loads. If it does, great, you’ve just successfully figured out how to host Python web application in cPanel, and your project is live.
If it doesn’t load, don’t panic.
Go to your error logs in cPanel. These logs are like a diary your server keeps. They record exactly what went wrong and when.
Common issues include:
- Missing packages
- Wrong file paths
- An incorrectly configured entry point.
Fix the issue, restart the app, and test again.
That cycle of fix, restart, and test is completely normal and part of the process.
Troubleshooting Common Python App Issues in cPanel

Even when you follow every step correctly, small things can stop your app from working. Here are the most common Python app problems and exactly how to fix them.
1) cPanel Does Not Show “Setup Python App.”
If you log in and can’t find the Setup Python App tool anywhere, the problem isn’t your code; it’s your hosting plan.
This usually means Python support isn’t enabled on your server, or your plan doesn’t include it at all. Here’s what to do.
First, check your hosting plan details. Shared hosting plans often restrict Python support.
Then contact your hosting provider and ask whether Python (Passenger) is enabled on your account. If the answer is no, you’ll likely need to upgrade to a VPS plan that fully supports Python apps. Without this tool, you simply cannot follow the steps for how to host Python web application in cPanel.
2) Your App Shows “Internal Server Error.”
This is one of the most common errors you can see right after deployment, and it almost always means your app failed to start. Check that your passenger_wsgi.py file is correctly pointing to your app. That your main file name matches what cPanel expects, and that no syntax errors are hiding in your code.
Then restart the application from cPanel and try again.
3) Missing Modules or Packages
If your app loads but immediately crashes with import errors, your dependencies aren’t installed in the virtual environment. Activate your virtual environment and run pip install -r requirements.txt again.
Make sure every package your app needs is listed in that file.
4) Changes Are Not Reflecting
You updated your code and uploaded the new files, but nothing changed in the browser. This happens because the server is still running the old version of your app. The fix is simple.
Go to cPanel, find your Python app, and click Restart. That forces the server to load your latest code.
5) Incorrect File Paths
If your app can’t find templates, images, or static files, your file paths are probably wrong. Always use correct relative paths based on your app folder structure. Your templates folder should be inside your app directory, and static files should be properly linked in your code.
6) Permission Errors
Sometimes your app fails because it doesn’t have the right permission to access its own files. Fix this by setting the correct file permissions. These are typically 755 for folders and 644 for files, and make sure your app files belong to your cPanel user account.
7) App Loads But Looks Broken
If your app opens but has no styling, no images, or no layout, your static files aren’t being served correctly. Double-check your static file settings inside your framework. Flask and Django both have specific ways of handling static files, and those settings need to match your server setup.
Hosting a Python App in cPanel FAQs
To know if your hosting supports Python in cPanel, you’ll see the Setup Python App tool inside your cPanel dashboard. If it’s not there, your plan doesn’t support Python or the feature isn’t enabled. Check with your host or consider upgrading to a VPS.
The Python version you should choose in cPanel is the same version your app was built with. Check your local environment or your project files if you’re unsure. Using the wrong version can break your app or cause package conflicts.
If your Python app is not loading after setup, something is stopping it from starting, usually a missing package, wrong file path, or incorrect entry file. Check your error logs in cPanel, fix the issue, and restart the app.
To install packages for your Python app, activate your virtual environment and run pip install -r requirements.txt. This installs everything your app needs in one command.
Yes, you need a virtual environment in cPanel. It keeps your app’s dependencies separate from the rest of the server, which avoids conflicts and keeps your setup clean and stable.
To update your app after making the changes, upload your new files through File Manager and then click Restart in the Python App section of cPanel. That’s it.
You’re getting a “Module Not Found” error because the required package isn’t installed in your virtual environment. Install it using pip and then restart your app.
You can host a Python app on shared hosting, but it has a small size. The small apps work fine on shared hosting, but large or high-traffic apps need more resources. A VPS gives you more RAM, CPU, and control, which keeps your app fast and stable as it grows.
Launch Your Python App the Right Way
At this point, you’re not guessing anymore. You know exactly how to host Python web application in cPanel, from creating the application and setting up the virtual environment to configuring the entry point and troubleshooting the issues that come up along the way.
The process that seemed complicated at the start is actually just a series of logical steps. Each one builds on the last. And now that you’ve seen the full picture, it becomes something you can repeat confidently every time.
So don’t let your project sit on your laptop. Push it live. Open it in a browser. Test it like a real visitor would. Break something, fix it, and make it better. That’s how good apps get built.
And as your app grows, make sure you get hosting that grows with it. You need proper Python support, enough RAM, and full control over your environment. That combination is what lets your project scale without hitting walls too early.