Domain SearchInstantly check and register your preferred domain name
 Web Hosting
 cPanel HostingHosting powered by cPanel (Most user friendly)
 KE Domains
 Reseller HostingStart your own hosting business without tech hustles
 Windows HostingOptimized for Windows-based applications and sites.
 Free Domain
 Affiliate ProgramEarn commissions by referring customers to our platforms
 Free HostingTest our SSD Hosting for free, for life (1GB storage)
 All DomainsBrowse and register domain extensions from around the world
 .Com Domain
 WhoisLook up domain ownership, expiry dates, and registrar information
 VPS Hosting
 Managed VPSNon techy? Opt for fully managed VPS server
 Dedicated ServersEnjoy unmatched power and control with your own physical server.
 SupportOur support guides cover everything you need to know about our services
If you run your own VPS with CyberPanel, learning how to use DNS in CyberPanel is literally subscribing to more control over your domain, your server, and how your website connects with visitors online.
Instead of relying on third-party DNS providers, you can manage everything directly from your VPS using the built-in PowerDNS service that comes with CyberPanel.
Now, if you’re a VPS owner, this setup comes with several advantages.
For one, you get lower latency because everything stays on your server. Second, you save money by not paying for extra DNS services. Plus, you have full authority over your records, which is especially useful for local domains like .co.ke or .ke.
CyberPanel uses PowerDNS, a strong built-in system that acts as your authoritative name server.
Before you begin, make sure you have the following ready:
- CyberPanel already installed and running on your VPS
- Access to your domain registrar account (Truehost works great for this)
- Your registered domain(s)
- Your VPS IP address handy
- Basic knowledge of common DNS records like A, NS, MX, CNAME, and TXT
You should also be able to access your CyberPanel dashboard.
Once everything is in place, you can start configuring DNS directly from CyberPanel and manage your domains without depending on external DNS platforms.
Step 1: Configure Default Nameservers in CyberPanel
This sets the foundation so all your domains can use your own name servers.
Steps to Configure the Default Nameservers
1. Log in to CyberPanel
Open your browser and access your CyberPanel dashboard using https://your-server-ip:8090.
2. Open DNS settings
From the left sidebar, go to “DNS”, then click “Config Default Nameservers.”
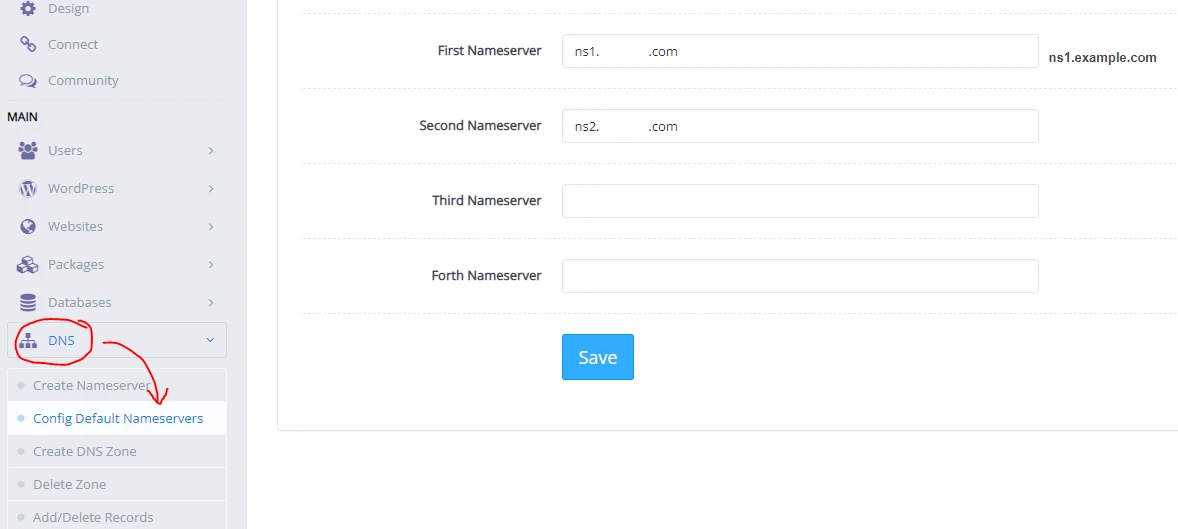
3. Enter your nameservers
Add two nameservers such as:
ns1.yourdomain.comns2.yourdomain.com
4. Save the configuration
Click “Save” to apply the default nameserver settings across your CyberPanel installation.
Using two nameservers is important. It creates redundancy so your DNS setup remains stable even when one record has issues.
Also, use a domain you own, actively manage, and plan to keep long-term. This helps avoid future DNS conflicts or migration issues. Many VPS owners use their main business domain for this setup since it becomes part of their server identity.
Step 2: Create Nameservers
After setting the defaults, the next action is to activate those nameservers so they can actually respond to DNS requests.
1. Inside CyberPanel, still in the DNS section, click “Create Nameserver.”
2. Enter your main domain, then assign:
ns1.yourdomain.comns2.yourdomain.com
3. Both should point to your CyberPanel VPS IP address.
4. Once done, click “Create Nameserver.”
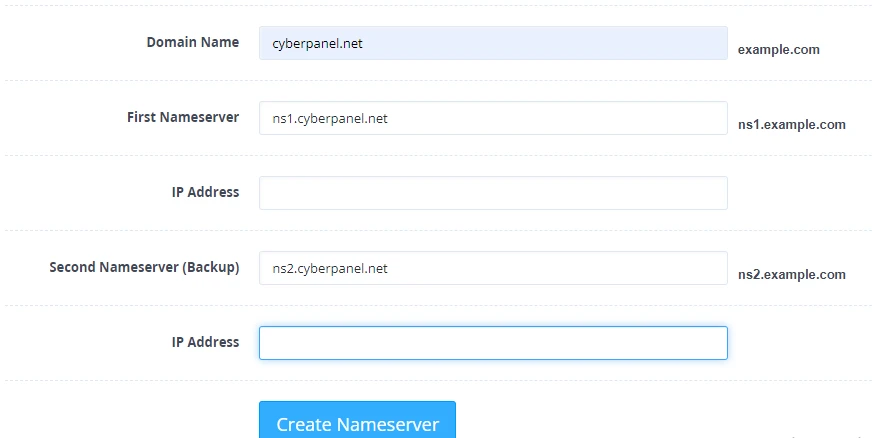
At this point, CyberPanel automatically generates a DNS zone for your domain, which removes the need for manual zone creation.
Importance of Creating a DNS Zone Automatically
When CyberPanel creates the DNS zone for you, several key things happen in the background that make management easier and more reliable:
- Your domain is instantly ready for hosting without extra manual DNS setup
- Email services (MX records) can be configured more smoothly
- SSL certificates are easier to issue and renew
- Fewer chances of configuration errors during setup
- Better compatibility when connecting with external services like Cloudflare
Important registrar step: Log into your domain registrar (Truehost for example) and register child nameservers or glue records. Tell them ns1.yourdomain.com and ns2.yourdomain.com both point to your VPS IP. This is a critical step that many people miss.
Without these glue records, DNS resolution will fail because the internet will not know where your custom nameservers actually live.
Step 3: Create DNS Zones and Manage Records
Once a website is created in CyberPanel, a DNS zone is automatically generated in the background.
That zone already includes the basic records needed for the site to work, such as A and MX records. From here, you can adjust everything based on your setup needs.
To add or change records:
1. Go to “DNS” then “Add/Delete Records.”
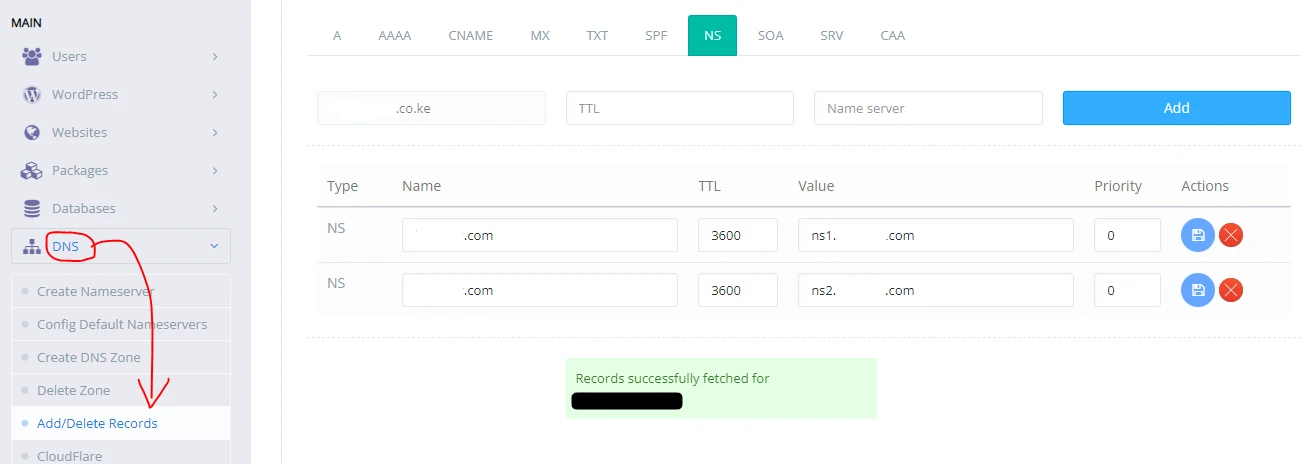
2. Select your domain from the dropdown menu. This is where all DNS changes happen.
3. Add new records, edit existing ones, or remove anything no longer needed.
Common Records You’ll Use:
1. A Record (IPv4 address mapping)
Used to point your domain to your VPS IP.
- Name:
@or left blank - Value: your server IP address
2. AAAA Record (IPv6 mapping)
Used if your server supports IPv6.
3. CNAME Record (alias for www)
Used to connect www to your main domain.
- Name:
www - Value:
yourdomain.com
4. MX Records (email routing)
Directs email traffic to your mail server.
A common setup is to first create:
mail.yourdomain.com(A record pointing to your VPS IP)
Then:- MX record pointing to
mail.yourdomain.com
5. TXT Records (verification and email security)
Used for SPF, DKIM, Google verification, and other authentication setups. These records help improve email deliverability and prevent spam issues.
Inside the interface, each record is managed on a simple table layout. You choose the record type, enter the name and value, then save it.
You can edit or delete records safely from the same screen and make corrections easily if something goes wrong.
Though, take care when updating DNS records. A small mistake can affect website loading or email delivery. It is always safer to double-check entries before saving changes.
PowerDNS also lets you test records directly in the panel.
Step 4: Update Nameservers at Your Domain Registrar
This tells the world to use your CyberPanel DNS. You need it for your server settings to go live on the internet.
1. Start by logging into your domain registrar account.
2. Once inside, find the domain and go to Nameservers or DNS settings.
3. Switch the nameserver type from the default (or any third-party service such as Cloudflare) to Custom Nameservers.
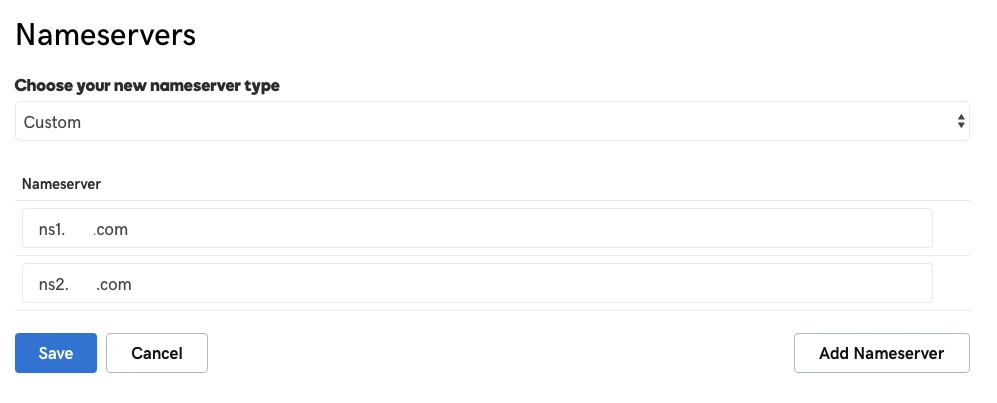
4. Enter ns1.yourdomain.com and ns2.yourdomain.com.
5. Save the changes.
After this, DNS propagation begins. It can take anywhere from 30 minutes to 48 hours for the new settings to fully spread across the internet.
During this time, some users may still reach the old setup while others start seeing the new one.
If you need to confirm whether the changes have fully propagated, tools like DNS Checker or command-line utilities such as dig and nslookup can help verify that your domain is correctly pointing to your CyberPanel nameservers.
Step 5: Verify, Troubleshoot and Monitor DNS Propagation
Once DNS changes are made inside CyberPanel, the final step is checking how everything is spreading across the internet and confirming that records are working correctly.
Verification Methods and Tools
Start by confirming that your domain is resolving correctly. These tools help with that:
- DNS Checker (dnschecker.org)
- What’s My DNS
- Run commands like
dig yourdomain.comornslookup yourdomain.com
Check that:
- Your A record is pointing to your VPS IP address
- Your NS records show
ns1.yourdomain.comandns2.yourdomain.com
If results are still showing old values, it usually means propagation is still in progress or you missed a configuration step.
Common issues
A few issues tend to show up during DNS setup, especially on new VPS environments:
- Missing glue records at the registrar
The domain may not resolve at all if child nameservers were not registered at the registrar level.
- Propagation delays
Changes can take up to 48 hours depending on ISP caching and TTL values.
- Email deliverability problems
Incorrect MX, SPF, or DKIM records can cause emails to land in spam or fail completely.
- SSL issues
After DNS updates settle, reissuing Let’s Encrypt SSL inside CyberPanel usually fixes certificate errors.
Most of these problems trace back to registrar settings or small record mistakes rather than server issues.
How to Flush DNS or Force Updates
If local devices still show old DNS results, refreshing the cache can help:
- On Windows:
ipconfig /flushdns - On macOS:
sudo dscacheutil -flushcache - On Linux: restart the network service or DNS resolver
You can also test from different networks or use online tools to confirm global results instead of relying on a single location.
Monitoring Tools and Best Practices for Ongoing Dns Management in Cyberpanel
After everything is working, ongoing monitoring helps keep your setup stable:
- Use tools like UptimeRobot to track domain availability
- Keep TTL values lower for frequently changing records
- Back up DNS zones regularly inside CyberPanel
- Review MX, SPF, and DKIM settings if email performance changes
- Recheck records after major server or VPS updates
PowerDNS handles updates efficiently in the background, but consistent monitoring ensures nothing breaks silently over time.
Advanced Tips for Using DNS in CyberPanel
Once the basics are running smoothly, a few advanced practices can improve stability, security, and performance:
- Secure DNS with DNSSEC (if your registrar and setup support it) to prevent spoofing and improve trust
- Optimize email delivery using properly configured MX, SPF, and DKIM records, which are especially useful for business emails and invoices
- Manage multiple domains and subdomains from one VPS without adding extra hosting costs
- Back up DNS zones regularly to avoid losing configurations during migrations or server changes
- Integrate with VPS features like auto SSL and LiteSpeed on your Truehost CyberPanel VPS for faster performance and easier management
Managing DNS directly in CyberPanel puts you in charge and simplifies your workflow once you get the hang of it. Plus, this setup removes a lot of limitations you might get with shared hosting and third-party DNS tools.
If anything feels unclear during setup, reaching out for support early saves time and avoids unnecessary downtime.
At this stage, DNS is fully under your control. The setup is complete, and your VPS is now handling domain traffic the way it should.
Now, if you’re ready to take control, log into your CyberPanel on your Truehost VPS and start setting up your name servers today.
If you run into any issues, Truehost support is there to help. You’ve got this!