Domain SearchInstantly check and register your preferred domain name
 Web Hosting
 cPanel HostingHosting powered by cPanel (Most user friendly)
 KE Domains
 Reseller HostingStart your own hosting business without tech hustles
 Windows HostingOptimized for Windows-based applications and sites.
 Free Domain
 Affiliate ProgramEarn commissions by referring customers to our platforms
 Free HostingTest our SSD Hosting for free, for life (1GB storage)
 All DomainsBrowse and register domain extensions from around the world
 .Com Domain
 WhoisLook up domain ownership, expiry dates, and registrar information
 VPS Hosting
 Managed VPSNon techy? Opt for fully managed VPS server
 Dedicated ServersEnjoy unmatched power and control with your own physical server.
 SupportOur support guides cover everything you need to know about our services
When you install CyberPanel on VPS, you get a practical way to take full control of your websites without paying for cPanel licenses.
This is because CyberPanel is free, plus it gives you a fast, clean setup for hosting multiple sites and managing emails, databases, and backups from one place.
CyberPanel is also praised for its performance. It runs on OpenLiteSpeed, which is built for speed, especially for WordPress and e-commerce sites.
You also get built-in tools like LSCache for faster page loading, free SSL certificates through Let’s Encrypt, one-click WordPress installation, and support for Redis and Memcached to improve performance even further.
Everything is managed from a simple dashboard, so you don’t need advanced Linux experience to get started.
But before installing, your VPS needs to meet a few basic requirements to keep everything stable.
I mean, a clean server setup is important so that nothing interferes with the installation process.
The recommended setup includes:
- Ubuntu 22.04, Ubuntu 20.04, or AlmaLinux 8/9 installed freshly
- At least 1 GB RAM, though 2 GB or more gives a smoother experience
- Minimum 10 GB SSD storage, with 20 GB or more preferred
- Root access through SSH so you can run installation commands
For consistent performance, it helps if you start with a fresh VPS rather than one that already has other control panels or software installed.
If you’re setting this up through us, our VPS option at Truehost supports CyberPanel hosting, and it’s built specifically for this kind of setup.
Phase 1: Connect to Your VPS and Update the System
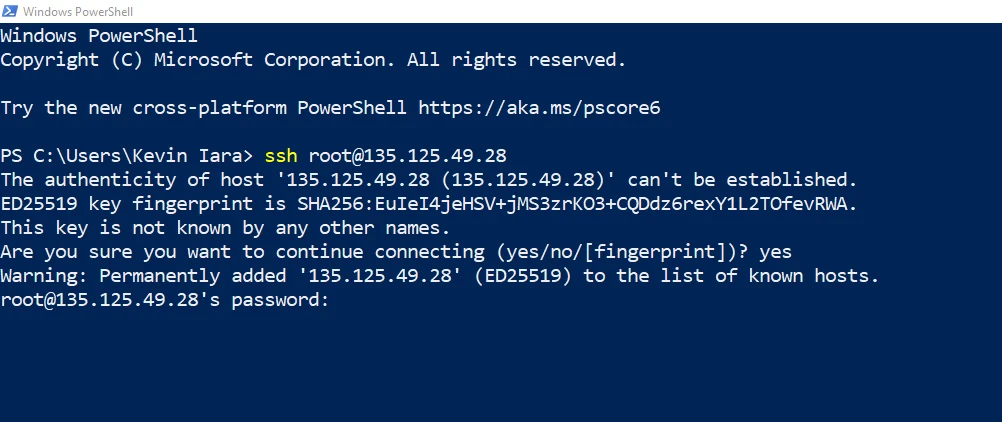
The first step is getting into your server and preparing it for installation. This is done through SSH, which lets you control your VPS from your computer.
Open your terminal (or PuTTY on Windows) and log in as root using SSH:
ssh root@your_vps_ipReplace your_vps_ip with the actual IP address of your VPS. Once you enter this command, the system will ask for your password.
From here, the next step is updating the system packages. This keeps everything stable and ensures you’re working with the latest software versions.
For Ubuntu servers, run:
apt update && apt upgrade -yFor AlmaLinux servers, use either:
yum update -yor
dnf update -yAfter running these commands, the server will start checking for updates and installing them. It may take a few minutes depending on how many packages need updating.
During this process, you might see prompts or progress messages; this is normal, and you should let it complete without interruption.
At the end of it, your VPS is refreshed and ready for the CyberPanel installation steps that follow.
Phase 2: Run the CyberPanel Installation Script
This is where the actual installation begins. Everything is handled through a single command that downloads and runs the CyberPanel installer for you.
Run this in your VPS terminal:
sh <(curl https://cyberpanel.net/install.sh || wget -O - https://cyberpanel.net/install.sh)Once you press Enter, the installer starts and begins asking a few setup questions. Each choice shapes how your CyberPanel environment will be configured, so it helps to go through them carefully.
The Script Prompts
1. The first prompt asks which version you want. Select option 1 for CyberPanel with OpenLiteSpeed (free version).

2. Next, you’ll be asked about full-service installation; choose the default Y for full install. This includes:
- PowerDNS (handles DNS)
- Postfix (handles email sending)
- Pure-FTPd (handles file transfers)
3. For Remote MySQL, usually choose N, unless you have a separate database server.
4. Then you’ll be asked about the CyberPanel version. Simply press “Enter” to install the latest version.
5. Next is the password setup. The default option is usually shown, but it’s better to set your own secure password. Choose S to create a strong custom password.
6. After that, you’ll see options for performance tools. It is recommended to enable them:
- Memcached:
Y(helps speed up data access through caching) - Redis:
Y(improves performance for databases and applications) - Watchdog:
Y(monitors system stability and can restart the server if it becomes unresponsive)
Watchdog works in the background to help keep the server stable in case of system issues.
Time expectation
Once everything is confirmed, the installation process begins.
It usually takes around 10–20 minutes, depending on your server speed. During this time, the system installs packages, configures services, and sets up the CyberPanel environment.
Don’t close the window or interrupt it. Let it complete fully so everything is installed correctly and ready for the next step.
Finalize Installation
Once the installation finishes, the server displays a success screen with all the important details about your setup.
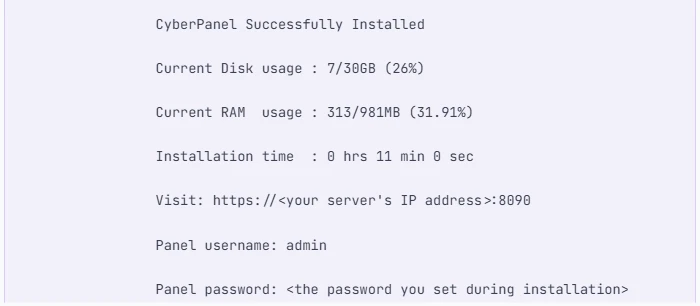
Select and copy everything to a safe location for future reference, especially your admin password, login URL, and other credentials since you’ll use them later.
Once everything is noted, the server is fully set for the next stage of working inside CyberPanel.
Phase 3: Access and Secure Your CyberPanel Dashboard
After the installation completes, the server may prompt for a reboot. This is a normal final step to ensure all services start correctly.
You’ll see a message like: “Would you like to restart your server now? [y/N]”: Enter y to restart immediately or “reboot” later after finishing any quick checks on the server.
Once the server is back online, access your CyberPanel dashboard using your browser: https://your_vps_ip:8090
Your browser may show a security warning about a self-signed SSL certificate. This is expected at this stage. You can safely proceed by clicking “Advanced” and continuing to the site.
Then log in using:
- Username: admin
- Password: the one you set during installation
Once inside, the first important step is securing your panel with a valid SSL certificate. Go to SSL, then Manage SSL, and issue a Let’s Encrypt SSL certificate for your server.
This replaces the browser warning with a trusted secure connection.
Before moving on, ensure your VPS firewall (or provider firewall) allows the required ports. These are essential for CyberPanel to function properly:
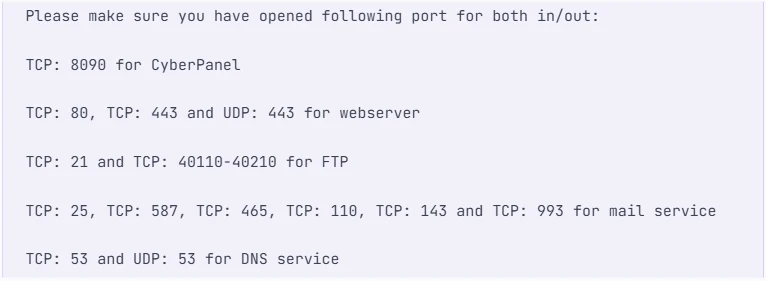
- 8090 – CyberPanel access
- 80 & 443 – Website traffic (HTTP/HTTPS)
- 21 – FTP access
- 25, 465, 587 – Email services
- 53 (TCP/UDP) – DNS services
If any of these are blocked, certain features like email, websites, or DNS may not work correctly.
Common Issues and Troubleshooting
Sometimes the setup does not go perfectly on the first try. Here are the most common issues and how to fix them:
1) 503 Error After Installation
If the panel shows a 503 error, the CyberPanel service may not be running properly.
1. Check the service status:
systemctl status lscpdIf it is not active, start it manually:
systemctl start lscpd2. Manually set up virtualenv (if issue persists)
source /usr/local/CyberCP/bin/activate

pip install --ignore-installed -r /usr/local/CyberCP/requirments.txt

deactivate

virtualenv --system-site-packages /usr/local/CyberCP

systemctl restart lscpd
3. Check Installation Logs
If you are still having issues after these steps, you can try to find errors in the install logs. They are located at: /var/log/installLogs.txt
4. Submit Bug Report
If all of the above failed, please submit a bug report.
2) Script Fails During Installation
This usually happens due to:
- Weak or unstable internet connection
- Incorrect permissions on the VPS
- Temporary package download issues
Double-check your internet connection and that you’re using root. Make sure the server is fresh.
3) Port Conflicts or Blocked Services
If certain services don’t respond, check whether required ports are already in use or blocked by your provider firewall.
4) Memory Errors
Low RAM can cause services to fail or crash. In this case, upgrading your VPS is the most reliable fix.
Next Steps After Installation
Once you install CyberPanel on VPS and it’s running smoothly, the real work begins:
- Create your first website inside the panel
- Point your domain using DNS A records
- Enable SSL for each domain using Let’s Encrypt
- Install WordPress or other applications with one click
- Set up basic security like firewall rules and regular updates
CyberPanel makes hosting straightforward once everything is in place.
If you are setting this up on a VPS, a good starting point is a plan from Truehost. It gives you enough resources to run multiple websites without performance issues.
And if anything gets stuck along the way, our support team is available to help you get back on track.