Domain SearchInstantly check and register your preferred domain name
 Web Hosting
 cPanel HostingHosting powered by cPanel (Most user friendly)
 KE Domains
 Reseller HostingStart your own hosting business without tech hustles
 Windows HostingOptimized for Windows-based applications and sites.
 Free Domain
 Affiliate ProgramEarn commissions by referring customers to our platforms
 Free HostingTest our SSD Hosting for free, for life (1GB storage)
 All DomainsBrowse and register domain extensions from around the world
 .Com Domain
 WhoisLook up domain ownership, expiry dates, and registrar information
 VPS Hosting
 Managed VPSNon techy? Opt for fully managed VPS server
 Dedicated ServersEnjoy unmatched power and control with your own physical server.
 SupportOur support guides cover everything you need to know about our services
If you want OpenClaw to work as a reliable AI assistant that’s available whenever you need it, running it on your personal computer isn’t the best long-term solution.
The moment your computer shuts down, loses power, or disconnects from the internet, your assistant goes offline too.
Hosting OpenClaw on a Virtual Private Server (VPS) solves that problem by keeping it running 24/7 in a Docker container, allowing your agents to continue responding to messages, executing automations, and maintaining active connections even when your own devices are turned off.
There are two main ways to deploy OpenClaw:
You can choose a managed one-click deployment offered by some VPS providers, where Docker installation, updates, and much of the server management are handled for you.
Alternatively, you can deploy it on a self-managed VPS, giving you complete control over your server, Docker environment, security settings, networking, and future upgrades.
While the self-managed approach requires a little more setup, it also offers greater flexibility, stronger security, and a deeper understanding of how your AI infrastructure works, making it the preferred choice for developers, businesses, and anyone who wants full ownership of their OpenClaw deployment.
Here, we’ll walk through the complete self-managed installation process, from preparing a Linux VPS and installing Docker to configuring persistent storage, completing onboarding, securely accessing the Control UI, and connecting your preferred messaging channels.
Along the way, you’ll also learn why each step counts, helping you build an OpenClaw deployment that’s secure, stable, and ready to run continuously.
Step 1: Set Up Your VPS and Lock Down SSH
The first step is choosing a Linux VPS that can comfortably run OpenClaw. While almost any major cloud provider will work, your server’s specifications count more than the provider itself. An underpowered VPS can struggle during Docker image builds, leading to memory-related crashes that interrupt your deployment.
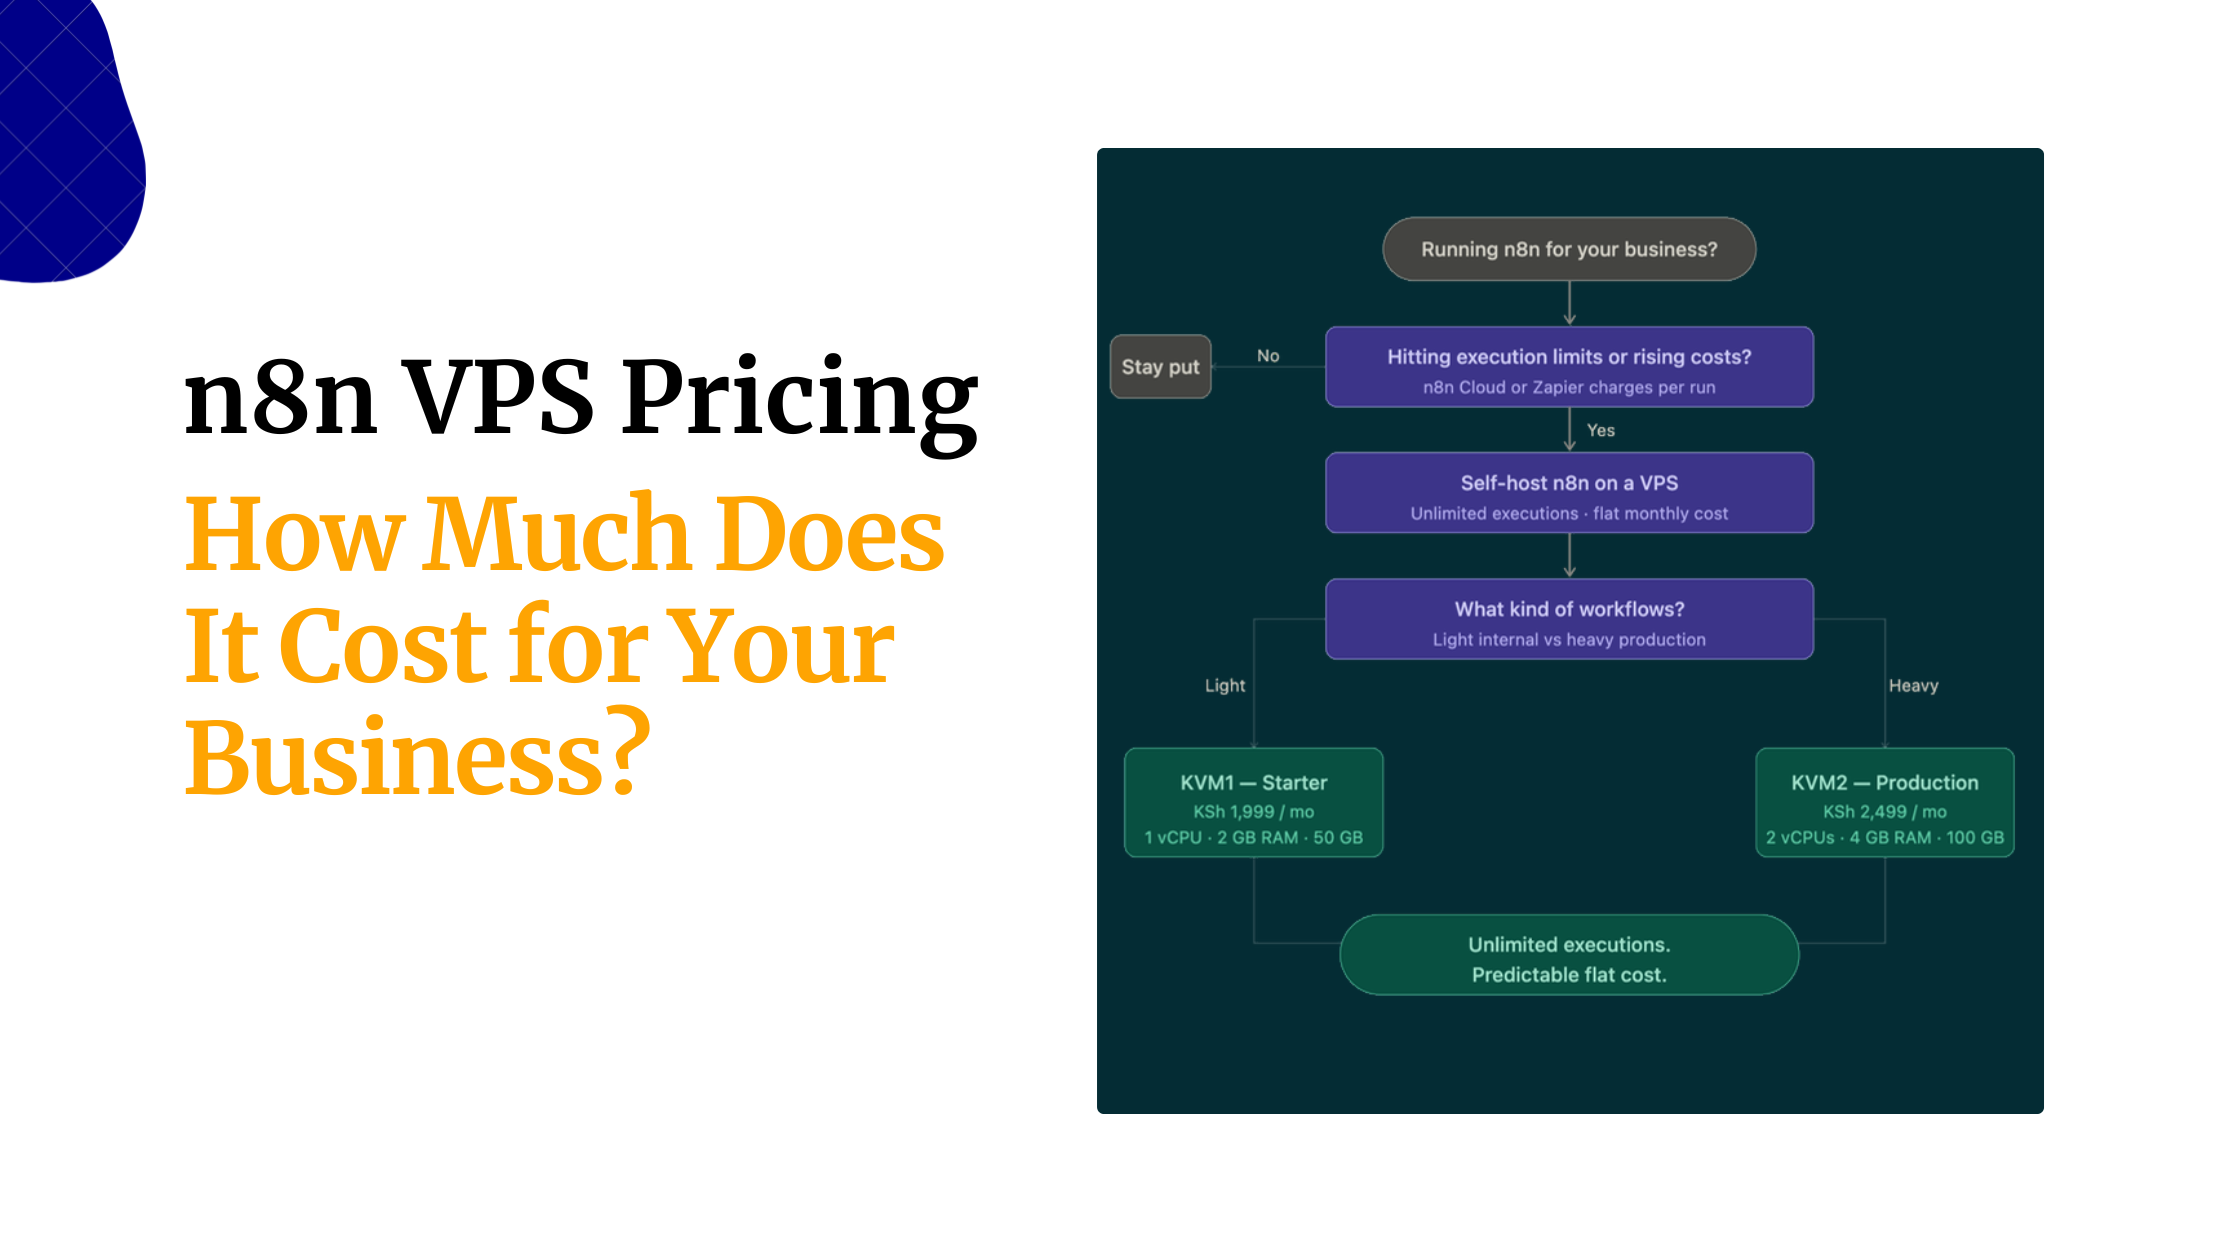
For a reliable setup, use Ubuntu 22.04 or 24.04, at least 2 GB of RAM (4 GB is recommended), 10 GB of storage, and 2–4 vCPUs. If you plan to run several AI agents or resource-intensive workflows, consider increasing both RAM and CPU resources.
Before installing OpenClaw, spend a few minutes securing your server. Since your VPS is connected to the internet from the moment it’s created, it’s good practice to use SSH keys instead of passwords, disable direct root login, and create a regular user with sudo privileges. Enabling a firewall and allowing only the ports you need adds another important layer of protection.
These simple security measures make your OpenClaw deployment much safer without adding much complexity.
Step 2: Install Docker and Docker Compose
OpenClaw is designed to run in Docker, which packages the application and all of its dependencies into a single container. This keeps your installation isolated from the host operating system and makes updates much easier in the future.
Install Docker using the official installation script, then add your user to the Docker group so you can manage containers without typing sudo for every command. After installation, verify that both Docker and Docker Compose are installed correctly before continuing.
If Docker reports permission errors after installation, simply log out and sign back in so your new group permissions take effect.
Step 3: Pull the Repository and Create Storage Directories
Containers are stateless by design. When a container restarts or gets replaced by a new image, everything written inside it is gone. The entire point of host-mounted volumes is to give the container a durable home for data that should survive across rebuilds.
Clone the repository and create the home:
git clone https://github.com/openclaw/openclaw.git
cd openclaw
mkdir -p ~/openclaw/data
This single directory (~/openclaw/data) becomes the source of truth for everything that counts:
Openclaw.json: gateway configuration including your auth tokenagents/<name>/: per-agent files and memory.env: environment variables loaded at startupWorkspace data, including WhatsApp sessions and channel state
Because this directory lives on the host (not inside the container), you can update OpenClaw to a new image version, rebuild the container entirely, and come back to the same configuration and session state you left. This is the key architectural insight: the container is disposable, the data directory is not.
Step 4: Write Your Docker Compose File
Instead of launching OpenClaw with long Docker commands, create a docker-compose.yml file to define your deployment.
Your configuration should include:
The latest OpenClaw Docker image
A persistent data volume
Automatic container restarts
Production mode
A localhost port binding for better security
Keeping the gateway bound to 127.0.0.1 prevents it from being exposed to the public internet. You can still access it securely using an SSH tunnel, which is the recommended approach for most users.
If needed, you can also define optional environment variables to set a custom gateway token, change the network binding, or pin OpenClaw to a specific version.
Step 5: Start the Gateway
With your Compose file in place, bring the gateway online:
docker compose up -d
The -d flag runs the container in detached mode (background). On the first run, Docker will pull the image from the registry, which may take a minute depending on your VPS’s network speed.
Verify Everything is Running
Check the container status:
docker compose ps
You should see openclaw-gateway listed with a status of Up.
Ping the health endpoint:
curl http://127.0.0.1:18789/healthz
A successful response confirms the gateway is listening and healthy.
Stream live logs to watch startup output:
docker compose logs -f openclaw-gateway
If the container exits immediately, the logs will tell you why; missing environment variables and port conflicts are the most common culprits at this stage.
Step 6: Complete First-Time Onboarding

OpenClaw’s initial configuration is handled through an interactive onboarding wizard that runs inside the container. This is where you provide your AI provider API keys and get the gateway fully initialized.
Open a shell inside the running container:
docker compose exec openclaw-gateway bash
Run the onboarding wizard:
openclaw onboard
The wizard walks through:
Collecting API keys for your AI providers (Anthropic, OpenAI, Google, and others)
Generating your gateway auth token (or accepting the one you set as an environment variable)
Creating the auth-profile secret key directory
Finalizing the initial gateway configuration
One thing to expect: the gateway may restart mid-onboarding as it applies configuration changes. If your shell session drops, that’s normal; just run openclaw onboard again. Because all config is persisted to the host-mounted volume, the wizard picks up from wherever it left off rather than starting over.
Step 7: Open an SSH Tunnel for Local Access
Because the gateway only listens on 127.0.0.1 of the VPS, you can’t reach the Control UI by navigating to your VPS’s IP address in a browser. You bridge this gap with an SSH tunnel, a secure, encrypted connection that forwards a local port on your machine through the SSH connection to the VPS.
Run this command on your local computer (not the VPS):
ssh -L 18789:127.0.0.1:18789 user@YOUR_VPS_IP
This tells your local machine: “forward anything that hits localhost:18789 through the SSH connection to 127.0.0.1:18789 on the VPS.” Keep this terminal open for as long as you need to access the UI.
Find Your Gateway Token
The gateway token is stored in the persistent config file on the VPS:
cat ~/openclaw/data/openclaw.json | grep '"token":'
Access the Control UI
With the tunnel running, open a browser on your local machine and navigate to:
http://127.0.0.1:18789
Enter your gateway token to authenticate. If the UI shows as disconnected, try passing the token directly in the URL:
http://127.0.0.1:18789/?token=YOUR_GATEWAY_TOKEN
Prefer Direct Access?
If you’d rather access the gateway without maintaining an SSH tunnel, you can bind to 0.0.0.0 instead of 127.0.0.1 in your Compose file. Before doing this, read the Security Hardening section below.
Public exposure of the gateway port requires firewall rules to limit who can reach it. The SSH tunnel approach is more secure and requires no firewall changes.
Step 8: Connect Your Messaging Channels
With the gateway running and accessible, you can wire in the messaging platforms you want your agents to operate on.
Telegram (Quickest to Set Up)
Open a conversation with BotFather on Telegram and create a new bot with /newbot
Copy the token BotFather provides
In the Control UI, navigate to Settings > Channels and paste the token
Send /start to your new bot in Telegram to complete pairing
Telegram is the fastest channel to get running because it uses a bot token for authentication rather than a QR code scan, and Telegram’s API is straightforward to integrate.

i) In the Control UI, find the WhatsApp channel setup and scan the QR code with your phone
ii) Immediately configure channels.whatsapp.allowFrom to limit which numbers can interact with the assistant
The allowFrom restriction is important: WhatsApp is tied to your personal account, and without it, anyone who messages the number could interact with your AI assistant.
Other Supported Channels
OpenClaw also integrates with Slack, Discord, Signal, and Microsoft Teams, among others. Each has its own authentication flow accessible from the Channels settings in the Control UI.
Test Your Setup
Send a message to your assistant through whichever channel you configured. It should respond and walk you through any remaining initial preferences. If it doesn’t respond, check the live logs (docker compose logs -f openclaw-gateway) for errors.
Where to Go from Here
Now that your OpenClaw gateway is up and running, you can start exploring features that make your AI assistant even more capable.
Enable Heartbeats: Configure scheduled tasks so your agents can work proactively. Heartbeats let them send reminders, generate daily reports, monitor systems, or perform other recurring tasks without waiting for a message.
Create Multiple Agents: Build specialized assistants for different jobs, such as customer support, research, content creation, or task management. Each agent can have its own personality, tools, and permissions.
Expand with Skills: Extend your assistant’s capabilities by installing skills from ClawHub or creating your own custom skills customised to your workflow.
Monitor Performance: Keep an eye on your gateway by reviewing the Docker logs regularly. This helps you identify startup issues, connection errors, or other problems before they affect your deployment.
Keep OpenClaw Updated: Regularly update your installation to benefit from the latest features, performance improvements, and security fixes. Since your data is stored separately from the container, updates won’t affect your configuration or agents.
Troubleshooting Common Issues
Most deployment issues are easy to fix once you know where to look.
i) Container won’t start: Check the Docker logs first. They usually point to the exact problem, such as missing environment variables, configuration mistakes, or a port conflict.
ii) WebSocket errors (1008 Unauthorized): If you’re using Nginx or Caddy as a reverse proxy, make sure it’s configured to forward WebSocket connections correctly. Missing headers are the most common cause of this error.
iii) Gateway is publicly accessible: If you notice the gateway is bound to 0.0.0.0, it’s exposed to the internet. For better security, bind it to 127.0.0.1 and access it through an SSH tunnel or a properly secured reverse proxy.
iv) Permission errors: These usually happen when the data directory is owned by the wrong user. Updating the directory permissions typically resolves the issue.
v) Problems after an update: If OpenClaw reports configuration errors after upgrading, run the built-in migration tool or restore your latest backup. Creating a backup of your data folder before updating is a simple habit that can save a lot of time.
vi) SSL certificates won’t generate: Verify that your domain points to your VPS and that port 80 is temporarily open so your certificate provider can complete the verification process.
Keep OpenClaw Running 24/7 with Docker on a VPS
Deploying OpenClaw on a VPS with Docker gives you a secure, reliable, and always-on AI assistant that you control. With persistent storage and an easy update process, your setup can grow as you add more agents and automations.
If you want to skip the server setup and maintenance, try Truehost OpenClaw Hosting. It offers a preconfigured environment that lets you deploy OpenClaw quickly and get started in minutes.
Get started here: Truehost OpenClaw Hosting.