Domain SearchInstantly check and register your preferred domain name
 Web Hosting
 cPanel HostingHosting powered by cPanel (Most user friendly)
 KE Domains
 Reseller HostingStart your own hosting business without tech hustles
 Windows HostingOptimized for Windows-based applications and sites.
 Free Domain
 Affiliate ProgramEarn commissions by referring customers to our platforms
 Free HostingTest our SSD Hosting for free, for life (1GB storage)
 All DomainsBrowse and register domain extensions from around the world
 .Com Domain
 WhoisLook up domain ownership, expiry dates, and registrar information
 VPS Hosting
 Managed VPSNon techy? Opt for fully managed VPS server
 Dedicated ServersEnjoy unmatched power and control with your own physical server.
 SupportOur support guides cover everything you need to know about our services
cPanel on a VPS gives you real control. And I’m talking about the kind of control shared hosting simply cannot offer.
You get root access, the ability to host multiple websites, manage emails, run custom scripts, and scale your server resources as your traffic grows.
For most of us, shared hosting is where the journey starts.
And it works until it doesn’t. Slow load times creep in, resource caps become a ceiling you keep hitting, and any customization beyond the basics feels like negotiating with a wall.
That’s when a VPS becomes the obvious upgrade, and you see the importance of learning how to install cPanel on a VPS.
However, before touching a single command, your VPS needs to tick a few specific boxes. cPanel is not a lightweight application, and it has specific system needs, and installing it on the wrong setup will leave you staring at error messages.
cPanel only works on certain Linux distributions. As of 2026, your options are:
1. AlmaLinux 8 and 9 (most recommended)
2. Rocky Linux 8 and 9
3. CloudLinux 8 and 9
CentOS is no longer supported by cPanel. Also, Ubuntu support is experimental and not recommended for production.
Always start with a fresh OS installation and do not install cPanel on a server that already has other control panels or services running.
On the resource side, you need at least 2 GB of RAM (4 GB for smooth performance), a minimum of 20 GB of disk space (40 GB recommended), a static publicly visible IP address, and a fully qualified domain name set as your hostname, something like server.yourdomain.com.
Our Truehost’s VPS plans come with SSD storage, full root access, and your choice of AlmaLinux or Rocky Linux. Everything is already in place for a clean cPanel installation.
Steps on How to Install cPanel on a VPS
Step 1: Get the Right VPS
For the installation to go smoothly, your server needs three things from the start: a static public IP address, root SSH access, and a supported operating system available at provisioning.
Miss any one of those, and you’ll hit a wall before you even begin.
At Truehost, we offer two types of VPS plans depending on how hands-on you want to be:
- Unmanaged VPS: You get full root access and handle the setup yourself.
- Managed VPS: We handle the server management, cPanel installation, and security hardening for you. Perfect if you’d rather focus on running your business than managing a server.
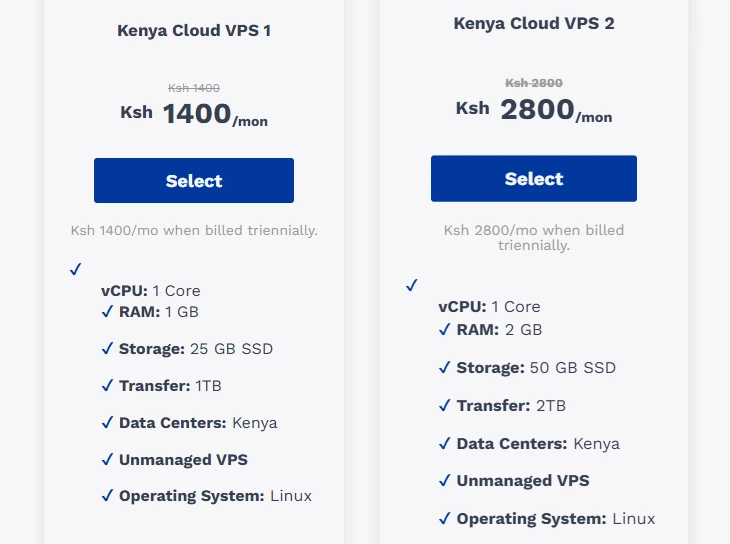
Our Kenyan VPS plans start from as low as KES 1400/month, and you can pay via M-PESA, card, or bank transfer, whichever is easiest for you.
Step 2: Connect to Your VPS via SSH
With your VPS provisioned, the next move is connecting to it remotely via SSH (Secure Shell). This is how you access your server’s command line remotely and start working.
On Linux or macOS, open your terminal and run:
ssh root@<your-vps-ip>Swap out <your-vps-ip> with the actual IP address from your Truehost dashboard.
On Windows, the easiest route is PuTTY, which is a free SSH client. Once you have it open:
- Enter your VPS IP address in the “Host Name” field
- Make sure Port is set to 22 and Connection type is SSH
- Click Open, log in as root, and enter your password
One thing that trips up a lot of first-timers: when you type your password, nothing shows on screen, no dots, no asterisks, nothing. That’s completely normal. Just type it and press Enter.
Once you’re in, update your server before doing anything else:
dnf update -yStep 3: Run the cPanel Installation Script
This is where the actual installation happens. While logged in as root, run this command:
cd /home && curl -o latest -L https://securedownloads.cpanel.net/latest && sh latestBreaking it down, cd /home moves you to the home directory, curl -o latest -L ... pulls the official installer straight from cPanel’s servers, and sh latest kicks it off.

From there, the script takes over: it configures your server, installs all required services, and sets up WHM without you having to lift a finger.
Do not close your terminal while this is running.
The installation typically takes anywhere from 10 to 15 minutes depending on your server speed and connection.
Pro tip: Before running the installer, start a screen or tmux session. If your SSH connection drops mid-install, the process keeps running in the background, and you can reconnect to it without losing progress.
Step 4: Access WHM and Complete the Setup
When the installer finishes, it’s time to log into WHM (Web Host Manager). Think of WHM as the layer above cPanel, where you handle server-level settings, create hosting accounts, and keep everything running smoothly.
Open your browser and head to:
https://<your-vps-ip>:2087
Your browser will probably throw up a security warning at this point. Don’t be alarmed; it’s expected on a new server that doesn’t have an SSL certificate configured yet. Click Advanced and proceed to the page anyway.

Log in with root as your username and your server’s root password.
From there, the WHM Setup Wizard walks you through the essentials: accepting the license agreement, configuring your nameservers, and adding a contact email.
It will ask you to put in your email ID that you used to purchase the cPanel and WHM license. Here, click the login button and enter the email address and password, then click “Sign In.”
You’ll be redirected back to the original page to activate the license and proceed to the server setup wizard.
Don’t rush through the nameserver step, especially if you’re planning to manage DNS for multiple domains. Getting this right from the start saves you a headache later.

Step 5: Create Your First cPanel Account
WHM manages the server. To actually host a website, you need to create a cPanel account for the domain.
This is how to do it:
In WHM, go to Account Functions, then Create a New Account. Fill in the domain name, a username, password, and contact email, then click Create.
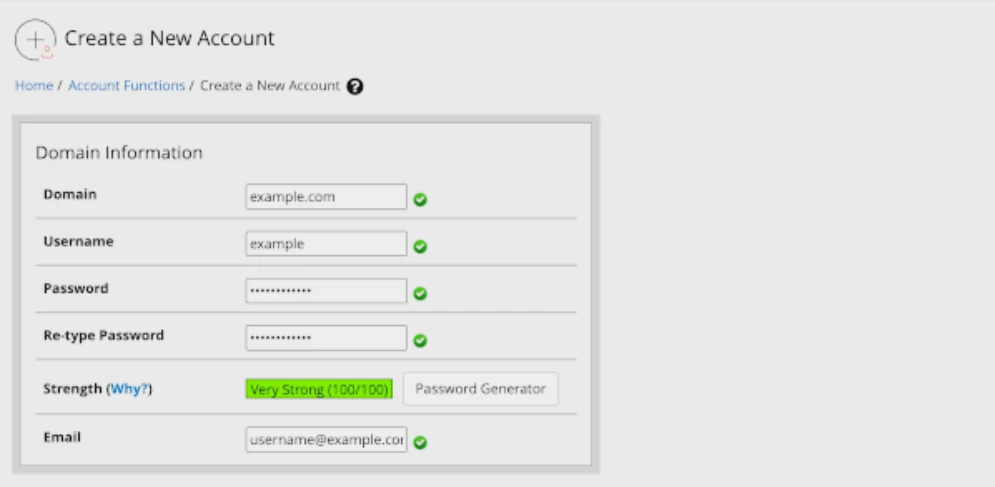
For the package, choose default
Once the account is set up, you can log into cPanel directly at:
https://<your-vps-ip>:2083
That’s it! Your VPS is fully up and running with cPanel. To proceed to your new account, click “Go To cPanel.” From here, you can create additional accounts for other domains or clients the same way straight from WHM whenever you need to.
FAQs on How to Install cPanel on a VPS
Does Truehost offer cPanel VPS in Kenya?
Yes. We offer both unmanaged VPS (where you install cPanel yourself using this guide) and managed VPS (where we handle the installation and server management for you). Both options are available with local payment via M-PESA.
Can I install cPanel on any VPS?
Not quite. cPanel needs a supported Linux OS (AlmaLinux, Rocky Linux, or CloudLinux), a static public IP address, and at least 2 GB of RAM. If your VPS provider assigns dynamic or internal IPs, or doesn’t offer root access, cPanel won’t install correctly.
Is cPanel free?
No. cPanel requires a paid license. That said, many hosting providers, including us at Truehost, bundle the license cost into their managed VPS plans or as an addon, so you don’t have to source or pay for one separately.
What if my installation fails?
The most common culprits are insufficient RAM, an unsupported OS, or a network interruption mid-install. The official cPanel troubleshooting guide covers specific error fixes in detail. If you’re on a Truehost VPS, the support team is also on hand to help you sort it out.
You’re Ready to Go
You now know exactly how to install a VPS on cPanel in five simple and direct steps.
With a compatible server, a supported OS, and the official installation script, you can have a fully working cPanel environment running in under two hours.
Now, get our cPanel-supported VPS hosting, follow the steps and create your first website on cPanel
If you’d rather skip the command line entirely, our managed VPS hosting at Truehost comes with cPanel already installed and configured. Pick a plan, pay, and start hosting right away.