 Domain SearchInstantly check and register your preferred domain name
 Web Hosting
 cPanel HostingHosting powered by cPanel (Most user friendly)
 WordPress HostingHost your WordPress website with fast, secure, and affordable WordPress hosting in Kenya.
 KE Domains
 Reseller HostingStart your own hosting business without tech hustles
 Windows HostingOptimized for Windows-based applications and sites.
 Free Domain
 Affiliate ProgramEarn commissions by referring customers to our platforms
 Free HostingTest our SSD Hosting for free, for life (1GB storage)
 Domain TransferMove your domain to us with zero downtime and full control
 All DomainsBrowse and register domain extensions from around the world
 .Com Domain
 WhoisLook up domain ownership, expiry dates, and registrar information
 VPS Hosting
 Managed VPSNon techy? Opt for fully managed VPS server
 Dedicated ServersEnjoy unmatched power and control with your own physical server.
 Website Builder
 Online Store BuilderLaunch a professional e-commerce store without writing code.
 Web Design ServiceGet a custom-designed website tailored to your brand and goals. From just KES 15,600
 BlogRead our guides on web hosting, online business, digital marketing, and more
 SupportOur support guides cover everything you need to know about our services
 ContactContact us via chat or email
Your friend’s PC freezes mid-match. The whole lobby drops with it. Everyone sits there, waiting for a machine that was never built to carry a game session on its own.
That single moment is why dedicated gaming servers exist. A dedicated server does not care if one player’s laptop overheats or their internet drops. It keeps running, keeps the match alive, and keeps everyone connected.
A player-hosted server lives and dies with one person’s machine. The moment that the player quits, closes the game, or loses power, the session ends for everyone.
A VPS shares hardware with other tenants on the same physical box. Performance can dip when a neighboring account spikes its usage, even if your own settings never change.
A dedicated server is different. The whole machine belongs to you. Nothing else runs on it, so nothing else competes for CPU cycles or memory.
That exclusivity brings a few clear gains:
- The server keeps running even if your own PC crashes or reboots.
- You get full root access so that you can choose the operating system yourself.
- You can install mods, custom maps, and anti-cheat tools without asking anyone.
- You can set your own admin rules and moderation policy for the community.
None of this means every group needs one. A few friends running a casual session on a weekend do fine with a player-hosted setup.
A dedicated server earns its cost once you run a public server, host twenty or more concurrent players, or care about competitive stability.
This guide walks through the full setup, from picking hardware to fixing the errors you will most likely hit along the way. We will use Counter-Strike 2 on Linux as the working example, since its setup via SteamCMD applies to most Source engine and Steam-based titles.
Hardware and OS Requirements Before You Start
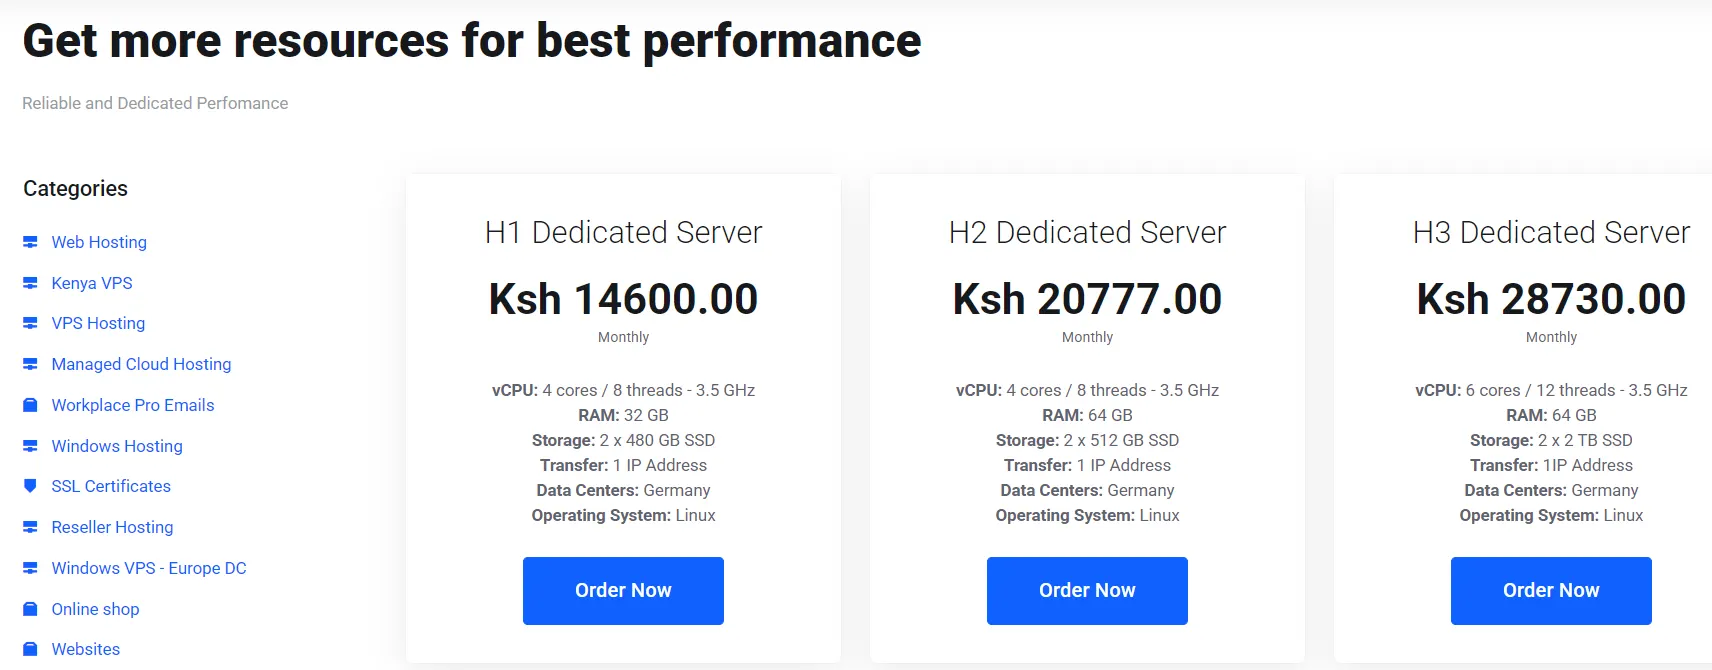
Before installing anything, check the hardware sitting under the operating system. Game servers do not need the same specs as a gaming PC built for graphics.
Here is a starting baseline that covers most multiplayer titles:
- CPU with a clock speed of at least 2.5GHz. Single-thread performance carries more weight than core count, since most game tick loops run on one thread.
- 8GB of RAM at minimum, though 16GB gives you headroom for larger player counts.
- An SSD, not a spinning hard drive, for faster load times and file access.
- A 64-bit Linux or Windows operating system, chosen based on the games you plan to run.
These numbers scale up with player count and mod load. Always check the specific game’s own listed requirements rather than relying on a single universal number.
Linux tends to run SteamCMD-based servers cleanly and with less overhead than Windows. Some games and some anti-cheat systems still require Windows, so confirm this before you commit to an OS.
You also have a choice between a bare-metal dedicated server, where you manage everything yourself, and a managed game server provider panel, where someone else handles most of the setup. A bare-metal box gives you full control. A managed panel trades some of that control for convenience.
Step 1: Provisioning the Dedicated Server (Before Touching Game Files)
Once you have a machine, the operating system needs a few steps to complete before any game files can be installed. Skipping this stage leaves the server open to easy attacks.
Start with a fresh OS install, then run a full update and patch cycle right away. An outdated system is the easiest target for anyone scanning open ports on the internet.
Next, create a non-root user account for daily work and game server management. Running everything as root gives any mistake or any attacker full control of the machine.
Lock down SSH access after that. Switch to key-based authentication and disable password logins entirely. This alone blocks most automated login attempts within hours of enabling it.
Set up a basic firewall, such as ufw on Ubuntu, before opening any game-specific ports. Deny everything by default, then allow only what you plan to use.
Finally, set a static IP address or ask your provider to reserve one for you. Players need a stable address to reconnect to, and a shifting IP breaks that every time it changes.
Step 2: Installing the Game Server Software (SteamCMD / CS2 Walkthrough)
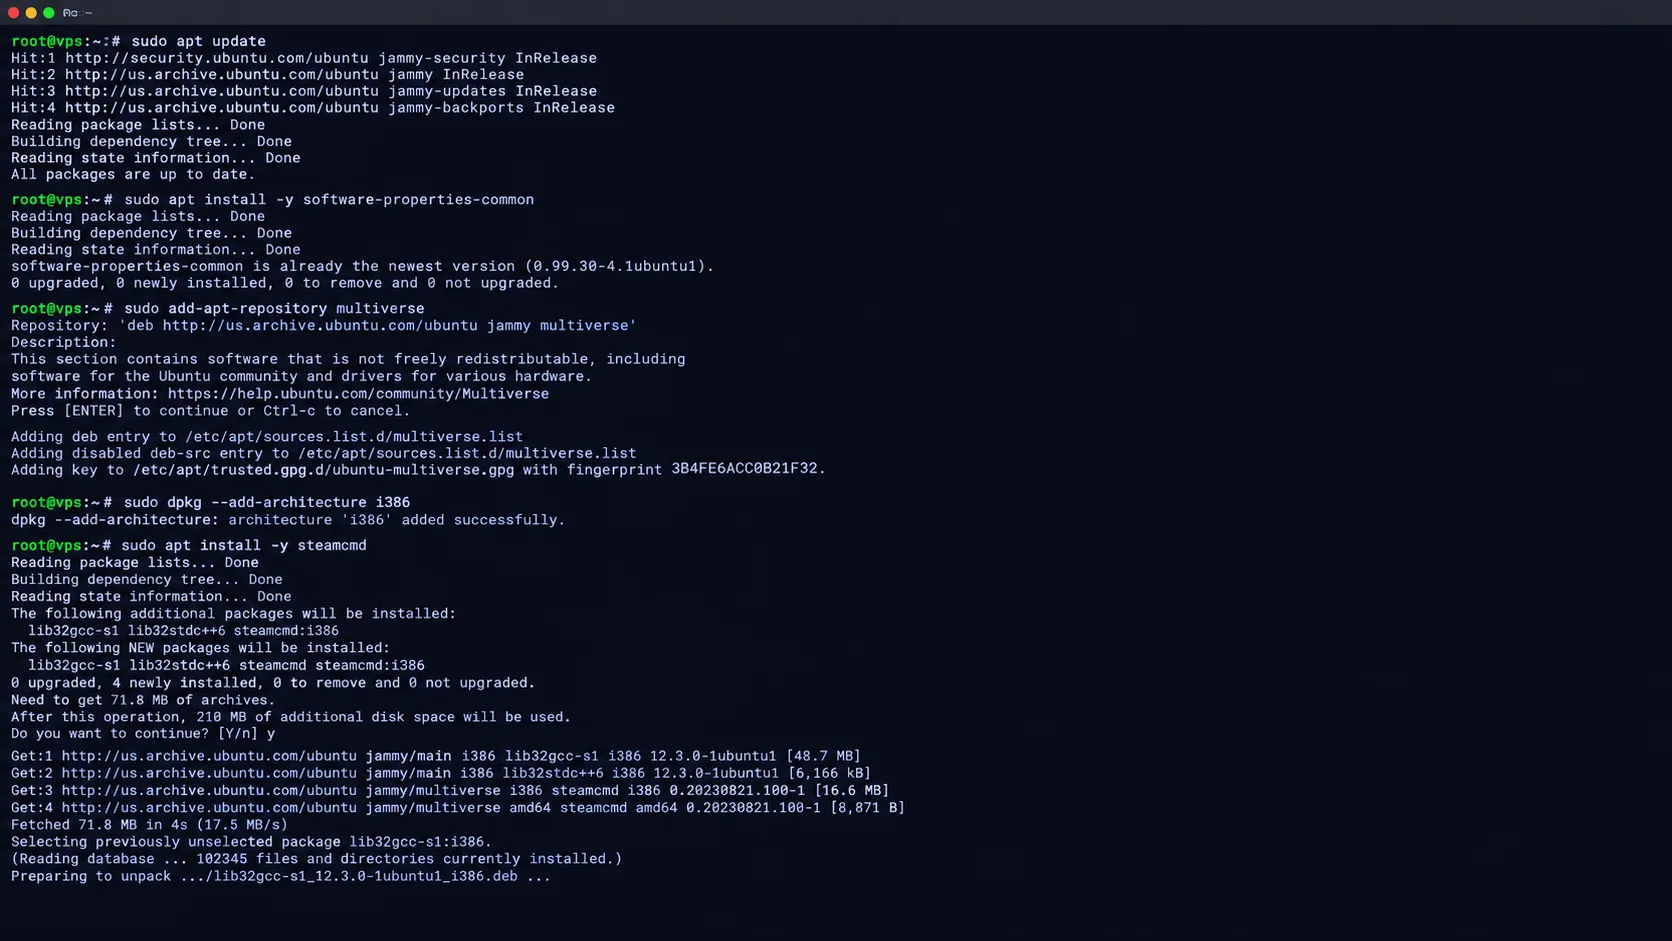
With the operating system ready, the next stage is to install the game server software. We will walk through Counter-Strike 2 on Linux as the working example.
First, enable the repositories SteamCMD needs. On Ubuntu, this means enabling the multiverse repository and adding 32-bit architecture support, since SteamCMD depends on both.
sudo apt update

sudo apt install -y software-properties-common

sudo add-apt-repository multiverse

sudo dpkg --add-architecture i386

sudo apt install -y steamcmd
Next, create the non-root user that will own and run the server files. A common choice is a user simply named “steam.”
Switch to that user, then run the install command with the correct App ID. CS2 uses App ID 730, the same ID as the CS2 client.
mkdir -p ~/cs2-server

steamcmd +force_install_dir ~/cs2-server +login anonymous +app_update 730 validate +quit
This download is close to 60GB, so plan for storage space and a wait of 10 to 30 minutes on most connections. Watch the console output for a clear success message once the update finishes. That confirms the installation completed without errors.
CS2 needs one more step that older CS:GO guides never mention: a steamclient. So symlink. Without it, CS2 cannot find the client library it needs to start.
mkdir -p ~/.steam/sdk64

ln -s ~/.local/share/Steam/steamcmd/linux64/steamclient.so ~/.steam/sdk64/steamclient.so
After that, generate a Game Server Login Token, known as a GSLT, from Steam’s Game Server Account Management page. Without a valid GSLT, the server will not appear in the public browser, and clients may fail to connect normally.
Each server instance needs its own separate token. Reusing one token across multiple servers will cause conflicts and connection failures.
Step 3: Configuring the Server Files
Server behavior is determined by a config file, typically named server.cfg, found inside the install directory. Open it in any text editor to set the basics.
Set a clear so players can identify your server in a list. Set an RCON password so you can manage the server remotely without direct console access.
Set the max player count and a starting tickrate that fits the game mode you plan to run, whether casual, competitive, or something custom.
Pass the GSLT into your launch command with the Steam account flag, rather than leaving it out or hardcoding it in an insecure location.
Set LAN mode to off inside server.cfg. LAN mode hides the server from the web browser entirely, even if all other settings look correct.
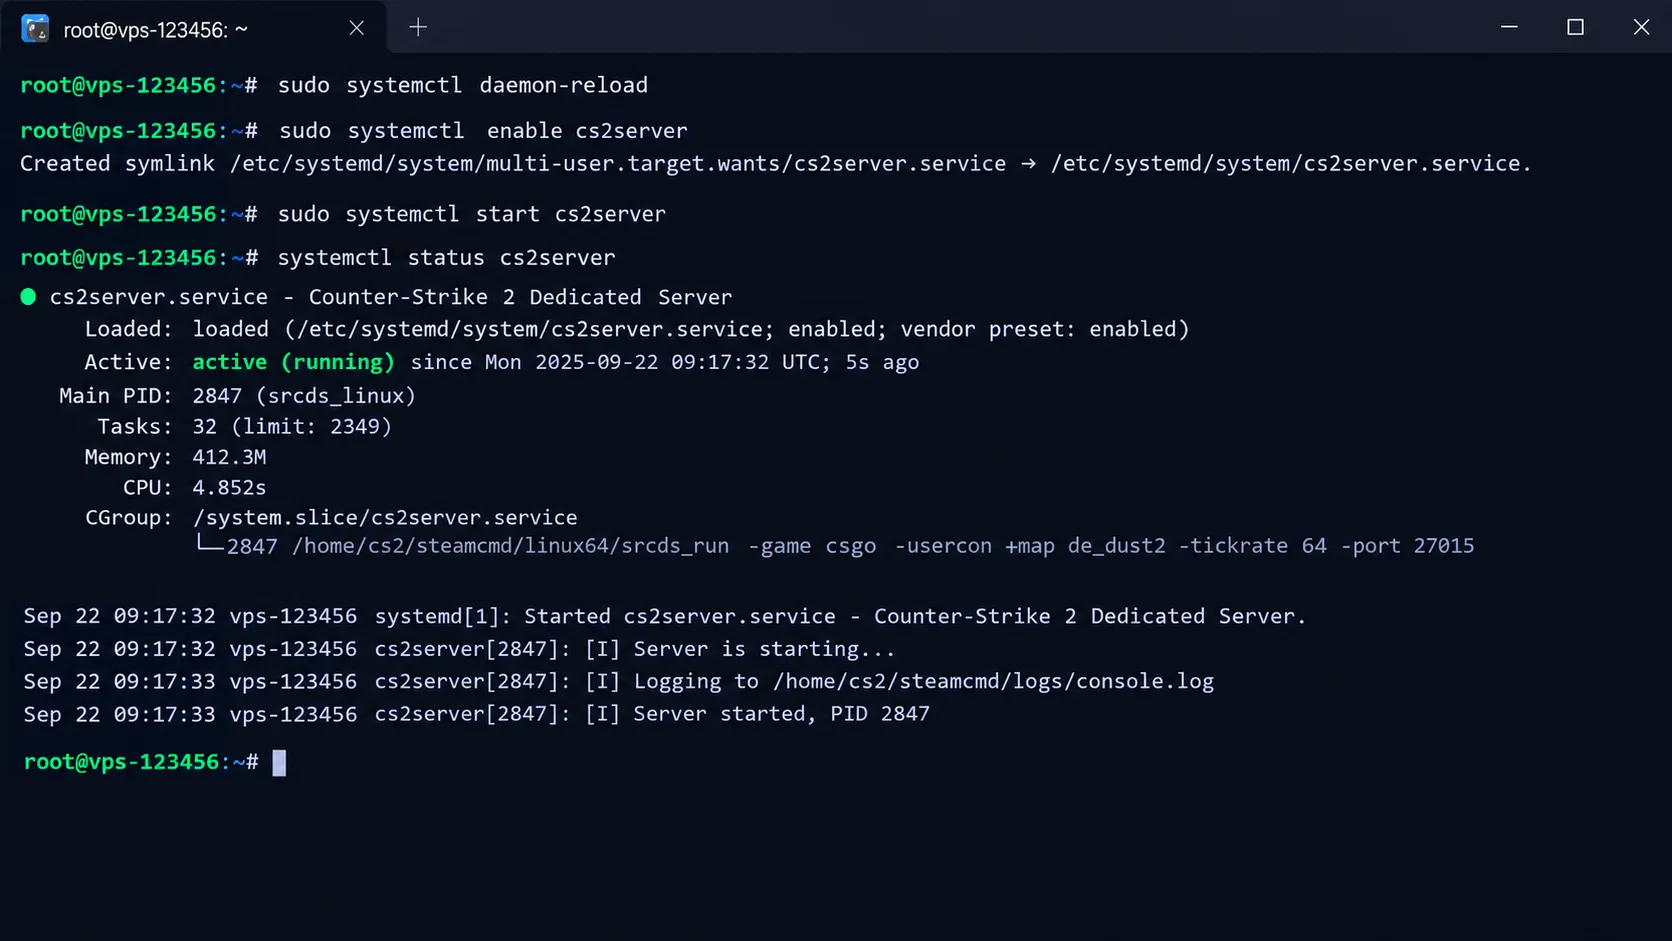
Finally, wrap the launch command in a systemd service. This keeps the server running after a reboot and restarts it automatically if the process crashes.
sudo systemctl daemon-reload

sudo systemctl enable cs2server

sudo systemctl start cs2server
Common mistakes at this stage include a typo in the RCON password field, a missing quote around a value, or a map name that does not match an installed map. Any of these can cause the server to fail silently on startup.
Step 4: Network Configuration: Port Forwarding and Firewall Rules
A working install still needs the right network path open before real players can connect from outside your network.
Start by identifying the exact ports the game needs. CS2, along with most Source engine titles, uses port 27015 for main game traffic over UDP, with additional ports for features such as SourceTV.
If you are self-hosting from a home network behind a router, you will need to forward these ports to the server’s internal IP address inside your router’s admin panel.
If you are running a rented dedicated server, the process looks different. You open the matching ports directly in the server’s own firewall, since there is no home router involved.
A static IP, or a Dynamic DNS setup if your address changes, gives players a stable way to reconnect without hunting for a new address every session.
Before inviting anyone, test the ports from outside your own network using a simple external port-check tool. This step alone catches most connection problems before players ever see them.
Step 5: Launching and Testing the Server
With the software installed and the network open, start the server process and watch the console for confirmation that it is running and queryable.
Connect to it from a separate client machine to check tick rate, response time, and general stability under a light load.
Run a small test session with two or three players before opening the server to the public. This catches config errors and network issues while the stakes stay low.
Step 6: Keeping the Server Running: Updates, Backups, and Uptime
A server that works on day one still needs upkeep to keep working months later.
Automated restarts on crash, handled through the same systemd service used at launch, keep the server available without anyone watching it around the clock.
Schedule the same update command used during install as your standard patch routine. Running app_update against the same App ID pulls in new game patches as they release.
Back up your config files and any save or world data before applying a major update. A failed patch should never mean losing hours of progress or custom settings.
Keep an eye on CPU and RAM headroom as your player count grows. A server that ran fine at ten players may need more resources at thirty.
Troubleshooting Common Dedicated Server Problems
Even with a correct setup, errors can occur at some point. Here are the ones players and admins hit most often, along with the fix for each.
1) The server does not appear in the public browser. Confirm sv_lan is set to 0 in server.cfg, since LAN mode hides the server from the internet list. Check that the GSLT is valid and that the console shows a successful connection to Steam. Listings can take up to 5 minutes to appear, so connect via direct IP or favorites while you wait.
2) “Invalid or expired GSLT” error. This usually traces back to one of a few causes. The token may have expired due to prolonged inactivity, the owning Steam account may be banned, the token may already be in use on another server, or the config line may have a small typo.
3) VAC shows as disabled on a server that should be secure. Check for a missing or invalid GSLT first. A flagged plugin or binary extension can also disable VAC, as can having sv_cheats set to 1 in the config. A full restart, not just a map change, clears this state.
4) Players connect fine on the local network but not from outside it. This points to a port forwarding or firewall gap almost every time, not a game setting. Confirm the UDP game port is open and forwarded to the correct, current server address.
5) The server starts, then crashes right away. Check the systemd journal or server logs before guessing at a cause. Most crashes trace back to a malformed line in server.cfg or a missing map reference.
6) High latency or noticeable rubber-banding despite strong hardware. Since multiplayer game logic runs on a single CPU thread, adding more cores will not fix this on its own. Single-thread clock speed and network path carry far more weight here.
7) “steamclient.so not found” or a similar library error. This almost always means the symlink step during install was skipped or points to the wrong file path.
8) Connection failures are tied to a specific network or region. Some networks, including school and corporate connections, block or throttle the UDP traffic that game servers depend on. Rule this out before assuming the server itself is misconfigured.
FAQs
How much RAM do I need for a game server?
Most titles run comfortably on 8GB, with 16GB giving more room for larger player counts and mods. Always check the specific game’s own published requirements, since needs vary widely by title.
Is a dedicated server better than a u003ca href=u0022https://truehost.co.ke/how-to-choose-the-right-os-for-your-vps/u0022u003eVPSu003c/au003e for gaming?
For public servers or competitive play, yes. A dedicated server gives you the full machine, with no other tenant’s traffic or workload competing for the same CPU and memory.
Do I need a GSLT for every game, or just Source engine titles?
GSLTs are a Valve requirement for Source engine and Steam-based titles, including CS2 and Team Fortress 2. Games outside the Steam ecosystem use their own separate authentication methods.
How many players can a dedicated server support?
This depends on the game, the tick rate you run, and your hardware specs. A modest CPU with 8GB of RAM can often handle a standard-sized public server without strain.
Is renting or owning a dedicated server cheaper for gaming?
Renting costs less upfront and shifts maintenance to the provider. Owning costs more at the start but saves money in the long run once you pass the break-even point.
Set Up Your Dedicated Gaming Server Today
Setting up a dedicated gaming server takes a real amount of upfront technical work. That work pays off the first time a player’s home PC crashes, and the match keeps running anyway.
The steps here, provisioning the box, installing the game server, opening the right ports, and keeping it patched, cover the setup most multiplayer titles need on Steam and beyond.
If you are ready to provision the machine this guide just walked through, check Truehost’s dedicated server plans and pick one sized to your expected player count.