Domain SearchInstantly check and register your preferred domain name
 Web Hosting
 cPanel HostingHosting powered by cPanel (Most user friendly)
 KE Domains
 Reseller HostingStart your own hosting business without tech hustles
 Windows HostingOptimized for Windows-based applications and sites.
 Free Domain
 Affiliate ProgramEarn commissions by referring customers to our platforms
 Free HostingTest our SSD Hosting for free, for life (1GB storage)
 All DomainsBrowse and register domain extensions from around the world
 .Com Domain
 WhoisLook up domain ownership, expiry dates, and registrar information
 VPS Hosting
 Managed VPSNon techy? Opt for fully managed VPS server
 Dedicated ServersEnjoy unmatched power and control with your own physical server.
 SupportOur support guides cover everything you need to know about our services
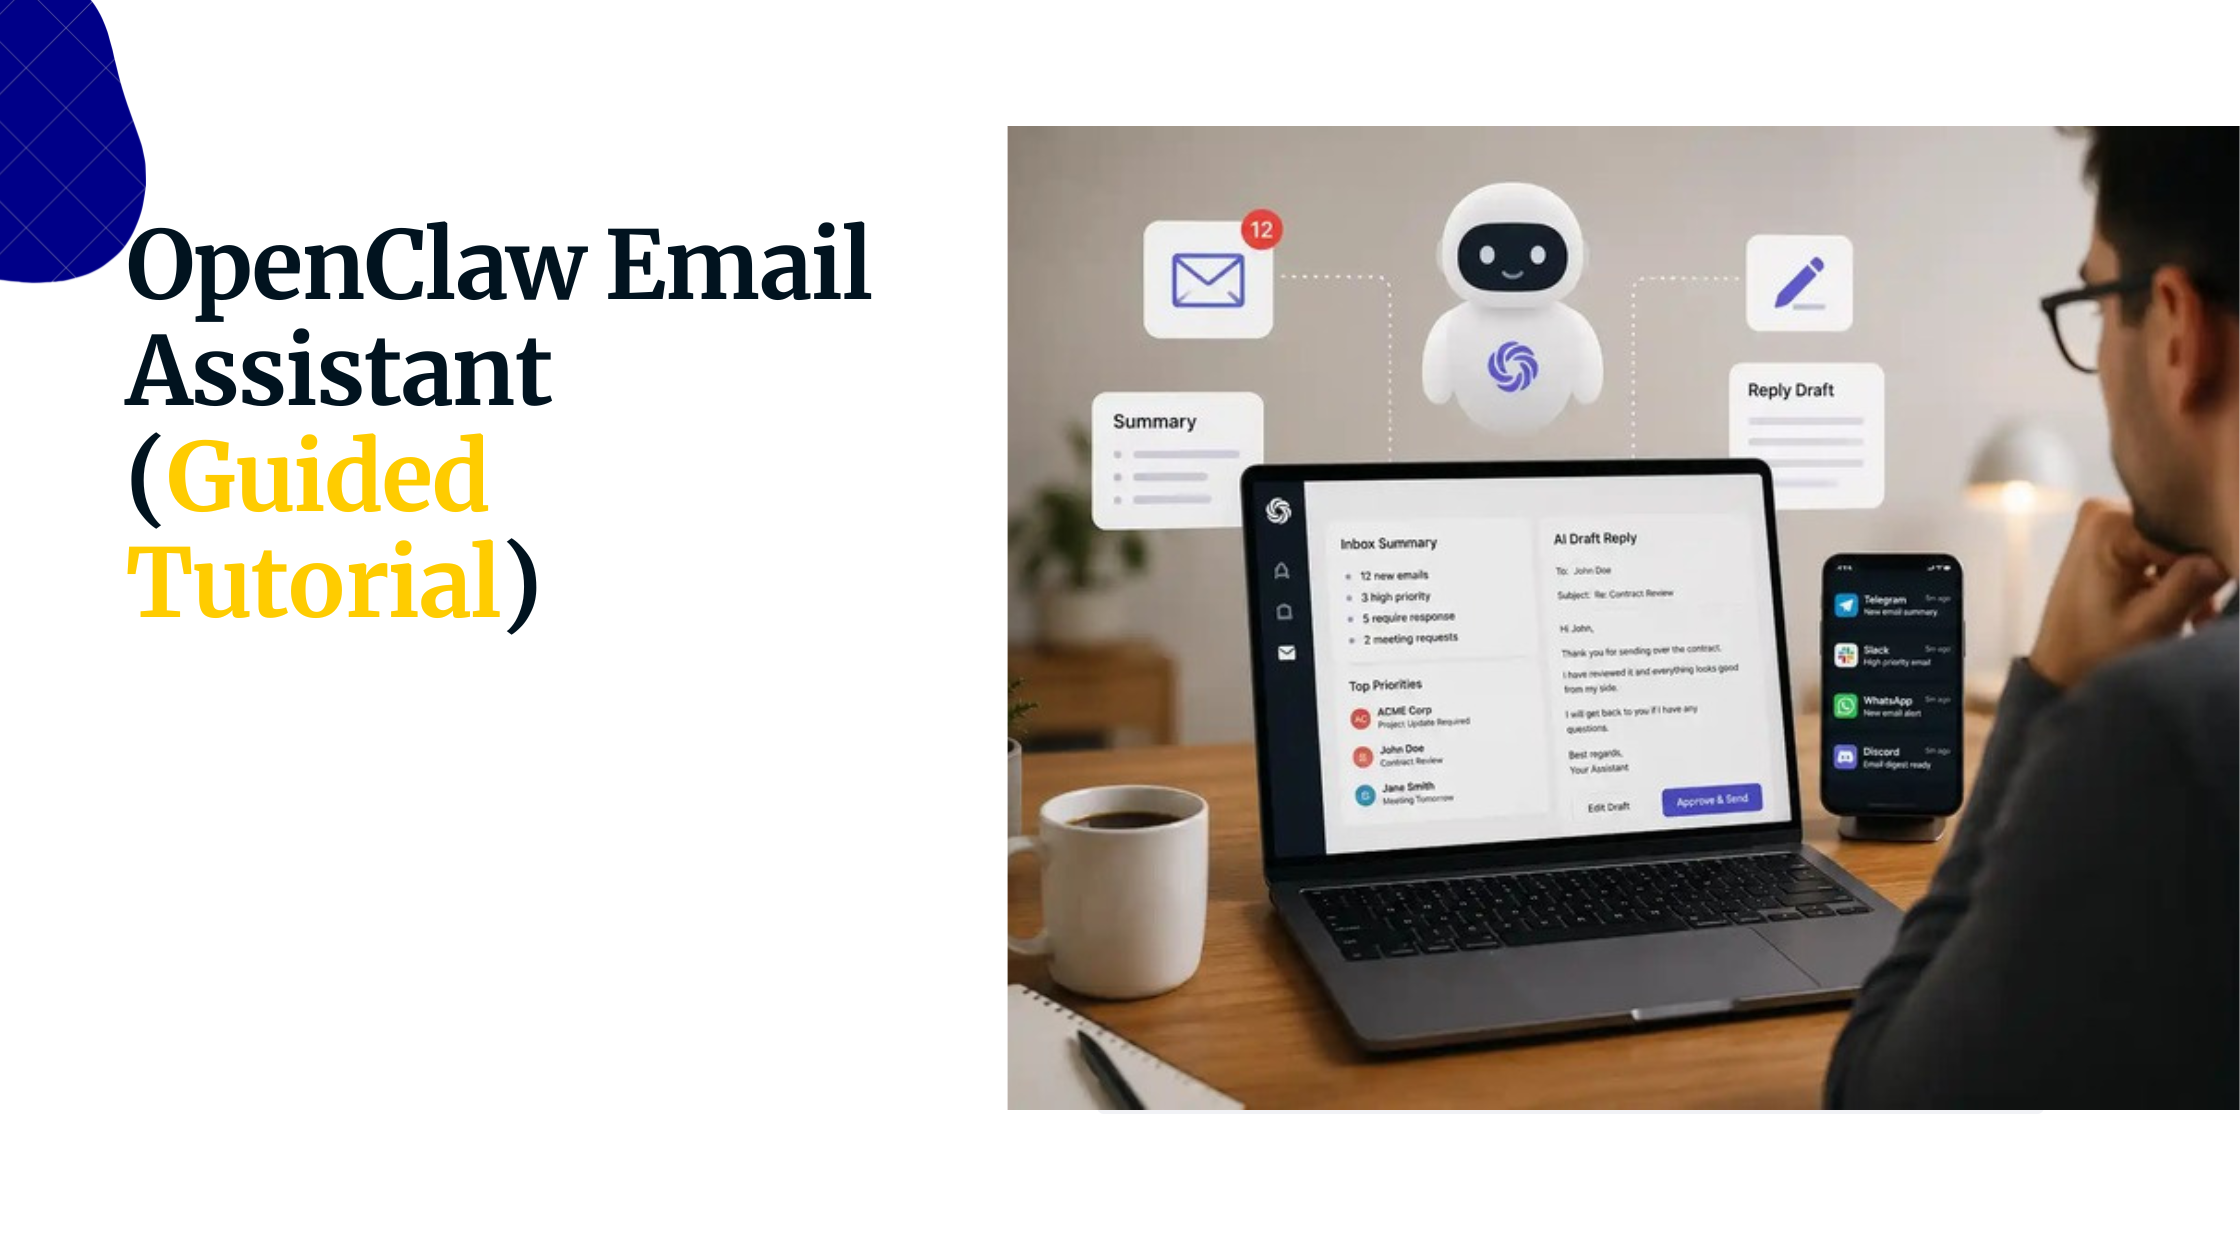
Running an AI agent that works around the clock takes more than a browser tab left open on your laptop. If you want OpenClaw to send Telegram messages while you sleep, generate morning reports, or handle scheduled tasks automatically, it needs a server that stays online 24/7.
OpenClaw is an open-source AI agent framework that supports models like Claude, GPT-4o, and locally hosted LLMs. It can automate browser tasks, manage schedules, connect to messaging platforms, and extend its capabilities through ClawHub skills. To get the most from it, you need a deployment that stays available even when your computer is turned off.
While OpenClaw can run locally for testing, a VPS is a better long-term option. Your laptop has to stay powered on, connected to the internet, and free from interruptions. A VPS removes those limitations, allowing your agent to keep working whether you’re offline, traveling, or asleep.
For most deployments, Ubuntu 22.04 LTS is the ideal choice. It offers long-term support, excellent Node.js compatibility, a large support community, and built-in tools like systemd that make managing OpenClaw much easier. Ubuntu 24.04 LTS works as well, but Ubuntu 22.04 remains the most widely tested option.
Before choosing a server, decide whether you’ll use external AI APIs or run a local model. Most users are better off starting with services like Claude or GPT-4o, since OpenClaw itself requires relatively modest resources and the heavy AI processing happens on the provider’s infrastructure.
| Tier | RAM | vCPUs | Storage | Best For |
| Minimum | 2 GB | 1–2 | 500 MB+ free | Basic text-based workflows |
| Recommended | 4 GB | 2 | 5 GB+ free | Browser automation, skills, and conversation history |
| Local LLM | 30 GB+ | 6+ | 30 GB+ | Running models like Mistral or LLaMA locally |
If you plan to host a local LLM, you’ll also need a GPU with sufficient VRAM, which usually means a dedicated GPU VPS and higher monthly costs. Starting with external APIs keeps things simpler and more affordable.
In this guide, you’ll learn how to deploy OpenClaw on an Ubuntu VPS, secure it with Nginx and SSL, run it as a system service, and configure it for reliable 24/7 operation.
Step 1: Picking a Server
What You Actually Need
- OS: Ubuntu 22.04 LTS (fresh install, don’t reuse a server with existing packages)
- RAM: 4 GB recommended; 2 GB minimum
- vCPUs: 2
- Storage: 20 GB SSD; keep at least 5 GB free at all times for logs and conversation history
- GPU: Not required if you’re using external AI APIs
Start from a clean Ubuntu installation. Reusing a server that’s been running other services introduces package conflicts and permission issues that are disproportionately annoying to debug.
Provider Quick-Picks
The table below covers four solid options across different price points and geographies. All have been tested on Ubuntu 22.04 LTS and support the SSH key workflows used in this guide.
| Provider | Plan | vCPUs | RAM | Storage | Bandwidth | Monthly Cost |
| Truehost | OpenClaw KVM 1 | 1 core | 2 GB | 50 GB NVMe | 4 TB | KES 1,999 |
| Hetzner | CX22 | 2 vCPUs | 4 GB | 40 GB NVMe | 20 TB | €3.79 (~$4.15) |
| Hetzner | CX32 | 4 vCPUs | 8 GB | 80 GB NVMe | 20 TB | €6.80 (~$7.40) |
| Contabo | Cloud VPS 1 | 4 vCPUs | 8 GB | 75 GB NVMe / 150 GB SSD | Unlimited | $4.50 |
A note on provider selection: don’t optimize purely on price. A $2/month provider with no documentation and a single-person support team will cost you more in lost hours than a $6/month provider with a one-click deployment option and an active community forum. Prioritize documentation quality, uptime SLAs, and support responsiveness.
Truehost deserves a specific mention for users based in East Africa. Their Nairobi data center means significantly lower latency for Kenyan users, and their OpenClaw KVM 1 plan comes pre-configured with OpenClaw already installed, which means you can skip Step 3 of this guide entirely if you choose them.
Once you’ve spun up your server and have its IP address, SSH in with:
ssh root@YOUR_SERVER_IP
You’re ready for the next step.
Step 2: Harden the Server Before Installing Anything
This step comes before the OpenClaw install on purpose. A fresh Ubuntu server accepts password-based SSH logins from any IP on the internet, runs everything as root, and has no firewall. Spend 10 minutes here, and you’ll never have a bad day because of it.
Stop using root for everything. If a skill misbehaves or gets compromised while running as root, the blast radius is the entire server. Create a regular user, give it sudo access, and use that from here on:
adduser deployer && usermod -aG sudo deployer
Switch to SSH keys and turn off passwords. Generate an ed25519 key on your local machine, copy it to the server with ssh-copy-id, then open /etc/ssh/sshd_config and set PermitRootLogin no and PasswordAuthentication no. Restart SSH with sudo systemctl restart sshd, and test from a second terminal before closing your current session. Locking yourself out here is a rite of passage nobody needs.
Set up the firewall. Ubuntu ships with ufw. Deny all incoming by default, allow SSH with rate limiting, and open ports 80 and 443. Port 18789, OpenClaw’s gateway port, stays closed to the outside world. Nginx handles that later.
sudo ufw default deny incoming
sudo ufw limit ssh
sudo ufw allow 80/tcp && sudo ufw allow 443/tcp
sudo ufw enable
Install fail2ban. One command, automatic protection against brute-force SSH attempts. Just do it:
sudo apt install fail2ban -y && sudo systemctl enable --now fail2ban
Step 3: Install OpenClaw
Create a dedicated service user before touching any files. OpenClaw will run as this user, not as root, not as you:
sudo adduser --system --group --no-create-home openclawops
Install dependencies and Node.js 22+. OpenClaw requires Node.js 22 or higher; the version in Ubuntu’s default repositories is typically older, so pull it from NodeSource:
sudo apt update && sudo apt install -y git curl build-essential python3
curl -fsSL https://deb.nodesource.com/setup_22.x | sudo -E bash -
sudo apt install -y nodejs
Run node –version before continuing. If it’s anything below v22, stop and fix it; everything after this depends on it.
Set up the project directory, owned by your service user:
sudo mkdir -p /opt/openclaw
sudo chown openclawops:openclawops /opt/openclaw && sudo chmod 750 /opt/openclaw
Switch to the service user, then install:
sudo -u openclawops bash
cd /opt/openclaw
npm install -g @openclaw/openclaw && openclaw init
init generates your directory structure, a SOUL.md file, a skills/ folder, and a .env template.
Configure your .env file. Open /opt/openclaw/.env and drop in your API key Anthropic, OpenAI, or OpenRouter) and your Telegram bot token. Telegram is the easiest first channel because it requires no port forwarding; OpenClaw polls Telegram’s API, so all traffic is outbound. Get your bot token from @BotFather on Telegram. Set GATEWAY_HOST=127.0.0.1 to keep the gateway on loopback only. Then lock down the file:
chmod 600 /opt/openclaw/.env
Never commit .env to version control. Never hardcode keys anywhere else.
Test the install manually before handing anything off to systemd. Run openclaw start as the service user and watch the output.
A bad API key, missing dependency, or port conflict will surface here in plain language, much easier to fix now than after it’s running as a background service. Once your bot responds to /start on Telegram, kill the process and move on.
Step 4: Make It Run Forever with systemd
A process that dies when you log out isn’t a server; it’s a demo. systemd turns OpenClaw into a proper background service that survives reboots and restarts itself on crashes.
It’s also a better choice than pm2 because security hardening, user context, filesystem restrictions, and resource limits live directly in the unit file, managed by the OS.
Create /etc/systemd/system/openclaw.service:
[Unit]
Description=OpenClaw AI Agent Gateway
After=network-online.target
[Service]
User=openclawops
WorkingDirectory=/opt/openclaw
EnvironmentFile=/opt/openclaw/.env
ExecStart=/usr/local/bin/openclaw start
Restart=always
RestartSec=10
NoNewPrivileges=true
ProtectSystem=strict
ReadWritePaths=/opt/openclaw
[Install]
WantedBy=multi-user.target
Restart=always with a 10-second delay means crashes don’t spiral into API hammering. ProtectSystem=strict makes the filesystem read-only for this process except for /opt/openclaw. Then enable and start:
sudo systemctl daemon-reload
sudo systemctl enable --now openclaw
sudo systemctl status openclaw
Watch logs live with journalctl -u openclaw -f. Before moving on, run ss -tlnp | grep 18789 and confirm the gateway shows 127.0.0.1:18789, not 0.0.0.0. If it’s the latter, fix GATEWAY_HOST in your .env before continuing.
Step 5: HTTPS and Your Domain

OpenClaw works but is only reachable from the server itself. This step puts it on the internet properly. You’ll need a domain with an A record pointing to your server IP; most registrars propagate this within a few minutes.
Install Nginx, write a server block that proxies traffic from your domain to localhost:18789, then symlink it to sites-enabled and test the config:
sudo apt install nginx -y
# Create /etc/nginx/sites-available/openclaw with proxy_pass http://127.0.0.1:18789
sudo ln -s /etc/nginx/sites-available/openclaw /etc/nginx/sites-enabled/
sudo nginx -t && sudo systemctl reload nginx
Then get your SSL certificate:
sudo apt install certbot python3-certbot-nginx -y
sudo certbot –nginx -d openclaw.yourdomain.com
Certbot modifies your Nginx config automatically and sets up HTTPS redirects. Run sudo certbot renew –dry-run to confirm auto-renewal works. You want to find out it’s broken now, not at 2 a.m. when your cert expires.
Finally, in your .env, make sure GATEWAY_TRUSTED_PROXIES=127.0.0.1 and GATEWAY_PASSWORD are set, then restart OpenClaw. Your dashboard is now live at https://openclaw.yourdomain.com.
Step 6: Make It Actually Useful

Write your SOUL.md. This is your agent’s identity document: its name, purpose, what it should proactively do, what it’s never allowed to do, and how it handles ambiguous requests. Think of it as onboarding a new employee: vague instructions produce vague results. “Be helpful” is not a constraint. “Never message anyone outside my contacts without explicit confirmation” is. Spend 30 minutes here rather than 5; the quality of this file has an outsized impact on how useful the agent actually is.
Install skills from ClawHub. ClawHub is a public registry of packaged capabilities, browser automation, web scraping, and API integrations. Install with openclaw skills install @clawHub/skill-name, and always enable new skills in sandboxed mode first (--sandbox flag). Sandboxed mode logs every filesystem and network action. Review it before removing the restrictions.
Set up scheduled tasks with the Heartbeat Engine. This is where the “autonomous” part kicks in. Edit heartbeat.yaml and define tasks using standard cron syntax: a morning briefing at 7 a.m., a system health check every 15 minutes, a weekly summary every Monday.
The agent runs them independently and sends results to whatever channel you’ve configured.
Test everything. Send a message from Telegram, watch the logs, and run ss -tlnp to confirm only ports 22, 80, and 443 are listening. If all three pass, you’re done.
Ongoing Maintenance
Keeping OpenClaw updated: always check the changelog for breaking changes before upgrading, particularly around SOUL.md format or .env variables. For native installs: npm install -g @openclaw/openclaw@latest, then restart the service. After major version bumps, run openclaw start manually first so migration errors surface in your terminal rather than silently in the journal.
Log rotation: journald handles its own logs, but skill output and conversation history written to disk can grow unbounded. Set a cron job to delete logs older than 30 days, and check disk usage regularly.
A full disk will cause OpenClaw to stop writing history and, in some configs, crash entirely.
Backups: four things matter: SOUL.md, .env (encrypted), your skills/ config, and the data/ directory if you want conversation continuity after a restore. Daily rsync to a remote destination covers the first three. Store .env separately in a password manager or encrypted vault, never in the same location as everything else unencrypted.
Monitoring uptime: UptimeRobot’s free tier checks your HTTPS endpoint every 5 minutes and alerts you by email or Telegram if it goes down. For deeper coverage, add a Heartbeat task that pings an ntfy.sh topic every 10 minutes. If the pings stop, your phone knows before you do.
Your OpenClaw Assistant Is Now Running 24/7
You’ve gone from a blank Ubuntu VPS to a hardened, production-grade AI agent. SSH key auth, a locked-down firewall, a dedicated service user, systemd restart policies, Nginx with SSL, scheduled tasks, and uptime monitoring- it’s all in place.
The agent will now run continuously, execute scheduled tasks, respond to Telegram messages, and restart itself if anything goes wrong, all without any intervention from you.
OpenClaw on an Ubuntu VPS: FAQs
Does OpenClaw work on Ubuntu 24.04?
Yes, without any changes to the steps in this guide. The one thing to watch: 24.04 ships with Python 3.12, which is newer than some skill dependencies expect. If you hit Python errors during skill installation, check the skill’s README for version requirements.
Do I need a desktop or GUI?
No. OpenClaw runs entirely from the command line. Ubuntu Server is the right choice for a VPS: less RAM usage, smaller attack surface.
How much RAM does OpenClaw need?
The core process uses around 200–400 MB at idle. Browser automation can spike that to 1–1.5 GB while a browser instance is active. 4 GB gives you comfortable headroom; 2 GB is workable but tight if you’re running browser-heavy workflows.
How do I check if OpenClaw is running?
Run sudo systemctl status openclaw for a quick status check, or journalctl -u openclaw -f to watch live logs. Use ss -tlnp to see what’s listening on which ports.
How do I update OpenClaw?
Check the changelog for breaking changes first, then run npm install -g @openclaw/openclaw@latest as the service user and restart the service. After major version bumps, start it manually once so any migration errors show up in your terminal rather than silently in the journal.
How do I uninstall OpenClaw?
Stop and disable the service, delete the unit file, remove the /opt/openclaw directory, delete the openclawops user, and uninstall the npm package. This leaves Node.js, Nginx, and Certbot in place; remove those separately if you no longer need them.
Can I run OpenClaw on any cloud provider?
Yes. It works on any VPS or cloud instance running Ubuntu 22.04 or 24.04 LTS, Truehost, Hetzner, Contabo, DigitalOcean, AWS, Google Cloud, Vultr, all of them.
Can I run multiple agents on one machine?
Yes. Each agent needs its own service user, working directory, .env, systemd unit file, port, and Nginx server block. It’s practical on a machine with 8 GB RAM or more.
What do I do when OpenClaw won’t start?
Start with journalctl -u openclaw -n 50; the output will usually tell you exactly what’s wrong. The most common culprits are a Node.js version below 22, a bad or expired API key, a port conflict on 18789, or a permission issue on /opt/openclaw. If it starts fine in manual mode but fails via systemd, the problem is almost always a wrong path in the unit file; double-check WorkingDirectory and EnvironmentFile.