Domain SearchInstantly check and register your preferred domain name
 Web Hosting
 cPanel HostingHosting powered by cPanel (Most user friendly)
 KE Domains
 Reseller HostingStart your own hosting business without tech hustles
 Windows HostingOptimized for Windows-based applications and sites.
 Free Domain
 Affiliate ProgramEarn commissions by referring customers to our platforms
 Free HostingTest our SSD Hosting for free, for life (1GB storage)
 All DomainsBrowse and register domain extensions from around the world
 .Com Domain
 WhoisLook up domain ownership, expiry dates, and registrar information
 VPS Hosting
 Managed VPSNon techy? Opt for fully managed VPS server
 Dedicated ServersEnjoy unmatched power and control with your own physical server.
 SupportOur support guides cover everything you need to know about our services
If your website has started to feel slower than before, or you keep hitting limits on your current hosting plan, you’re probably at a turning point. More visitors, more content, more demand, and your shared hosting is struggling to keep up.
Moving to VPS hosting is the natural next step. But for many website owners, the word migration triggers a specific kind of dread. What if the site breaks? What if you lose data? What if it’s down for hours while your customers are trying to reach you?
Those concerns are valid, and this guide addresses all of them directly.
Before you start, it helps to know whether you actually need to migrate. Here are the clearest signs:
- Your pages have slowed down noticeably even without a traffic spike
- Your hosting provider has flagged or suspended you for using too many shared resources
- You’re running WooCommerce, a membership site, or a custom application that needs stable RAM
- Traffic spikes are causing your site to crash or become unresponsive
- You need root access or the ability to install custom software
If two or more of those apply, you’re ready. Let’s walk through how to move safely, step by step.
A Step-by-Step Process
This step-by-step process breaks the VPS migration journey into clear, manageable actions you can follow with confidence.
Each step builds on the last, helping you move your website safely, avoid common mistakes, and get the best performance from your new VPS, without unnecessary stress or downtime.
1) Backup Your Website Before Migration
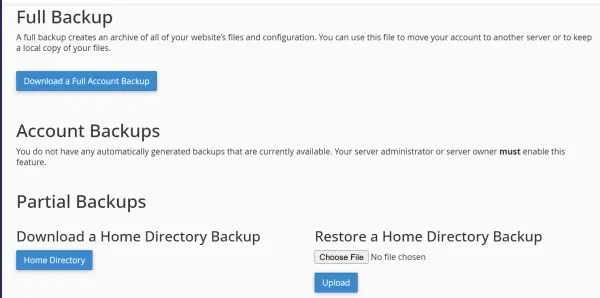
Before you even think about moving your website, stop and make a full backup. This step is not optional. It’s your insurance.
Website migrations usually go smoothly, but if something breaks, a file goes missing, a database fails to import, or settings get mixed up, a backup is what saves you. Without it, you’re guessing. With it, you’re in control.
How to back up your website properly:
- cPanel full backup
Most hosting providers give you a one-click option to download a complete backup. This includes your files, databases, emails, and settings.
- FTP file download
Using tools like FileZilla, you can manually download all your website files to your computer. This is useful as an extra layer of safety. - Database export
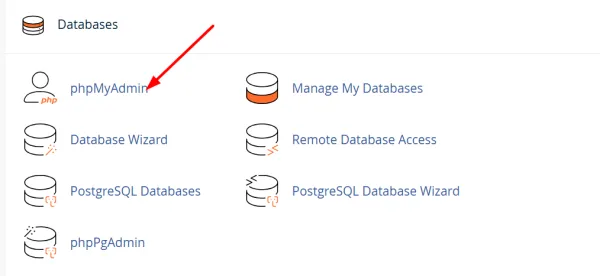
Open phpMyAdmin and export each database as a .sql file. Your content, users, and settings live here; don’t skip this.
2) Choose the Right VPS Plan
Choosing a VPS plan isn’t about getting the biggest server available. It’s about choosing what your website actually needs today, with room to grow tomorrow.
If your plan is too small, performance suffers. If it’s too large, you pay for unused resources.
When choosing a VPS plan, it helps to focus on a few core essentials. These are the things that directly affect how your website performs day to day.
i) RAM and CPU
These two work together to determine how fast your website responds when someone visits. If traffic suddenly increases, enough RAM and CPU power ensure your pages still load smoothly instead of freezing or timing out.
The more resources available, the easier it is for your site to handle multiple visitors at once.
ii) Storage type and size
Where your website files are stored also matters. SSD storage is much faster than traditional HDD, which means pages load quicker and data is accessed more efficiently. This speed difference is noticeable, especially on content-heavy or e-commerce websites.
iii) Bandwidth
Bandwidth controls how much data your website can send to visitors. If your site gets more traffic than your plan allows, it may slow down or stop loading altogether. Choosing enough bandwidth ensures your site stays online and responsive, even during busy periods.
iv) Operating system
Most websites run perfectly on Linux, which is stable, secure, and widely supported. Windows servers are only necessary if your site relies on specific Microsoft technologies. Choosing the right operating system keeps things simple and compatible.
3) Set Up Your VPS Server
Once your VPS is active, it needs a basic setup before it’s ready to host your website. If you’re on a managed VPS, Truehost handles this for you, you can skip to Step 4.
If you’re setting up an unmanaged VPS yourself, here’s what the process involves:
- Choose and install your operating system Most websites run on Linux, it’s stable, widely supported, and what most hosting guides assume. Ubuntu and CentOS are the most common choices. Windows server is only needed if your site relies on Microsoft-specific technologies like ASP.NET.
- Install a control panel A control panel like cPanel or Plesk gives you a visual dashboard to manage your files, databases, and email, without needing to type commands. If you’re not comfortable with the command line, installing a control panel first makes every step after this significantly easier.
- Configure basic firewall rules Your VPS is exposed to the internet the moment it’s active. Before you transfer any files, set up a basic firewall to block unwanted traffic. Most Linux systems come with UFW (Uncomplicated Firewall) built in, enable it and allow only the ports you need (typically 22 for SSH, 80 for HTTP, 443 for HTTPS).
- Enable SSH access SSH lets you connect to your server securely from your computer. Think of it as a direct line to your server’s brain. You’ll use it to run commands, install software, and fix things if something breaks. Most VPS providers give you SSH credentials when your server is activated.
Not comfortable with any of this? That’s completely fine, it’s exactly what managed VPS is for. Truehost’s managed VPS plans include full server setup so you can focus on your website, not the server.
4) Transfer Your Website Files and Databases
This is the actual migration, moving your website from the old server to the VPS.
Take your time here. Rushing increases the chance of mistakes.
How the transfer usually works:
- Upload website files using FTP or SFTP
- Import databases using phpMyAdmin or command line tools
- Ensure folder structures remain unchanged
Before moving on, load your site using the VPS IP or a temporary URL to confirm everything works.
5) Update Website Configurations
After transferring files, your website still needs to “connect” properly to the new server.
Some settings won’t automatically adjust.
What needs updating:
- Database names, usernames, and passwords
- Configuration files like wp-config.php
- Email and mail server settings
- File and folder permissions
This step is where many migration issues happen. Slow down, double-check everything, and test after each change.
6) Test Your Website Thoroughly
Before you make the VPS live, test everything as if you were a visitor.
Don’t assume things work; confirm they do.
When testing your website before going live on your VPS, it’s important to check more than just whether pages appear. Each element affects your visitors’ experience and your site’s overall performance.
- Page loading speed
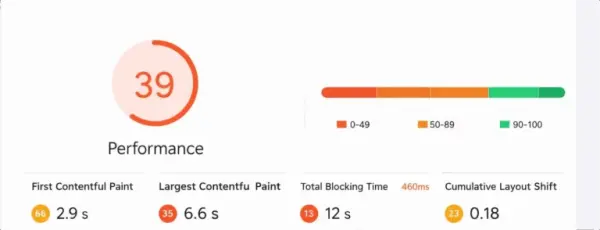
Slow-loading pages frustrate visitors and can drive them away. Test how fast your site loads on different devices and browsers. Even a few extra seconds can impact engagement and sales. Tools like GTMetrix or Pingdom can give clear insights.
- Navigation and internal links
Menus, buttons, and links need to work smoothly. Broken links or confusing navigation can leave users stuck or lost, reducing the chances they’ll stay or complete an action. Click through every section as if you were a visitor.
- Contact forms and login pages
Forms and logins are often critical for communication and user access. Make sure submissions go through correctly and that login processes are simple. Any error here can affect user trust.
- Checkout and payment flows
If you run an online store, test every step of the checkout process. From adding items to the cart to completing payment, every step must work without glitches. A small issue can result in lost orders and revenue.
- Mobile and tablet responsiveness
More than half of web traffic comes from mobile devices. Make sure your site looks good, loads fast, and functions properly on smartphones and tablets. Buttons should be tappable, text readable, and pages should resize smoothly.
Performance tools like GTMetrix or Pingdom can help you spot speed issues early.
7) Go Live by Updating DNS
When you’re confident everything works on the new VPS, it’s time to point your domain to it. This is done by updating your DNS records, specifically the A record, which tells the internet which server your domain should load from.
Here’s how to do it:
- Log into your domain registrar (wherever you registered your domain, Truehost, GoDaddy, Namecheap, etc.)
- Find the DNS Management or Zone Editor section
- Locate the A record for your domain (it will show your old server’s IP address)
- Replace the old IP with your new VPS IP address
- Save the changes
What to expect after updating: DNS changes don’t take effect instantly. They need to propagate across the internet, which typically takes 2 to 6 hours, but can take up to 48 hours in some cases. During this window, some visitors may still reach your old server while others hit the new VPS, this is normal.
Important: Keep your old hosting account active for at least 48 hours after updating DNS. Don’t cancel it yet. If something needs fixing, your old site is still there as a fallback.
You can check propagation progress at whatsmydns.net, it shows you which regions have already updated and which are still pointing to the old server.
8) Post-Migration Optimization
Moving to a VPS is only the beginning. This is where the real benefits show.
Now you can fine-tune performance and security.
Optimizations Worth Doing After Migration
Moving your website to a VPS is just the beginning. To get the most out of your new server, you’ll want to optimize it for speed, security, and stability. These steps help ensure your site runs smoothly, keeps visitors happy, and stays safe from threats.
- Enable caching for faster loading
Caching stores parts of your website temporarily so they don’t have to load from scratch every time someone visits. This reduces server load and makes pages appear almost instantly for your visitors.
For blogs, e-commerce sites, or content-heavy pages, caching can significantly improve user experience and even boost search rankings.
- Install an SSL certificate for security
SSL certificates encrypt data between your server and visitors, protecting sensitive information like passwords and payment details.
Beyond security, SSL also gives visitors confidence that your site is trustworthy, and search engines favor secure websites, improving SEO.
- Add server-level firewalls
Firewalls act as a protective barrier, filtering out malicious traffic before it reaches your website. While many plugins handle security at the website level, a server-level firewall blocks attacks earlier, reducing the risk of hacks, DDoS attacks, and malware infections.
- Monitor resource usage and upgrade when needed
A VPS gives you dedicated resources, but your website may grow faster than expected. Keep an eye on CPU, RAM, storage, and bandwidth usage.
Monitoring allows you to spot performance bottlenecks and scale your resources proactively, preventing slowdowns before they affect your visitors.
By applying these optimizations, your VPS won’t just host your website; it will make it faster, safer, and ready to handle growth with confidence.
What to Do If Something Goes Wrong
Migrations usually go smoothly, but if yours doesn’t, here’s where to start:
- Site isn’t loading after DNS update Check DNS propagation first at whatsmydns.net. If your region hasn’t updated yet, wait a few hours. If it has updated but the site still won’t load, SSH into your VPS and check that your web server (Apache or Nginx) is running.
- Database connection error This almost always means the credentials in your config file don’t match what was set up on the new server. Open wp-config.php (for WordPress) or your equivalent config file and verify the database name, username, password, and host are all correct.
- Images or files are missing The file transfer likely didn’t complete. Re-upload the specific folders using FTP and check that the folder structure mirrors what was on the old server exactly.
- Emails stopped working Email settings are often tied to the old server. Update your MX records in DNS to point to the correct mail server, and reconfigure any email accounts in your control panel.
If you’re stuck, Truehost support is available 24/7, you don’t have to troubleshoot alone.
Start Moving Today
Moving your website to a VPS hosting environment may seem like a big task at first, but it doesn’t have to be stressful. With a clear plan and careful steps, you can transfer your site safely, avoid unnecessary downtime, and immediately start enjoying the benefits of faster load times, stronger security, and greater control.
At Truehost, we know that website migrations can feel daunting. That’s why our VPS plans are built to make the process as smooth as possible, giving you flexibility, reliable performance, and room to grow without the headache.
If your website is ready for an upgrade, there’s no better time to leap. Move to a VPS with Truehost and give your site the speed, stability, and security it deserves.