Domain SearchInstantly check and register your preferred domain name
 Web Hosting
 cPanel HostingHosting powered by cPanel (Most user friendly)
 KE Domains
 Reseller HostingStart your own hosting business without tech hustles
 Windows HostingOptimized for Windows-based applications and sites.
 Free Domain
 Affiliate ProgramEarn commissions by referring customers to our platforms
 Free HostingTest our SSD Hosting for free, for life (1GB storage)
 All DomainsBrowse and register domain extensions from around the world
 .Com Domain
 WhoisLook up domain ownership, expiry dates, and registrar information
 VPS Hosting
 Managed VPSNon techy? Opt for fully managed VPS server
 Dedicated ServersEnjoy unmatched power and control with your own physical server.
 SupportOur support guides cover everything you need to know about our services
If you’ve just set up a VPS, the next logical step is getting your domain to point to it, basically because nobody wants to share a link that looks like http://196.43.172.11.
A clean domain name is easier to remember, looks professional, and builds trust with your visitors.
Linking a domain to your VPS simply means mapping it to your server’s public IP address through your domain registrar’s DNS settings.
In practice, this involves adding what’s called an “A record,” which is an instruction that tells the internet, “when someone types this domain, send them to this IP address.”
Once the changes are saved, your domain begins pointing traffic directly to your VPS.
This setup gives you more control over your hosting environment, better flexibility, and improved performance, something shared hosting simply can’t match.
Before you begin on how to link a domain to a VPS, make sure you have the following:
- A registered domain name
- An active VPS with a public IP address
- Access to your domain registrar dashboard
Once these are ready, you can move on to linking your domain to your VPS in just a few simple steps.
5 Easy Steps to Link Your Domain to a VPS
1) Retrieve Your VPS IP Address
Start by logging into your Truehost client area and opening the VPS management section.
This applies across all plan types, Kenya VPS, Cloud VPS, or Managed VPS dashboards, depending on the plan you are using.

Inside the dashboard, look for your server’s public IPv4 address. It usually looks something like 123.45.67.89. Copy it and keep it somewhere handy, since you’ll need it shortly.
If your server also has an IPv6 address listed, note that down too.
This IP address is essentially your server’s location on the internet. Right now, nobody knows how to connect your domain to it, and that’s exactly what the steps ahead will fix.
2) Log in to Your Domain Registrar
Next, go to the platform where you registered your domain name. This could be Truehost, Namecheap, GoDaddy, Hostinger, or another registrar.
Log in to your account and navigate to your domain list. From there, select the specific domain you want to point to your VPS.
You are now ready to update the DNS settings and point the domain to your server.
3) Access DNS Management
Once you’re inside your domain’s settings, look for the DNS area.
Depending on your registrar, it might be labeled DNS Management, Advanced DNS, or DNS Zone Editor, so the name varies, but it’s usually easy to spot. Click Manage to open it.

Before adding anything new, take a moment to clear out any existing records that were automatically added when the domain was registered. These are often called “parked records” or “default hosting records.”
Leaving them in place can cause conflicts later, so it’s cleaner to remove them first and start fresh.
4) Create Your A Records
Now it’s time to connect your domain to your VPS using A records. These records tell the internet where your domain should send traffic.
You need two of them, one for your root domain and one for the www version, so that both yourdomain.com and www.yourdomain.com point to your VPS.
This’s what each record should look like:
- Root domain (main site)
Type: A
Host/Name:@
Value/Points To: Your VPS IPv4 address - www subdomain
Type: A
Host/Name:www
Value/Points To: The same VPS IPv4 address
Both records ensure your website works whether someone types your domain with or without “www.”
Set the TTL (Time to Live) to a low value, such as 300 seconds, or choose “Automatic” if that option is available. This helps the changes spread across the internet more quickly after saving.
Note: A record acts as the connection point between your domain name and your server’s IP address. Once set correctly, they direct all traffic from your domain straight to your VPS without needing any extra steps.
5) Verify the Connection
After saving your records, give it a few minutes and then check if your domain is already pointing to your VPS.
You can confirm everything is working using free tools like NSLookup.io, What’s My DNS, or MxToolbox.com. Just enter your domain name and check if it now points to your VPS IP address.

Another quick check is opening your domain in a private or incognito browser window. This helps avoid cached results from your previous setup and shows the latest version of your site.
DNS changes don’t happen instantly everywhere.
In most cases, updates take a few minutes, but it can stretch to 24 hours depending on the network. During this time, some visitors may still reach the old server while others see the new one.
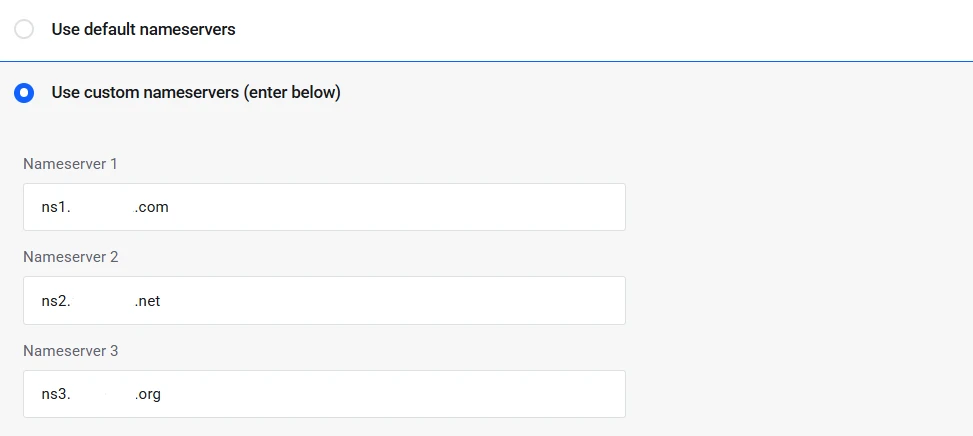
Alternative Method: Using Custom Nameservers
The A Records method covered above works well for most people because your domain stays under your registrar’s nameservers, and the setup is quick.
That said, there’s another route worth knowing about, that is, pointing your domain to custom nameservers hosted on your VPS.
This setup makes more sense when you want full control over DNS from your VPS. It also works well if you are handling multiple domains or need more advanced DNS configurations.
This is the general process:
- Set up DNS software on your VPS, such as BIND9, which is the standard choice on Ubuntu. This allows your server to manage DNS records directly.
- Create child nameservers at your domain registrar (for example,
ns1.yourdomain.comandns2.yourdomain.com) and point them to your VPS IP address. - Update your domain to use these new nameservers.
- Configure your DNS zones inside your VPS so it can properly respond to domain requests.
Custom nameservers give you full DNS control from your server, but they require a more involved process and take longer to configure. The A records approach is faster, simpler, and easier for most users, especially when getting started.
Only consider the nameserver route once you’re comfortable managing your server and need that extra layer of DNS control.
Common Issues and Quick Fixes
Even when you follow every step correctly, a few things can still trip you up. Here’s what to check if something doesn’t look right:
Propagation taking too long? You can’t speed up what’s already in motion, but for next time, setting a lower TTL before making DNS changes helps the update spread faster.
Connection refused error? This usually means your web server isn’t running yet, or your firewall is blocking traffic. Make sure Nginx or Apache is active and that ports 80 and 443 are open.
SSL warning showing up? Once your domain is fully live, install a free Let’s Encrypt certificate using Certbot. It takes about five minutes and gets rid of the “not secure” warning entirely.
If you run into anything else, our Truehost support team is always available in both English and Swahili, so don’t hesitate to reach out.
Next Steps: Configuring Your VPS After Linking
Linking your domain was the first milestone; now it’s time to put that VPS to work.
Once your domain is pointing correctly to your server, you’ll need to set it up to actually serve your website.
Start by installing a web server. The two most common options are Nginx (fast and lightweight) and Apache (highly flexible). On a Truehost VPS running Ubuntu or Debian, either one installs with a single command:
sudo apt update

sudo apt install nginx # For Nginx

# OR

sudo apt install apache2 # For Apache
For Nginx, create a configuration file for your domain:
sudo nano /etc/nginx/sites-available/yourdomain.comAdd this basic setup inside:
server {

    listen 80;

    server_name yourdomain.com www.yourdomain.com;

    root /var/www/yourdomain.com;

    index index.html index.htm index.php;

    location / {

        try_files $uri $uri/ =404;

    }

}
Then activate it and restart Nginx:
sudo ln -s /etc/nginx/sites-available/yourdomain.com /etc/nginx/sites-enabled/

sudo systemctl restart nginx
Apache follows a similar pattern, where you create a virtual host file, enable the site, and restart the service.
Next, make sure your /var/www/yourdomain.com folder exists and has your website files in it. Even a simple index.html is enough to confirm your site is live.
Also check that your firewall has ports 80 and 443 open, otherwise visitors won’t be able to reach you at all.
From here, the road is open.
Your VPS is fully prepared to serve your domain and display your website online.
You can install a CMS like WordPress, configure your SSL certificate with Certbot, or start deploying your own applications, all with full root access and no shared-hosting limitations holding you back.
Truehost VPS hosting gives you local infrastructure in Kenya, SSD storage, dedicated resources, and both managed and unmanaged plans to suit your level of experience.
Thousands of Kenyan businesses already run on our servers, and our support team is always available whenever you need a hand.