Domain SearchInstantly check and register your preferred domain name
 Web Hosting
 cPanel HostingHosting powered by cPanel (Most user friendly)
 KE Domains
 Reseller HostingStart your own hosting business without tech hustles
 Windows HostingOptimized for Windows-based applications and sites.
 Free Domain
 Affiliate ProgramEarn commissions by referring customers to our platforms
 Free HostingTest our SSD Hosting for free, for life (1GB storage)
 All DomainsBrowse and register domain extensions from around the world
 .Com Domain
 WhoisLook up domain ownership, expiry dates, and registrar information
 VPS Hosting
 Managed VPSNon techy? Opt for fully managed VPS server
 Dedicated ServersEnjoy unmatched power and control with your own physical server.
 SupportOur support guides cover everything you need to know about our services
If your WordPress site has ever crawled to a halt during a traffic spike, thrown a “503 Service Unavailable” error at the worst possible moment, or been slapped with a resource limit warning by your hosting provider, you already know the frustration shared hosting brings.
It works fine in the beginning, it’s cheap, easy to set up, and requires no technical knowledge. But shared hosting is exactly what the name says: shared. Your site competes with dozens, sometimes hundreds, of other websites for the same CPU, RAM, and bandwidth on a single server.
The moment your traffic grows, your content picks up, or you start running a WooCommerce store, shared hosting becomes a ceiling rather than a foundation.
That’s where a VPS, a Virtual Private Server, changes everything. A VPS gives your WordPress site dedicated, guaranteed resources in an isolated environment, all for a fraction of the cost of a fully dedicated server. You get the performance and control of a private server with the price point of an affordable hosting plan.
You can scale RAM, CPU, and storage as your site grows, configure the server exactly how your application needs it, and take full ownership of your security posture.
This guide walks you through exactly how to do that, four concrete steps to go from a blank VPS to a live, secure, and optimized WordPress site.
Step 1: Choose and Provision the Right VPS
Before touching a single command, you need to make the right provisioning decisions. The choices you make here, provider, specs, and operating system, set the foundation for everything that follows.
a) Picking a VPS Provider
The VPS market is crowded, but not all providers are equal when it comes to WordPress hosting. You want a provider with reliably low latency, strong uptime guarantees, fast SSD storage, and data centers close to your target audience.
Truehost VPS is a highly recommended option, particularly for users in Africa and emerging markets.
It offers competitive pricing, KVM-based virtualization, SSD storage, and dependable support, making it well-suited for WordPress deployments at any scale.
For global alternatives, DigitalOcean, Vultr, and Hetzner are widely trusted among developers.
When evaluating any VPS provider, the key factors to look for are dedicated RAM and CPU allocation (your resources are guaranteed, no other customer’s traffic spike affects you), easy scalability, full root access, and an isolated server environment that keeps your files and database completely separate from other users on the same physical host.
Managed vs. Unmanaged VPS: This is an important decision.
A managed VPS means the hosting provider handles server updates, security patches, and monitoring on your behalf. An unmanaged VPS gives you a blank Linux server with complete root access and full responsibility. This guide covers the unmanaged path, which delivers maximum control at the lowest cost.
b) Recommended Server Specifications
For a single WordPress site, a minimum of 1 vCPU, 1–2 GB of RAM, and 20–40 GB of SSD storage is a solid starting point. If you plan to host multiple sites or expect moderate traffic, step up to 2 vCPU and 4 GB RAM, a configuration that can comfortably handle 10 to 30 WordPress sites simultaneously.
On the virtualization side, KVM (Kernel-based Virtual Machine) is the gold standard. Unlike older OpenVZ-based plans, KVM provides true hardware-level isolation, a dedicated kernel, and full support for custom operating systems. Paired with a modern web server like Nginx or OpenLiteSpeed, KVM delivers optimal WordPress site speed.
c) Selecting an Operating System
Ubuntu 22.04 LTS is the recommended operating system. It carries long-term support, has the largest library of tutorials and community documentation, and is what most WordPress hosting guides, including this one, are written for.
Debian 12 is an excellent alternative for those who prefer a leaner, more conservative environment, while AlmaLinux or Rocky Linux suit enterprise teams already invested in the Red Hat ecosystem.
d) Initial Server Access
Once your VPS is provisioned, your provider will supply an IP address and root credentials. Before doing anything else, generate SSH keys locally and upload the public key to your server. This replaces password-based login with cryptographic authentication, which is far more secure.
Log in via SSH using ssh root@your_server_ip, then, immediately create a non-root sudo user to use for all subsequent work. Running everything as root is a significant security risk that’s easy to avoid from the start.
Step 2: Configure the Server and Install the Web Stack (LEMP)
Once your VPS is ready, the next step is installing the software that will run WordPress. The most popular setup for modern WordPress hosting is the LEMP stack: Linux, Nginx, MySQL, and PHP.
a) LEMP vs. LAMP: Which Should You Choose?
Both LEMP and LAMP work well for WordPress, but the biggest difference is the web server. LAMP uses Apache, while LEMP uses Nginx (pronounced “Engine-X”).
For WordPress sites on a VPS, Nginx is usually the better choice because it handles static files like images, CSS, and JavaScript more efficiently while using less memory. That counts a lot on smaller VPS plans with limited RAM. In simple terms, Nginx helps your site stay faster and more stable during traffic spikes.
b) Update the Server
Before installing anything, update the server packages to the latest versions:
sudo apt update && sudo apt upgrade -y
This helps patch security vulnerabilities and ensures better compatibility with the software you install later.
c) Install Nginx
Next, install Nginx and configure the firewall to allow HTTP, HTTPS, and SSH traffic. Once installed, visit your server IP address in a browser. If you see the default Nginx welcome page, the web server is working correctly.
d) Install MySQL or MariaDB
WordPress needs a database to store posts, pages, settings, and user accounts. After installing MySQL or MariaDB, run the mysql_secure_installation script to improve security by setting a root password, removing anonymous users, disabling remote root logins, and deleting the default test database.
After that, create a dedicated database and database user specifically for WordPress instead of using the root account directly.
e) Install PHP and PHP-FPM
Since Nginx cannot process PHP files on its own, you also need PHP-FPM (FastCGI Process Manager). Install PHP 8.2 or 8.3 along with important WordPress extensions like:
- php-mysql
- php-curl
- php-gd
- php-mbstring
- php-xml
- php-zip
Finally, enable OPcache, which stores compiled PHP scripts in memory, so WordPress loads faster without repeatedly processing the same code. Simple OPcache tuning can noticeably improve page speed and server performance.
Step 3: Configure Your Domain and Set Up SSL
At this stage, your server is running, but your WordPress site still needs a domain name and HTTPS encryption before it is ready for real visitors.
a) Point Your Domain to the VPS
Log in to your domain registrar and update your DNS settings. Point the main A record and the www record to your VPS IP address.
DNS changes can take a little time to spread globally, sometimes just a few minutes, but in some cases up to 48 hours.
For better performance and added protection, many website owners also use Cloudflare. Its free plan includes CDN caching, DDoS protection, and automatic HTTPS support, which can improve both speed and security.
b) Create an Nginx Server Block
Next, configure Nginx to recognize your domain. This is done using a server block (sometimes called a virtual host).
The configuration file tells Nginx:
- which domain to serve,
- where your WordPress files are located,
- and how PHP requests should be handled through PHP-FPM.
After creating the configuration, enable it, test it with nginx -t, and reload Nginx. Testing first helps catch syntax mistakes before they break the site.
c) Install a Free SSL Certificate
HTTPS is essential for every modern WordPress site. It encrypts visitor data, secures logins, and improves trust with both users and search engines.
The easiest option is Let’s Encrypt together with Certbot. After installing Certbot and its Nginx plugin, you can generate a free SSL certificate for both your main domain and the www version.
Certbot can also automatically configure HTTPS redirects and handle certificate renewals in the background.
For stronger security, configure Nginx to use only modern SSL protocols like TLS 1.2 and TLS 1.3.
d) Add HTTP Security Headers
Finally, add HTTP security headers in your Nginx configuration. These headers help protect your site against common browser-based attacks like clickjacking, content injection, and cross-site scripting (XSS).
Important headers include:
- X-Frame-Options
- X-Content-Type-Options
- Strict-Transport-Security (HSTS)
- Content-Security-Policy
Once enabled, your WordPress site will be more secure and better prepared for production traffic.
Step 4: Download and Install WordPress
Now that your server, domain, and SSL certificate are fully configured, it is time to install WordPress itself.
a) Download WordPress and Set Ownership
Download the latest version of WordPress from WordPress.org using wget or curl, extract the files, and move them into your web root directory, usually /var/www/yourdomain.com.
After that, set the correct file ownership with:
chown -R www-data:www-data /var/www/yourdomain.com
This gives Nginx and PHP-FPM the permissions they need to serve your site, handle uploads, and install plugins properly.
b) Set Correct File Permissions
File permissions are an important part of WordPress security. A good baseline is:
- 755 for directories
- 644 for files
This keeps WordPress functional while reducing the risk of unauthorized changes.
For extra protection, lock down the system wp-config.php file system since it stores your database credentials and security keys.
c) Configure wp-config.php
Copy the default WordPress configuration file and add the database name, username, and password you created earlier.
Next, generate unique authentication keys and salts from the WordPress Secret Key API and paste them into the configuration file. These help secure user sessions and login cookies.
It is also smart to:
- change the default table prefix from wp_,
- and ensure
WP_DEBUGis set to false on a live site.
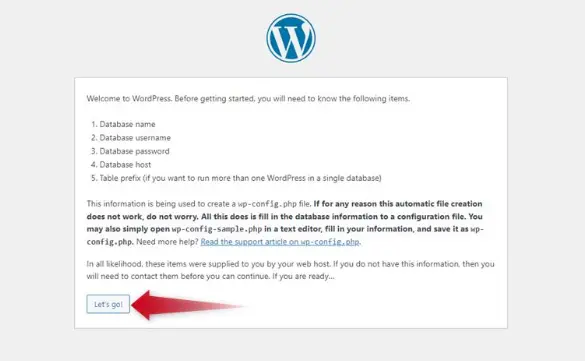
d) Run the WordPress Installation Wizard
Finally, visit your domain in a browser: https://yourdomain.com
WordPress will launch the setup wizard automatically. From there, choose your site title, create an admin account, and set a strong password.
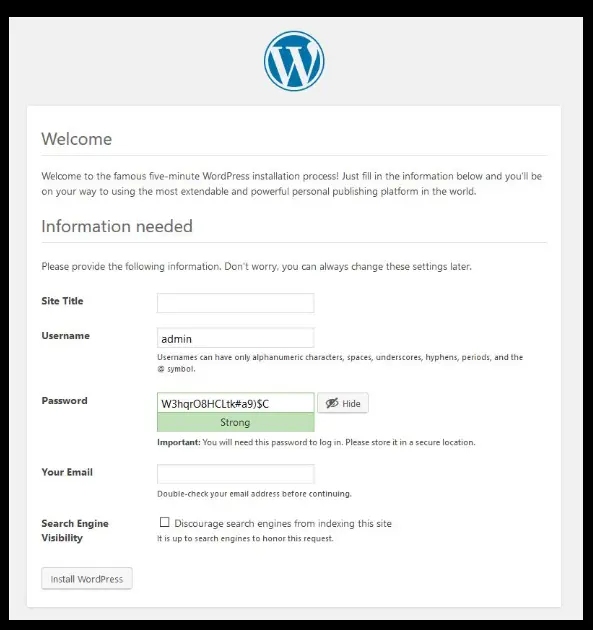
Avoid using “admin” as the username since it is commonly targeted in brute-force attacks.
Once installation is complete, log in to the WordPress dashboard and confirm everything is working correctly.
Final Thoughts: Successfully Hosting WordPress on a VPS
Hosting WordPress on a VPS is one of the highest-leverage decisions you can make for your site’s performance, security, and long-term growth. What once required deep sysadmin expertise is now accessible to any technically inclined site owner willing to work through the right steps methodically.
To recap: you picked a reliable VPS provider and provisioned a properly specced server with KVM virtualization. You installed the LEMP stack, Nginx for efficient request handling, MySQL for a hardened database, and PHP-FPM with OPcache for fast PHP execution. You tied your domain to the server, secured traffic with a free Let’s Encrypt SSL certificate, and locked down the browser layer with HTTP security headers. Finally, you downloaded WordPress, set the correct file permissions, configured wp-config.php properly, and walked through the installation wizard to go live.
This is a solid production foundation, but there’s still room to go further. Consider adding Redis for object caching to cut database queries dramatically, setting up automated off-server backups to a service like Backblaze B2 or Amazon S3, and installing a security plugin like Wordfence or Patchstack for ongoing threat monitoring. A CDN in front of your site will reduce latency for visitors anywhere in the world.
The control is now entirely yours, and that’s exactly the point.
If you’re ready to get started, Truehost VPS plans offer KVM-based virtualization, SSD storage, and scalable resources at competitive pricing, everything you need to host WordPress with confidence. Spin up your VPS today and put this guide to work.