Domain SearchInstantly check and register your preferred domain name
 Web Hosting
 cPanel HostingHosting powered by cPanel (Most user friendly)
 KE Domains
 Reseller HostingStart your own hosting business without tech hustles
 Windows HostingOptimized for Windows-based applications and sites.
 Free Domain
 Affiliate ProgramEarn commissions by referring customers to our platforms
 Free HostingTest our SSD Hosting for free, for life (1GB storage)
 All DomainsBrowse and register domain extensions from around the world
 .Com Domain
 WhoisLook up domain ownership, expiry dates, and registrar information
 VPS Hosting
 Managed VPSNon techy? Opt for fully managed VPS server
 Dedicated ServersEnjoy unmatched power and control with your own physical server.
 SupportOur support guides cover everything you need to know about our services
When you decide to host a website, you generally have three main options: Shared hosting, VPS hosting, and Dedicated servers.
Shared hosting is like sharing a room with several people, each with a bed, but if one person plays loud music or uses too much water, everyone feels it.
Performance can suffer when neighbors spike their usage.
VPS hosting gives you your own apartment inside a larger building.
You get your own keys, dedicated resources, and the ability to set your own rules. Neighbors can’t touch your stuff.
It delivers better speed and control without the full cost of a dedicated server.
Dedicated servers are like owning your own house, maximum power and privacy, but also the most expensive.
Most beginners and growing Kenyan businesses don’t need that level yet.
VPS hosting sits in the perfect middle ground. It’s fast, reliable, and gives you real control as your site grows.
In this guide, I’ll walk you through exactly how to get started with VPS hosting for beginners, step by step, using Truehost.
Step 1: Purchase a VPS Hosting Plan
Start by heading over to Truehost.co.ke. Navigate to the VPS section.
As a beginner, choose Managed VPS. We handle the heavy server maintenance so you can focus on your website instead of babysitting the server.
We recommend starting with the Cloud Starter plan. Here’s what you get:
| Feature | Details |
| RAM | 2 GB |
| Storage | 50 GB SSD |
| Transfer | 1 TB |
| Access Levels | Admin, Resellers, Clients |
| Operating System | Linux |
| Pricing (Annual) | KSh 1,120/month |
| Pricing (3-Year) | KSh 840/month |
These prices offer excellent value for Kenyan users, with local data centers for faster speeds and M-PESA payment support.

Want to compare all plans and their features? View all Truehost VPS plans.
Choose your billing period for longer terms to give better discounts.
Next, configure your server:
- Set a Hostname (something memorable like
mywebsite-ke) - Create a strong Root Password
- Set NS1 Prefix and NS2 Prefix for DNS
Linux is pre-selected by default, perfect for most users.
Additional services you might want:
- Additional 50 GB Disk Space: KSh 500.00/month (great if you store lots of images or media)
- AskSSL Premium SSL Certificate: KSh 750.00/year (secures your site with HTTPS, vital for trust and Google rankings)
- Additional IPv4 Europe: KSh 500.00/month
Once you complete payment, Truehost provisions your VPS quickly. You’ll receive login details by email.
For more details on the difference, check our guide on Managed vs Unmanaged VPS.
Step 2: Log in to Your VPS Using Secure Shell (SSH)
You now have your server time to connect. SSH (Secure Shell) is an encrypted protocol that lets you control your server remotely through a terminal.
Think of it as a secure phone line directly to your server.
On macOS or Linux (using Terminal):
- Open Terminal
- Type:
ssh root@your-server-ip - Enter the root password when prompted
The first time you connect, you’ll see a message asking you to verify the server’s fingerprint. Type yes and press Enter. This is normal.
On Windows:
- Download and open PuTTY
- Enter your server IP address in the Host Name field
- Click Open
- Log in as
rootwith your password
You should see a welcome message once connected. This is your command-line access to the server. Everything from this point forward happens here.
Save your session in PuTTY for faster future logins. Under Session, type a name in the Saved Sessions field and click Save before connecting.
Step 3: Update Your VPS
Always start with fresh packages for security and stability. When a new VPS is provisioned, its pre-installed software may already be weeks or months behind the latest versions.
Run these commands one after another:
apt update
apt upgrade -y
apt update refreshes the list of available packages from the Ubuntu/Debian repositories. apt upgrade installs the newest versions of everything already on your system.
This process can take a few minutes, depending on how many packages need updating. It’s a habit you should repeat regularly, ideally once a week or at least once a month.
Keeping your system updated is one of the most effective ways to protect against known vulnerabilities. Many server breaches happen simply because an update was skipped.
After it finishes, reboot if prompted:
rebootThen log back in.
Step 4: Create a New User and Modify Privileges
Never work as root for daily tasks; it’s risky.
The root account has unrestricted access to every part of your server, meaning a single mistake (or a compromised session) can cause serious damage.
Create a regular user instead and only escalate to root-level access when you specifically need it.
Run:
adduser yourusernameFill in the details (you can skip most by pressing Enter). Choose a username that’s easy to type but not obviously tied to your real name or domain. Then give sudo privileges:
usermod -aG sudo yourusername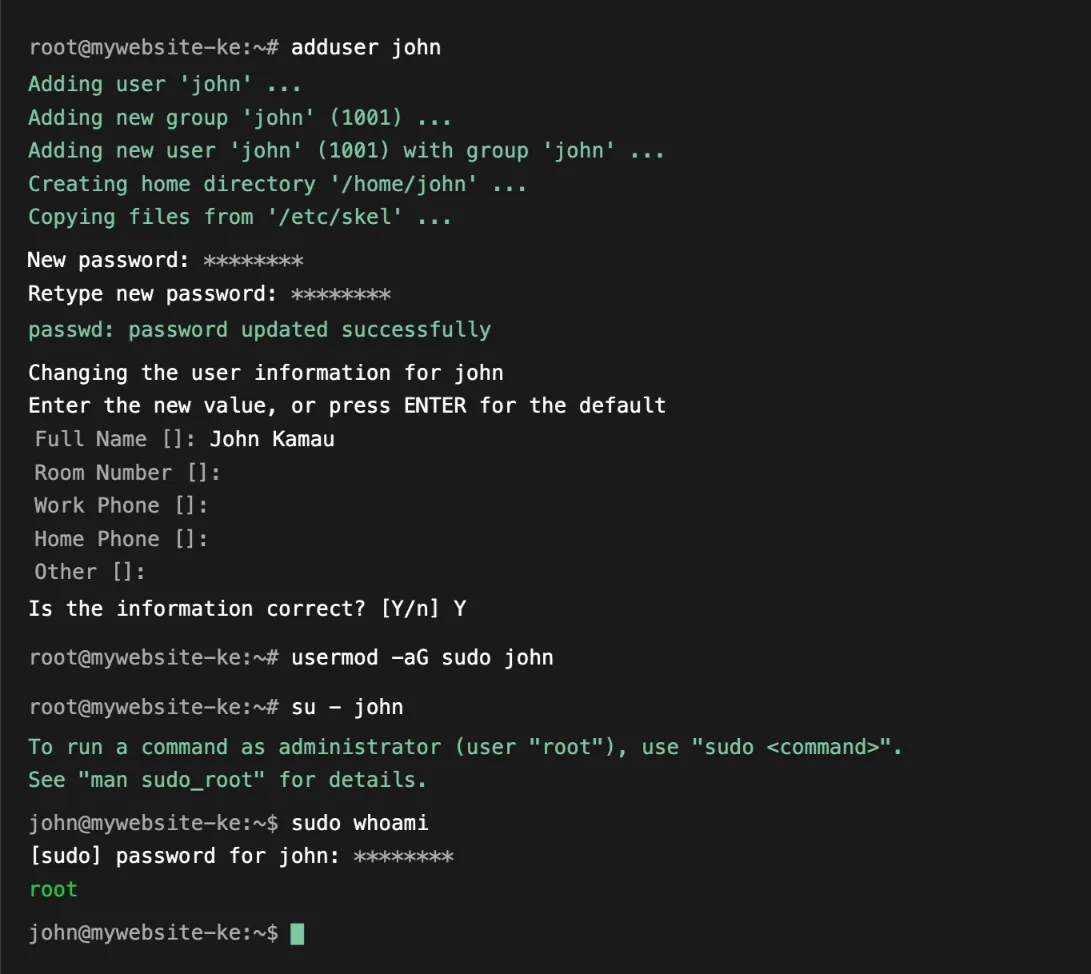
The -aG flag appends the user to the sudo group without removing them from any existing groups.
This is important, skipping the -a flag would overwrite their group memberships.
Switch to the new user:
su - yourusernameNow you’re working with safer permissions. Use sudo before commands that need higher access.
If you make a typo or run the wrong command, the damage is limited because you’re no longer operating with full root power by default.
Step 5: Enable Public Key Authentication
Passwords work, but SSH keys are significantly more secure.
A key pair consists of a private key (stored on your computer, never shared) and a public key (uploaded to the server).
When you connect, the server verifies your private key against the public key on file, no password needed, and nothing can be guessed or brute-forced.
On your local computer (not the server):
Generate a key pair:
ssh-keygen -t ed25519Press Enter to accept the default save location. You can add a passphrase for an extra layer of security; if someone steals your private key file, they still can’t use it without the passphrase.
Copy the public key to your VPS:
ssh-copy-id yourusername@your-server-ipThis command automatically places your public key in the correct file on the server (~/.ssh/authorized_keys).
Test the connection by logging out and logging back in with the key. It should connect without asking for a password.
Finally, harden security by disabling password login entirely. Edit the SSH config:
sudo nano /etc/ssh/sshd_configFind and change these lines:
PasswordAuthentication no
PubkeyAuthentication yes
Save (Ctrl+O, then Enter) and exit nano (Ctrl+X). Then restart SSH:
sudo systemctl restart sshYour server is now much harder to brute-force attack. Automated bots scan the internet constantly looking for servers with password-based SSH logins.
Disabling passwords removes you from that attack surface entirely.
Important: Before disabling password login, confirm your SSH key works by testing it in a separate terminal window. If you lock yourself out, you’ll need to contact Truehost support to regain access.
Step 6: Configure a Firewall for Your VPS
A firewall controls what network traffic can reach your server.
Without one, every port on your server is potentially exposed, including database ports, admin panels, and services you may not even know are running.
UFW (Uncomplicated Firewall) is a beginner-friendly tool that makes managing Linux firewall rules straightforward.
Install UFW if it’s not already there:
sudo apt install ufw -yAllow essential ports:
sudo ufw allow ssh    # or port 22
sudo ufw allow http   # port 80
sudo ufw allow https  # port 443
These three rules cover SSH access (so you can still log in), regular web traffic (HTTP), and secure web traffic (HTTPS).
Any port not explicitly allowed will be blocked by default once the firewall is enabled.
Enable the firewall:
sudo ufw enableCheck status:
sudo ufw statusYou should see your rules listed with a Status: active message. This setup blocks unwanted traffic while allowing web visitors and SSH access.
If you later install additional services like a database, mail server, or custom application, remember to open the relevant ports with sudo ufw allow [port number] before enabling those services.
Step 7: You’re All Set. Start Hosting!
Congratulations! You’ve completed the core setup. In just a few steps, you’ve gone from a blank VPS to a secure, production-ready server.
Quick recap checklist:
- Purchased and configured your VPS plan
- Logged in via SSH
- Updated system packages
- Created a non-root user with sudo
- Set up SSH key authentication and disable passwords
- Configured UFW firewall
What to do next:
- Install a web server (Nginx or Apache)
- Set up a database (MySQL/MariaDB)
- Point your domain to the VPS
- Install your application (WordPress, custom code, etc.)
Each of these next steps builds directly on the foundation you’ve just laid. If you’re running WordPress, for example, you’ll need all four.
If you’re deploying a Node.js or Python app, your stack will differ slightly, but the SSH access, user permissions, and firewall you’ve just configured apply regardless.
We at Truehost also offer helpful services such as AI Workers, n8n Hosting, and more to enhance your setup.
Why Choose Truehost for VPS Hosting?
We built our VPS plans with Kenyan users in mind, local data centers for low latency, M-PESA payments, and responsive support.
Whether you need a simple managed VPS or more advanced setups, our team helps you avoid common pitfalls.
Many beginners start with our Cloud Starter and scale smoothly as their projects grow.
Get started with our managed VPS hosting.
You’ve got this. Take it one step at a time, and you’ll have a fast, secure, and controllable VPS running in no time.
If you get stuck, our support team is just a click away.