Domain SearchInstantly check and register your preferred domain name
 Web Hosting
 cPanel HostingHosting powered by cPanel (Most user friendly)
 KE Domains
 Reseller HostingStart your own hosting business without tech hustles
 Windows HostingOptimized for Windows-based applications and sites.
 Free Domain
 Affiliate ProgramEarn commissions by referring customers to our platforms
 Free HostingTest our SSD Hosting for free, for life (1GB storage)
 All DomainsBrowse and register domain extensions from around the world
 .Com Domain
 WhoisLook up domain ownership, expiry dates, and registrar information
 VPS Hosting
 Managed VPSNon techy? Opt for fully managed VPS server
 Dedicated ServersEnjoy unmatched power and control with your own physical server.
 SupportOur support guides cover everything you need to know about our services
Knowing how to set up email on a subdomain in cPanel is one of those small steps that makes a big difference.
Instead of using a generic email, you get something clean and professional like [email protected].
It shows clients you’re serious, especially when dealing with customers who expect clear communication before sending payments through M-PESA or bank transfers.
The email builds trust quickly, keeps your brand consistent, and, since it’s on a subdomain, helps separate different parts of your business.
For example, you can have one subdomain for your shop and another for support and assign each its own email address.
Plus, it’s a good thing the process is straightforward.
So, you don’t need any technical background, and once your domain is ready, everything happens inside cPanel in just a few minutes. I completed it in under 10 minutes on my first try.
In this guide, I’ll take you through the simple step-by-step process and show you exactly what to click and what to fill in.
By the time we’re through, you’ll have a working email on your subdomain, ready to use for your business.
Let’s get straight to it.
Step 1: Log into Your cPanel Account
Before anything else, you need access to your hosting dashboard. This is where all the setup happens.
Start by heading to your Truehost client area.
You can do this through the login page you normally use after purchasing your domain or hosting.
Enter your email address and password, the same details you used during registration. If you don’t remember them, you can always reset your password from the login page.
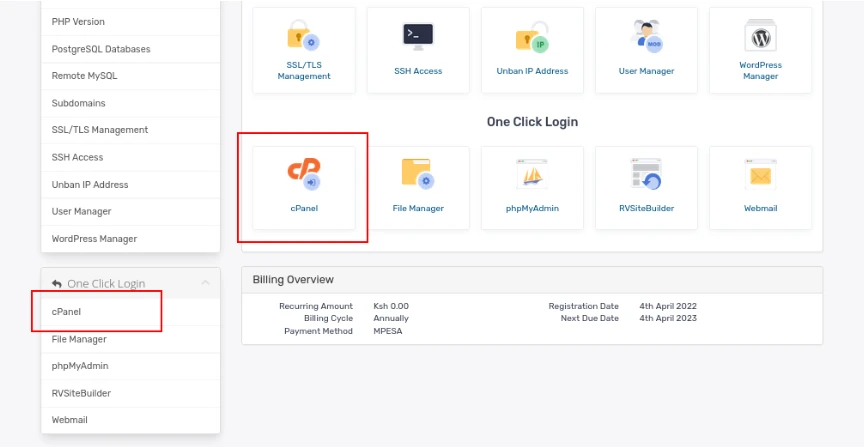
Once you’re inside, go to Services, then scroll down to your hosting and click on it.
Scroll down and click the cPanel icon or cPanel link in the side bar, and a new tab will open with your cPanel dashboard.
If this is your first time seeing cPanel, it’s quite simple. You’ll find different sections with icons for domains, emails, files, and more.
Keep this page open, because you’ll be using it for the next steps.
Step 2: Create Your Subdomain in cPanel
Now that you’re inside cPanel, you can create the subdomain that your email will use if you haven’t already.
Scroll down until you find the Domains section. Click on “Domains” and then select “Create a New Domain.”
In the Domain Name field, enter the subdomain you want. For example:
mail.yourdomain.co.keshop.yourdomain.co.kesupport.yourdomain.co.ke
Choose something simple and easy to type, especially for mobile users.
Next, look for the option labeled “Share document root with main domain” and uncheck it. This keeps your subdomain separate from your main website.
You’ll then see the Document Root field. Set it to a custom folder such as:
- public_html/mail
- public_html/shop
This just tells your hosting where files related to that subdomain will live.
Once everything looks good, click “Submit.”
Within a few seconds, you should see a confirmation message. Your subdomain is now active and ready for the next step.
Step 3: Verify the Subdomain and Wait for Propagation
Before creating your email, it’s worth confirming that your subdomain is active.
This step helps you avoid small errors that can slow things down later.
Go back to your main cPanel dashboard and use the search bar at the top to find “Domains.”
Open it, and you should see your newly created subdomain listed there. If it has been created successfully, it will appear in the list without any issues.
For an extra check, open a new browser tab and type your subdomain (for example, shop.yourdomain.co.ke).
If it loads, even if it’s just a blank page or a simple directory view, that’s a good sign it’s working.
You can also confirm using tools like WhatsMyDNS, which show whether your subdomain has spread across different servers globally.
This process is called propagation and usually takes between 5 and 30 minutes. In many cases, it’s even faster.
If it doesn’t load immediately, give it a bit of time and refresh your browser after a few minutes. Getting this step right makes everything smoother moving forward.
Step 4: Create the Email Account on Your Subdomain
With your subdomain ready, you can now create your email address.
From your cPanel dashboard, scroll down to the Email section and click on “Email Accounts.” Then click the “+ Create” button.

You’ll see a setup form appear. Start by selecting your new subdomain from the domain dropdown menu.
Next, enter the username you want.
For example, if you type info, your full email will be [email protected]. Keep it simple and relevant to its purpose.
Create a strong password using a mix of letters, numbers, and symbols. This helps keep your email secure.
After that, set your mailbox quota. Around 1 GB is a good starting point, and you can always increase it later as your usage grows.
Once everything is filled in, click “Create.”
You’ll get a confirmation message, and your new email address will be ready to use.
Here are a few simple ideas you can use:
shop.yourdomain.co.ke:[email protected](great for online stores)mail.yourdomain.co.ke:[email protected](good for general communication)orders.yourdomain.co.ke:[email protected](useful for handling customer requests)
At this point, your professional email is set up and ready for the next step, which is accessing and using it.
Step 5: Access, Test, and Set Up Your Subdomain Email
You’re almost there. Now it’s time to make sure your new email is ready to use.
Start by logging into Webmail. You can either click “Check Mail” inside cPanel or go directly to yourdomain.co.ke/webmail.
Use the full email address you just created along with its password.
Once logged in, send a test email to your personal Gmail or another account you use. Then reply to it to confirm that incoming emails are working as well.
This quick test ensures everything is set up correctly.
To access your email on your phone (Android or iPhone), follow these steps:
- Open your phone’s Mail app.
- Select Other, then IMAP.
- Enter the incoming server:
mail.yourdomain.co.ke(Port 993, SSL). - Enter the outgoing server:
mail.yourdomain.co.ke(Port 465, SSL). - Log in with your full email and password, then test sending and receiving a message.
If you ever encounter a small issue, like a “quota full” warning, you can quickly adjust storage in cPanel. It takes only a few seconds.
What Next?
Now you have learned how to set up email on a subdomain and have a professional subdomain email ready to use.
At Truehost, our system makes this process smooth for every domain you register.
Now it’s time to get started. Register your domain, create the subdomain, and then the email. You can even get a free domain when paired with SSD hosting.
Follow this guide after activating your domain, and you’ll have your professional email running in minutes. Our support team is ready if you need help.
Set up your subdomain email today and give your Kenyan business a professional edge!