Domain SearchInstantly check and register your preferred domain name
 Web Hosting
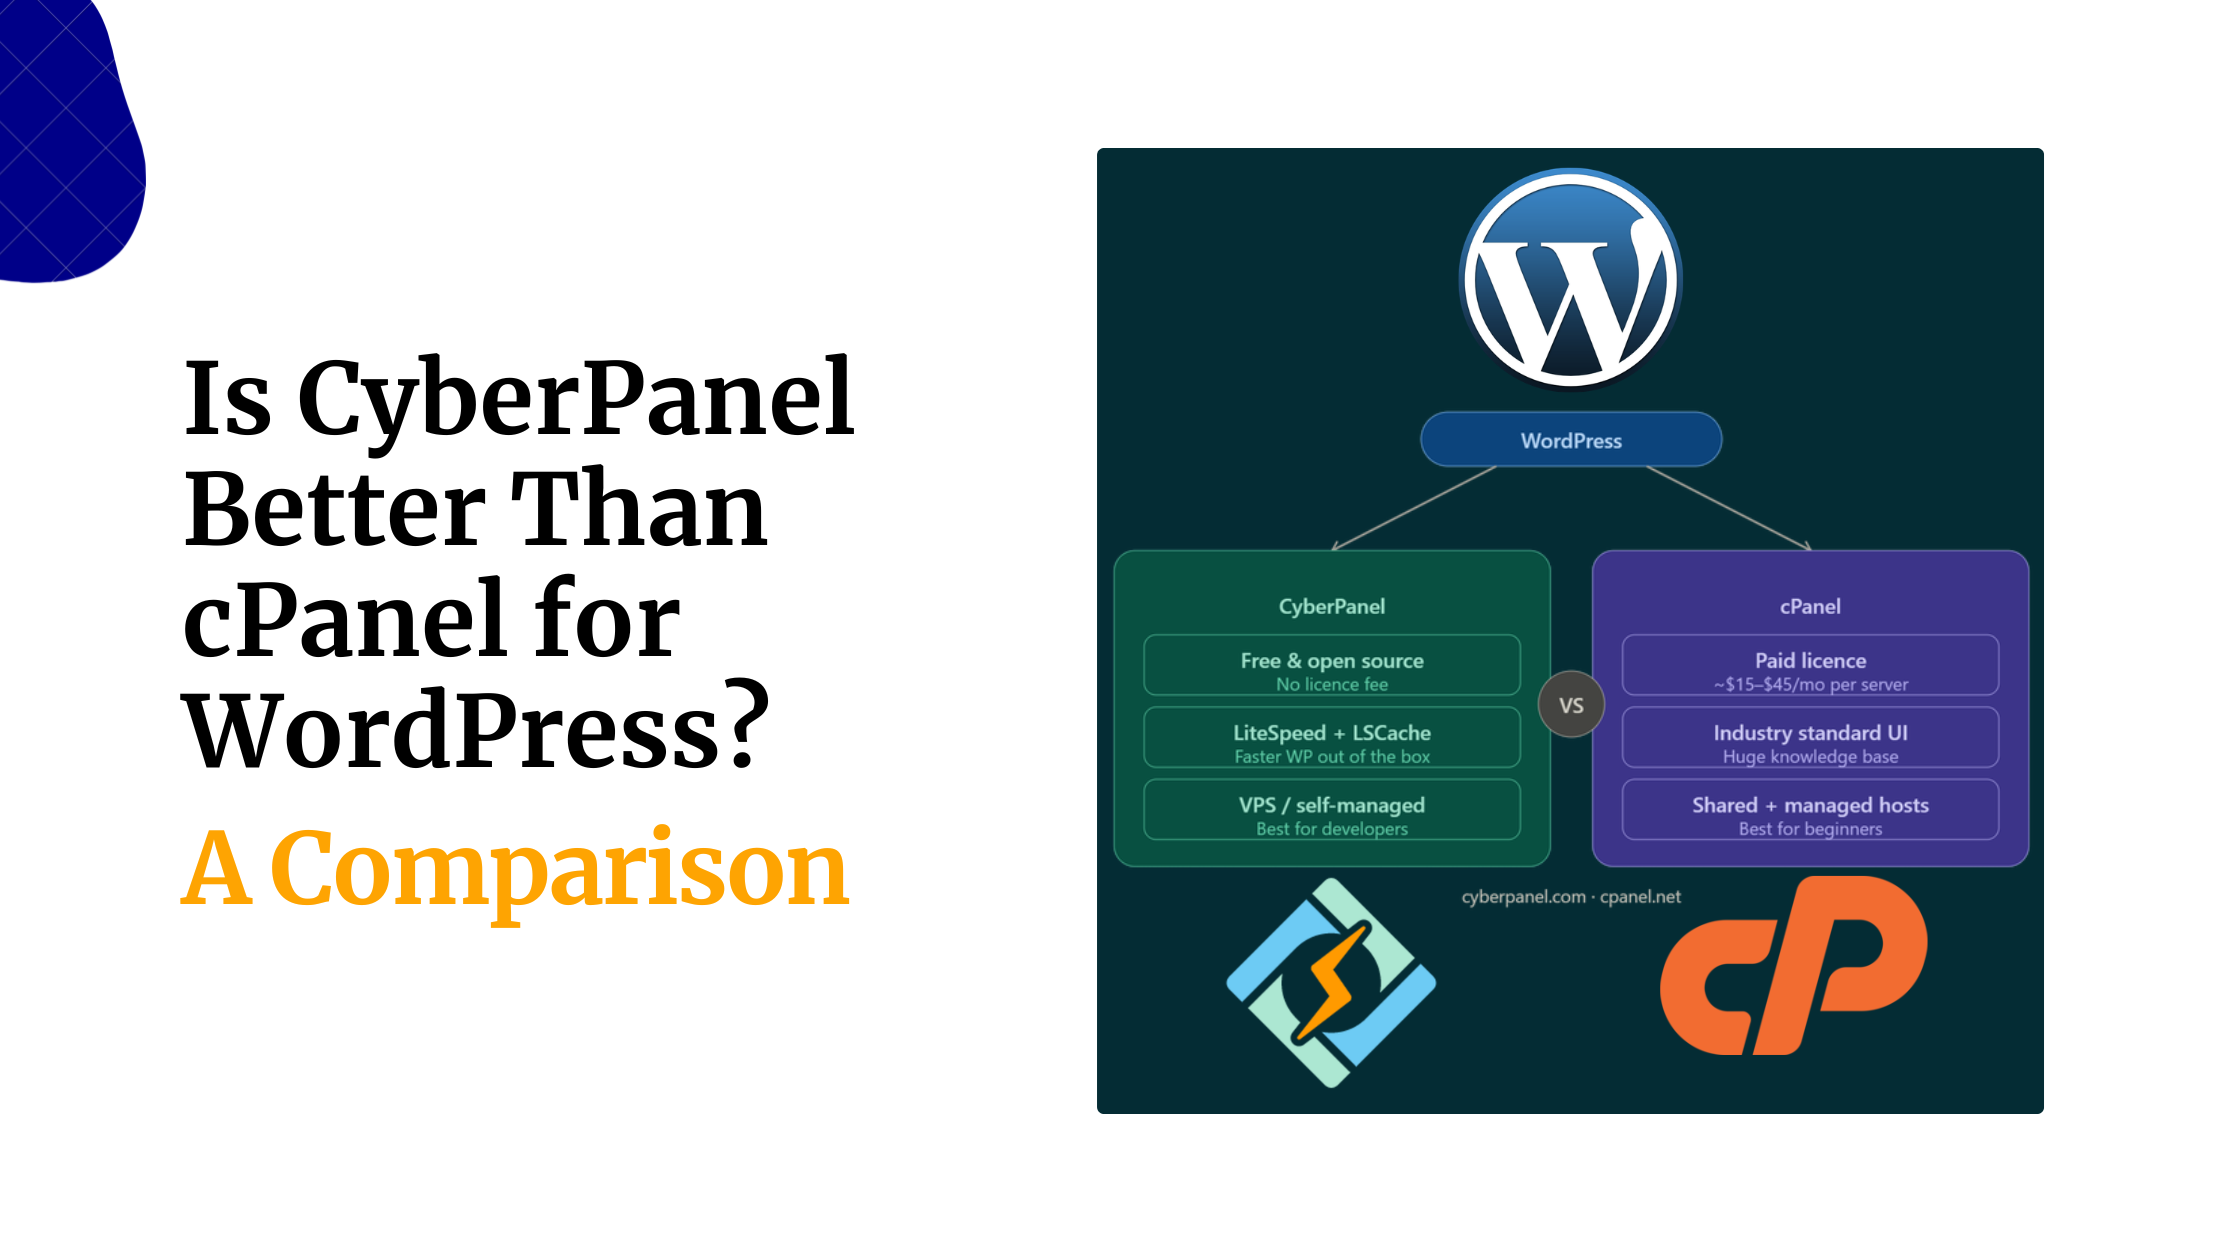
 cPanel HostingHosting powered by cPanel (Most user friendly)
 KE Domains
 Reseller HostingStart your own hosting business without tech hustles
 Windows HostingOptimized for Windows-based applications and sites.
 Free Domain
 Affiliate ProgramEarn commissions by referring customers to our platforms
 Free HostingTest our SSD Hosting for free, for life (1GB storage)
 All DomainsBrowse and register domain extensions from around the world
 .Com Domain
 WhoisLook up domain ownership, expiry dates, and registrar information
 VPS Hosting
 Managed VPSNon techy? Opt for fully managed VPS server
 Dedicated ServersEnjoy unmatched power and control with your own physical server.
 SupportOur support guides cover everything you need to know about our services
Overview
Nameservers match domain names to IP addresses. When a visitor attempts to find a website that your server hosts, their computer asks a nameserver for the IP address of the domain that they wish to view. The nameserver returns the IP address for your web server and directs the visitor to the correct page. You must publish records for your domain names to nameservers so that visitors can reach those sites. These nameservers communicate with other nameservers to distribute the records of sites that your server hosts. The propagation period is the amount of time that it takes for a domain’s DNS records to spread across the Internet.
This article explains the methods that you can use to update your nameservers and how your choices affect your server.
- In all currently-supported cPanel & WHM versions, you can use a series of WHM interfaces to configure and update your nameservers.
- In cPanel & WHM version 74 and earlier, when you log in to WHM for the first time, the Initial Setup Assistant interface appears. The Nameservers section of this interface (Step 4) allows you to set up nameservers. We removed the Initial Setup Assistant interface in cPanel & WHM version 76.
Configure your nameservers

Select a nameserver software.
Navigate to WHM’s Nameserver Selection interface (WHM >> Home >> Service Configuration >> Nameserver Selection). Then, select the desired nameserver software and click Save.
Notes:
- For most servers, we recommend that you select BIND.
- MyDNS does not support Certificate Authority Authorization (CAA) records, which certificate authorities use to determine if they can issue certificates for a domain.
- MyDNS requires that you add external nameserver IP addresses to the
resolv.conffile. - If you already use your registrar’s DNS services, you can skip this step.

Configure your default nameservers.
Navigate to WHM’s Basic WebHost Manager Setup interface (WHM >> Home >> Server Configuration >> Basic WebHost Manager Setup). At the bottom of the interface, enter the desired nameserver names in the text boxes and click Save Changes.
We recommend that you use the following guidelines when you name nameservers:
- The name must consist of a prefix, a dot (
.), and your domain. The common convention for nameservers is to prefix your domain name withns1(for example,ns1.example.comandns2.example.com). - Your nameservers cannot share a name.
- We strongly recommend that you use a domain that reflects your company’s main homepage URL.

Add IP addresses.
To add IP addresses to your server, perform the following steps:
- Navigate to WHM’s Add a New IP Address interface (WHM >> Home >> IP Functions >> Add a New IP Address).
- Enter the IP address or IP address range in the New IP or IP range to add text box.
- Enter the subnet mask in the Select a subnet mask for the IP or IPs above to use text box.
- Enter any IP addresses that you wish to exclude in the IPs and IP ranges to exclude from the range of new IPs.
- Click Submit.

Create A or AAAA entries for your nameservers.
In WHM’s Basic WebHost Manager Setup interface (WHM >> Home >> Server Configuration >> Basic WebHost Manager Setup), perform the following steps:
- Next to the appropriate Nameservers text box, click Configure Address Records. A new window will appear.
- The system will perform a DNS lookup on the nameserver that you entered.
- To enter a different IPv4 address, enter a new value in the Enter an IPv4 address to create an A record text box or Confirm the IPv4 address to create an A record text box.
- To enter a different IPv6 address, enter a new value in the Enter an IPv6 address to create an AAAA record (optional) text box.
- Click Configure Address Records.
-
The system will display the results of your changes. Click Close.
- Repeat these steps for each nameserver that you entered.
Create A entries for your hostname.
Navigate to WHM’s Add an A Entry for Your Hostname interface (WHM >> Home >> DNS Functions >> Add an A Entry for Your Hostname). Enter your server’s IP address in the available text box and click Add Entry.
Set up nameservers with your registrar.
After you configure your server’s nameservers, you must register your nameservers with your registrar. When you register nameservers, you announce their existence to the rest of the internet. You do not perform this action in cPanel & WHM, but you must do it or your nameservers will not function.
Click the links to the right for registrar instructions for some of the most popular domain registrars. Each set of instructions assumes that the following statements are true:
- You have an account with the registrar.
- You have already registered your domain with that company.
- You have logged in to your account and are on the first screen that you see after you log in.

Manage reseller nameservers.
After you configure your nameservers, you may wish to configure special nameservers for your server’s resellers. We design cPanel & WHM to accommodate a white-label reseller experience, which allows customizable branding. You can configure hosting resellers to each use their own nameservers.
To edit nameserver names and assign nameserver IP addresses for individual reseller nameservers, use WHM’s Edit Reseller Nameservers and Privileges interface (WHM >> Home >> Resellers >> Edit Reseller Nameservers and Privileges).
Note:
Resellers may use their own nameservers, but individual cPanel accounts cannot use their own nameservers.
Select a nameserver software.
Select the desired nameserver software. cPanel & WHM offers the following options:
- BIND
Note:
For most servers, we recommend that you select BIND.
- PowerDNS
- MyDNS
Important:
- MyDNS does not support Certificate Authority Authorization (CAA) records, which certificate authorities use to determine if they can issue certificates for a domain.
- MyDNS requires that you add external nameserver IP addresses to the
resolv.conffile.
- NSD
- Disabled
Note:
If you already use your registrar’s DNS services, you can skip this step.
Name your nameservers.
Enter the desired name for each of your nameservers. We recommend that you use the following guidelines when you name nameservers:
- The name must consist of a prefix, a dot (
.), and your domain name. The common convention for nameservers is to prefix your domain name withns1(for example,ns1.example.comandns2.example.com). - Your nameservers cannot share a name.
- We strongly recommend that you use a domain that reflects your company’s main homepage URL.
Create A entries and add IP addresses.
Select the desired options for your server’s A entries and IP addresses.
- We strongly recommend that you select both the Add “A Entries” for all Nameservers and Add “A Entries” for Hostname checkboxes.
- If you do not enter IP addresses in the Please enter an IP address for each of your nameservers text boxes, the system automatically assigns available IP addresses from your server to each nameserver.
Set up nameservers with your registrar.
After you configure your server’s nameservers, you must register your nameservers with your registrar. When you register nameservers, you announce their existence to the rest of the internet. You do not perform this action in cPanel & WHM, but you must do it or your nameservers will not function.
Click the links to the right for registrar instructions for some of the most popular domain registrars. Each set of instructions assumes that the following statements are true:
- You have an account with the registrar.
- You have already registered your domain with that company.
- You have logged in to your account and are on the first screen that you see after you log in.
Instructions for the most popular domain registrars
Manage reseller nameservers.
After you configure your nameservers, you may wish to configure special nameservers for your server’s resellers. We design cPanel & WHM to accommodate a white-label reseller experience, which allows customizable branding. You can configure hosting resellers to each use their own nameservers.
To edit nameserver names and assign nameserver IP addresses for individual reseller nameservers, use WHM’s Edit Reseller Nameservers and Privileges interface (WHM >> Home >> Resellers >> Edit Reseller Nameservers and Privileges).
Note:
Resellers may use their own nameservers, but individual cPanel accounts cannot use their own nameservers.
Do you have any questions about cpanel issues ? Ask away in the comments section below!