Domain SearchInstantly check and register your preferred domain name
 Web Hosting
 cPanel HostingHosting powered by cPanel (Most user friendly)
 KE Domains
 Reseller HostingStart your own hosting business without tech hustles
 Windows HostingOptimized for Windows-based applications and sites.
 Free Domain
 Affiliate ProgramEarn commissions by referring customers to our platforms
 Free HostingTest our SSD Hosting for free, for life (1GB storage)
 All DomainsBrowse and register domain extensions from around the world
 .Com Domain
 WhoisLook up domain ownership, expiry dates, and registrar information
 VPS Hosting
 Managed VPSNon techy? Opt for fully managed VPS server
 Dedicated ServersEnjoy unmatched power and control with your own physical server.
 SupportOur support guides cover everything you need to know about our services
At some point, shared hosting starts to show its limits. Your site loads fine in the morning, then slows down in the evening when traffic picks up. Pages take longer to open, and sometimes the site even goes down when there’s a spike in visitors.
Then is when you know it’s time to upgrade. But how do you migrate from shared hosting to VPS hosting?
So the promised land is a VPS with dedicated resources, which means your site won’t be competing with others for performance.
Here, pages load faster, traffic spikes are easier to handle, and you can install custom software, adjust server settings, and improve security with greater flexibility thanks to root access.
If your website is targeting users in East Africa, you get the option to host your VPS in Nairobi, which keeps your data closer to your audience, reducing loading times for visitors in nearby regions.
It also helps with local data compliance and gives you access to support that understands the regional market.
Now, before you begin your migration journey, make sure you have the basics in place.
You should be comfortable using a file manager or SSH, have a complete backup of your current website, and have your VPS plan ready to go.
Once these are sorted, the migration process becomes much smoother and far less risky.
Now, let me show you how to migrate your website from shared hosting to VPS.
Step-by-Step Guide: How to Migrate from Shared Hosting to VPS
Step 1: Create a Full Backup of All Files and Databases
Start here. Before moving anything, make sure you have a complete copy of your website. If something doesn’t go as planned, this backup is what brings everything back to normal.
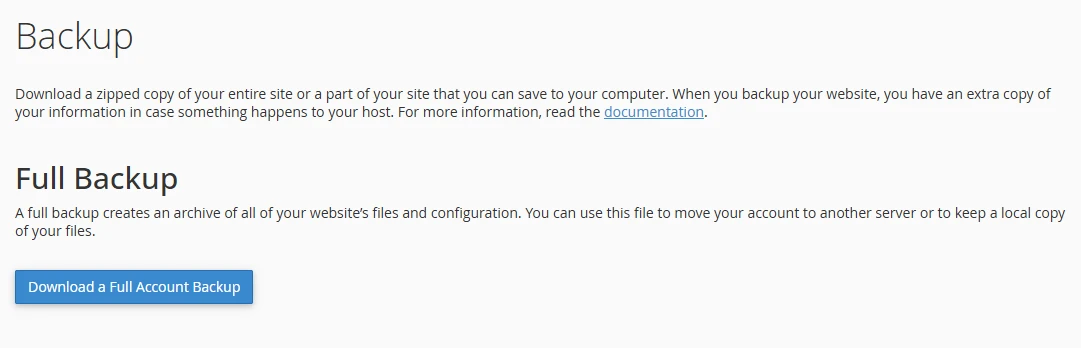
1. Log in to your current hosting control panel and head to the Files or Backups section.
2. Find the “Backup” or “Backup Wizard” section to generate and download a full backup.
3. For manual backup:
- Look for the main website folder, usually called
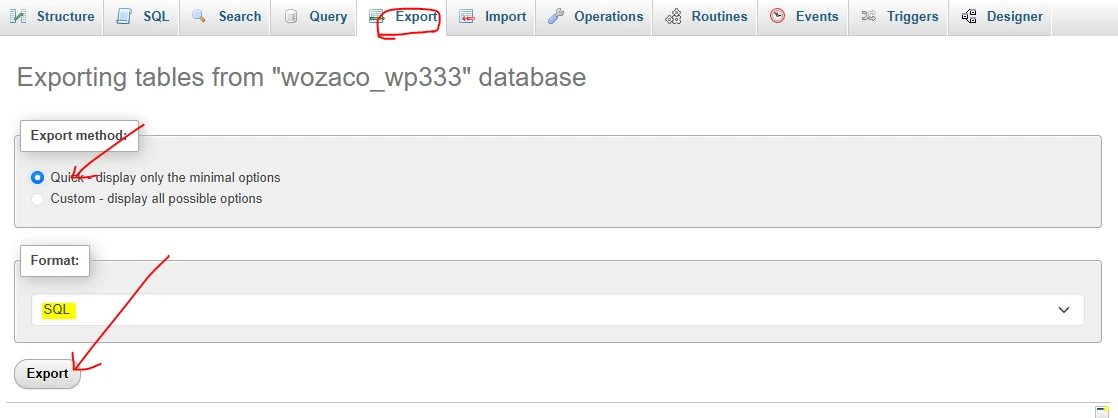
public_htmlorwww. Use an FTP client like FileZilla to download the entire folder as a.zipor.tar.gzfile and save it on your computer. - Next, back up your database using phpMyAdmin by selecting the database you want from the left sidebar, then clicking the Export tab at the top. Choose the quick export method with the format set to SQL, and click “Export” to download the .sql backup file directly to your computer.
4. Keep both the website files and the database file in a safe place.
If you’re running a WordPress site, take a moment to note down your current database name, username, and password, since you’ll need those details when setting things up on your VPS.
This step might feel simple, but it’s the one that keeps everything safe while you move.
Step 2: Set Up Your VPS
Before you move your website, your new VPS needs to be ready to receive it.
1) Choose a VPS Hosting Plan
Start by choosing a plan that matches your current needs, with a bit of room to grow.
If your site is just starting to gain traction, an entry-level VPS with modest RAM and storage will do the job.
If you’re already handling steady traffic or running an online store, it’s worth going for a higher plan so you don’t run into performance issues again too soon.
2) Choose the operating system.
Most VPS providers will give you options like Ubuntu or AlmaLinux.
If you’re more comfortable with beginner-friendly environments and lots of online guides, Ubuntu is usually the easier choice.
AlmaLinux, on the other hand, is a solid option if you prefer a setup similar to traditional cPanel hosting environments.
Either way, they both work just fine, but it depends on what you’re more comfortable managing.
3) Managed vs Unmanaged VPS.
With a managed VPS, most of the heavy lifting is handled for you.
The hosting provider takes care of server setup, updates, security patches, and general maintenance. This option works well if you’d rather focus on running your website instead of managing a server.
With an unmanaged VPS, you’re in full control.
That also means you’re responsible for setting everything up yourself. This route works if you’re comfortable working with servers or want complete flexibility.

Once your VPS is active, you’ll receive a few key details: your server’s IP address, the default username (usually root), and the password.
If you chose a managed plan, the basic environment will already be prepared for you.
If you went with unmanaged, you’ll need to connect to your server using SSH and install the required software. This typically includes a web server like Apache or Nginx, along with PHP and a database server such as MySQL.
Once that’s in place, your VPS is ready for the next step.
Step 3: Transfer Your Website Files to the VPS
With your VPS ready, it’s time to move your website files from your old hosting account to the new server.
The simplest way to do this is by using FileZilla, a free SFTP client that gives you a visual, drag-and-drop interface.
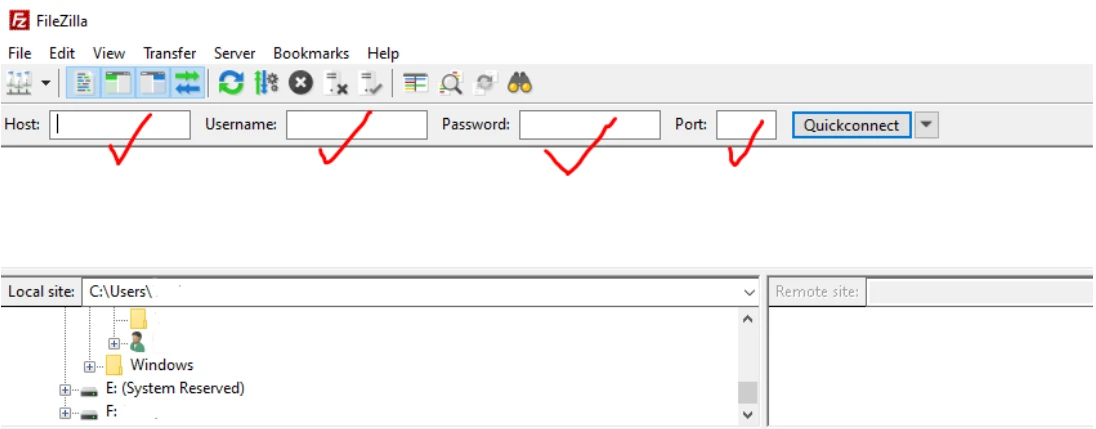
1. Start by opening FileZilla. At the top, you’ll see a few fields to fill in:
- Host: your VPS IP address
- Username: root
- Password: your root password
- Port: 22
2. Click Quickconnect, and after a few seconds, you should see your server files appear on the right-hand side.
3. On that right side (the remote server), go to your web directory. In most cases, this is /var/www/html/. If it’s not there yet, you can quickly create it using SSH with a command like:
mkdir -p /var/www/html4. Now look at the left side of FileZilla; that’s your computer. Find the folder where you saved your website backup. Once you have it open, simply drag and drop the files from the left side to the right side.
Give it a few minutes to upload, depending on the size of your site.
5. If you prefer working with the command line, you can use SSH instead. Connect to your server using:
ssh root@your-vps-ipThen move into your web directory:
cd /var/www/htmlFrom there, you can transfer files using tools like scp or wget.
That said, if you’re not used to the terminal, FileZilla is usually faster and easier to manage.
6. Once the upload is complete, take a moment to confirm everything is in place. Check that all your main folders, like wp-content, themes, plugins, and uploads, are present and intact.
This quick check helps you catch missing files early before moving on to the next step.
Step 4: Transfer and Import Your Database
Now that your website files are in place, the next step is moving your database.
1. Start by uploading your .sql backup file to the VPS using FileZilla. It’s best to place it in a temporary folder, such as /root/sql_backup/.
If the folder doesn’t exist yet, you can create it after connecting to your server via SSH:
mkdir -p /root/sql_backup && cd /root/sql_backup2. Once your file is on the server, you’ll need to create a new database.
Connect to MySQL:
mysql -u root -p

Enter your MySQL root password, then run the following commands:

CREATE DATABASE new_database_name;

CREATE USER 'new_db_user'@'localhost' IDENTIFIED BY 'strong_password';

GRANT ALL PRIVILEGES ON new_database_name.* TO 'new_db_user'@'localhost';

FLUSH PRIVILEGES;

EXIT;
3. With the database ready, import your backup:
mysql -u new_db_user -p new_database_name < /root/sql_backup/your-backup-file.sqlEnter the password when prompted, and give it a moment to complete.
Step 5: Update Configuration Files
Your website now needs to connect to the new database.
1. Go to your website directory:
cd /var/www/html2. Open the configuration file:
nano wp-config.php3. Find the database settings and replace them with the new details:
define('DB_NAME', 'new_database_name');

define('DB_USER', 'new_db_user');

define('DB_PASSWORD', 'strong_password');

define('DB_HOST', 'localhost');
4. Save and close the file by pressing Ctrl + X, then Y, then Enter.
5. Next, fix file permissions so your server can access everything correctly:
chown -R www-data:www-data /var/www/html/

chmod -R 755 /var/www/html/

find /var/www/html/ -type f -exec chmod 644 {} \;
Step 6: Update Your DNS Records
The final step is pointing your domain to the new VPS.
Log in to your domain registrar or hosting dashboard and go to the DNS settings. Look for the A record (usually marked as @) and update its value to your VPS IP address.
Save the changes.
After this, there’s a short waiting period while the changes spread across the internet.
This can take anywhere from a few minutes to up to 24 hours. During that time, some visitors may still land on the old server while others start seeing the new one.
Step 7: Final Check and Secure Your Site
Once your DNS changes have taken effect, it’s time to confirm everything is working as expected.
1. Start by clearing your browser cache, then open your website. Click through a few pages and take your time here, to check forms, logins, images, and anything interactive like a contact form or shopping cart.
2. If something doesn’t work, go back and review your database details in wp-config.php or double-check your file permissions.
3. With functionality confirmed, move on to basic security.
Install an SSL certificate so your site loads over HTTPS. On Ubuntu, you can do this with:
apt install certbot python3-certbot-apache

certbot --apache -d yourdomain.co.ke
(If you’re using Nginx, use the Nginx version of Certbot instead.)
4. Next, enable a simple firewall:
ufw allow OpenSSH

ufw allow 80

ufw allow 443

ufw enable
If you’re on a managed VPS, most of this is already handled for you. Security setup, updates, and performance tweaks are taken care of in the background, which saves you time and effort.
Common Issues and Quick Fixes
A few hiccups can come up during migration, but most are easy to fix:
- Database connection error
Check your database name, username, and password in wp-config.php.
- Old version of the site still showing
Give DNS more time to update, or clear your browser and DNS cache.
- Permission errors
Re-run the chown and chmod commands to reset access rights.
- Slow speed after moving
This usually improves once everything settles. Hosting your VPS closer to your audience, especially within Nairobi, often reduces load times significantly.
If you run into anything you can’t resolve, our support is there to help.
Ready for Better Performance?
After completing the move, the difference is usually clear.
Your site loads faster, handles more visitors without slowing down, and gives you the flexibility to grow without constant limits.
For Kenyan websites, at Truehost, we have VPS hosted in Nairobi, which keeps your audience closer to your server, improving speed across Kenya and the wider East African region.
It also means quicker support and infrastructure built with local needs in mind.
If you want full control, our standard VPS gives you that freedom. If you’d rather skip the server management side, our managed VPS takes care of updates, security, and optimization for you.
When you’re ready to make the switch, choose a VPS plan that fits your current traffic and leaves room for growth.
And if you need a hand along the way, our support is always available to help; don’t hesitate to reach out.