Domain SearchInstantly check and register your preferred domain name
 Web Hosting
 cPanel HostingHosting powered by cPanel (Most user friendly)
 KE Domains
 Reseller HostingStart your own hosting business without tech hustles
 Windows HostingOptimized for Windows-based applications and sites.
 Free Domain
 Affiliate ProgramEarn commissions by referring customers to our platforms
 Free HostingTest our SSD Hosting for free, for life (1GB storage)
 All DomainsBrowse and register domain extensions from around the world
 .Com Domain
 WhoisLook up domain ownership, expiry dates, and registrar information
 VPS Hosting
 Managed VPSNon techy? Opt for fully managed VPS server
 Dedicated ServersEnjoy unmatched power and control with your own physical server.
 SupportOur support guides cover everything you need to know about our services
Every dynamic website runs on a database. From WordPress blogs to e-commerce stores to custom web applications, databases are what keep your content, user data, and settings organized and accessible.
Without one, your site is essentially a static page, and in today’s web, that limits nearly everything you can do.
One reason many website owners prefer CyberPanel is how simple it makes server management. You can create databases in just a few clicks without dealing with complicated commands or technical setups.
Especially when you’re on reliable hosting platforms such as Truehost, the process becomes even smoother because the VPS already comes optimized for speed, stability, and easy management.
Now, before you begin to create databases in CyberPanel, make sure you have a few basics ready:
- Active CyberPanel installation (At Truehost we support CyberPanel VPS Hosting, making this easy for you).
- Your CyberPanel admin login credentials.
- A website or domain already added inside CyberPanel.
- A clear idea of what the database will be used for. For example, most WordPress websites require one database for each installation.
If you are still looking for a server, Truehost VPS Hosting gives you affordable VPS options with daily backups, scalable resources, and local support in Kenya, making it easier to get started with CyberPanel hosting.
Step-by-Step: How to Create Databases in CyberPanel
Creating a database in CyberPanel only takes a few minutes. Once you know where the settings are located, the process becomes very direct.
Step 1: Log Into Your CyberPanel Dashboard
Start by opening your CyberPanel login page in your browser. In most cases, the login URL looks something like this:
https://your-server-ip:8090
Enter your admin username and password, and select language, then click “Sign In” to access the dashboard.

After logging in, you will see the main control panel where you can manage websites, databases, emails, SSL certificates, backups, and server settings from one place.
Step 2: Navigate to Databases
Once you are inside the dashboard, move to the left-hand menu and look for the Databases section.
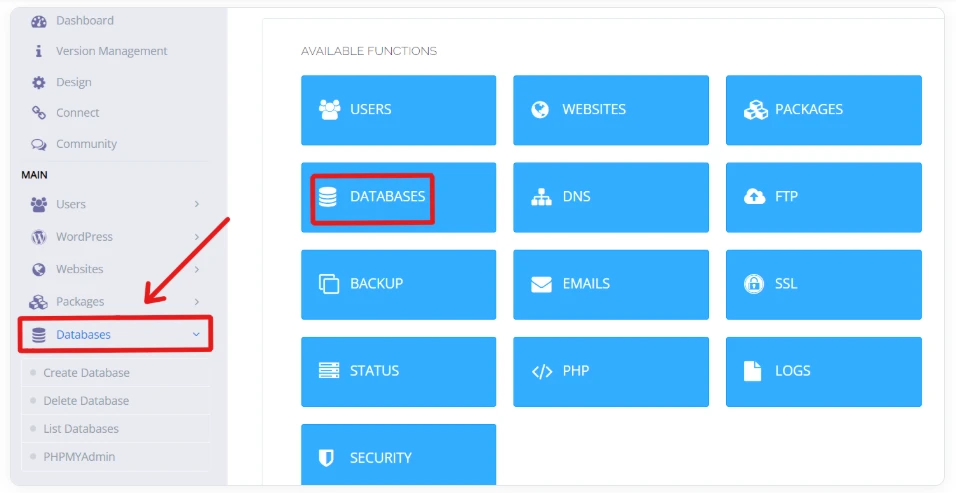
Click on it to expand the available options. From there, you can access tools for:
- Creating new databases
- Managing existing databases
- Assigning database users
- Accessing database management tools like phpMyAdmin
You can also find the database section directly from the main dashboard shortcuts, depending on your CyberPanel version.
Step 3: Click “Create Database”
Inside the Databases section, click on Create Database. This opens the setup page where you will enter the details for your new database.
The form is simple and only takes a minute to complete.
Step 4: Fill in the Database Details
You will now see several fields that need to be completed before the database can be created.
a) Select the Website or Domain
Start by choosing the website or domain connected to the database from the dropdown menu.
This helps CyberPanel organize your databases correctly, especially if you host multiple websites on the same VPS.
b) Enter the Database Name
Next, type in your database name.
A good approach is to keep the name related to your website so it is easier to identify later. For example:
mykenyasite_dbshopstore_dbblogportal_db
Being able to recognize a website’s data from its database name becomes very helpful once you start managing several websites on the same server.
c) Create the Database Username
After that, enter the database username.
In many cases, CyberPanel automatically adds a prefix linked to your website account. You only need to complete the remaining part of the username.

Try using a simple but recognizable username still connected to the site or application. You could use a similar username to the database name.
d) Generate a Strong Password
The final step is creating a secure password for the database user.
CyberPanel includes a built-in password generator that can instantly create a strong password for you. This is usually the safest option since generated passwords are harder to guess.
Make sure you save the following details somewhere secure:
- Database name
- Database username
- Database password
You will need them later when installing applications like WordPress or connecting your website to the database.
Step 5: Click “Create Database”
After filling in all the required details, click the Create Database button at the bottom of the page.
CyberPanel will process the request and, within a few seconds, display a success message confirming that the database has been created successfully.
Once you see the confirmation, your database is ready to use.
You can now connect it to your website, install applications like WordPress, or import existing database files if you are migrating a site.
Common Issues and Troubleshooting When Creating Databases in CyberPanel
Most database setups work smoothly, but occasionally you may run into small issues during the process. The silver lining is that many of them are easy to fix.
1) “Operation Failed” or Permission Errors
This usually happens when:
- The database name already exists
- The username conflicts with another account
- The CyberPanel account lacks the required permissions
Start by trying a different database name or username. If the issue continues, log out and back into CyberPanel, then try again.
On VPS servers, restarting CyberPanel services can also help clear temporary permission issues.
2) Database Not Showing Up
Sometimes the database is created successfully but does not appear immediately in the database list.
Refreshing the page or logging out and back in often fixes this. You can also check through phpMyAdmin to confirm the database was created correctly.
If the database still does not appear, the database service may need a restart.
3) Import Size Limits
When importing large database backups, you may run into upload size restrictions inside phpMyAdmin.
This is common when migrating larger websites or e-commerce stores.
To fix this, increase the PHP upload limits on your server by adjusting settings such as the following:
upload_max_filesizepost_max_sizememory_limit
Most VPS users can update these settings directly from CyberPanel or through the server configuration files.
4) Firewall or Port Issues for Remote Access
If you want to connect to the database remotely using external tools, the server firewall may block the connection.
In many cases, you will need to:
- Open the required MySQL or MariaDB port
- Allow remote database access
- Whitelist your IP address if security rules are enabled
Be careful when enabling remote access since incorrect firewall settings can expose your server to security risks.
5) When to Contact Support
If you have tried the common fixes and the issue still remains, it may be time to contact your hosting provider.
At Truehost, our support can help with:
- CyberPanel configuration issues
- VPS permission problems
- Database service failures
- Firewall setup
- Backup restoration
- Performance troubleshooting
Having local support available can save a lot of time, especially when managing production websites or client projects.
What Next After Creating a Database
Once your database is ready, the next step is managing it and connecting it to your website or application.
CyberPanel makes this easier through phpMyAdmin, which you can access directly from the Databases section.
From there, you can view tables, edit records, run SQL queries, export backups, and handle everyday database tasks without using command-line tools.
If you need to migrate a website or restore a backup, phpMyAdmin also allows you to import .sql or .sql.zip files through the Import tab. This is commonly used when moving WordPress websites between servers or restoring existing projects.
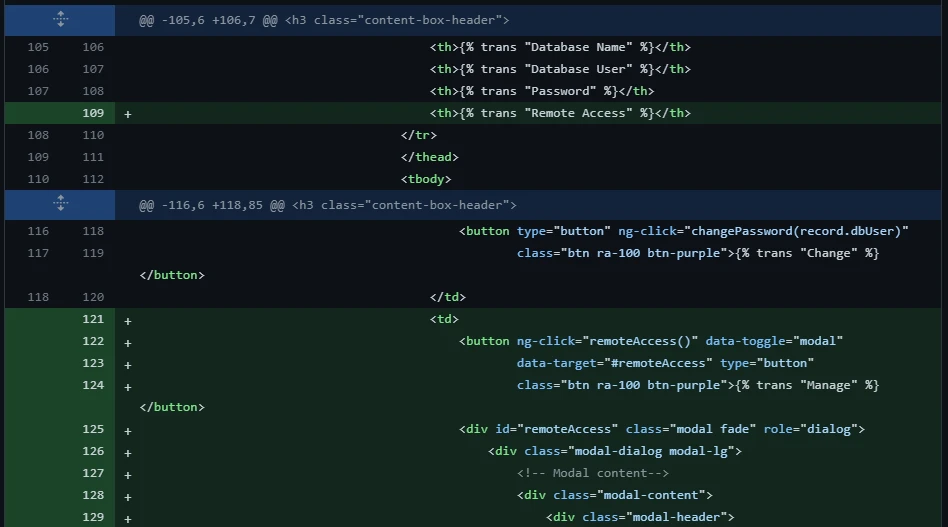
You can also manage all your databases from the List Databases section, where you can view existing databases, change passwords, remove unused databases, or quickly access phpMyAdmin.
For remote connections using tools like MySQL Workbench, CyberPanel allows you to add your IP address under the database management settings.
Just make sure port 3306 is open on your firewall and remote access is only allowed for trusted IP addresses to keep your server secure.
Lastly, with reliable hosting from us at Truehost, managing databases becomes faster, smoother, and much easier as your website grows.