Domain SearchInstantly check and register your preferred domain name
 Web Hosting
 cPanel HostingHosting powered by cPanel (Most user friendly)
 KE Domains
 Reseller HostingStart your own hosting business without tech hustles
 Windows HostingOptimized for Windows-based applications and sites.
 Free Domain
 Affiliate ProgramEarn commissions by referring customers to our platforms
 Free HostingTest our SSD Hosting for free, for life (1GB storage)
 All DomainsBrowse and register domain extensions from around the world
 .Com Domain
 WhoisLook up domain ownership, expiry dates, and registrar information
 VPS Hosting
 Managed VPSNon techy? Opt for fully managed VPS server
 Dedicated ServersEnjoy unmatched power and control with your own physical server.
 SupportOur support guides cover everything you need to know about our services
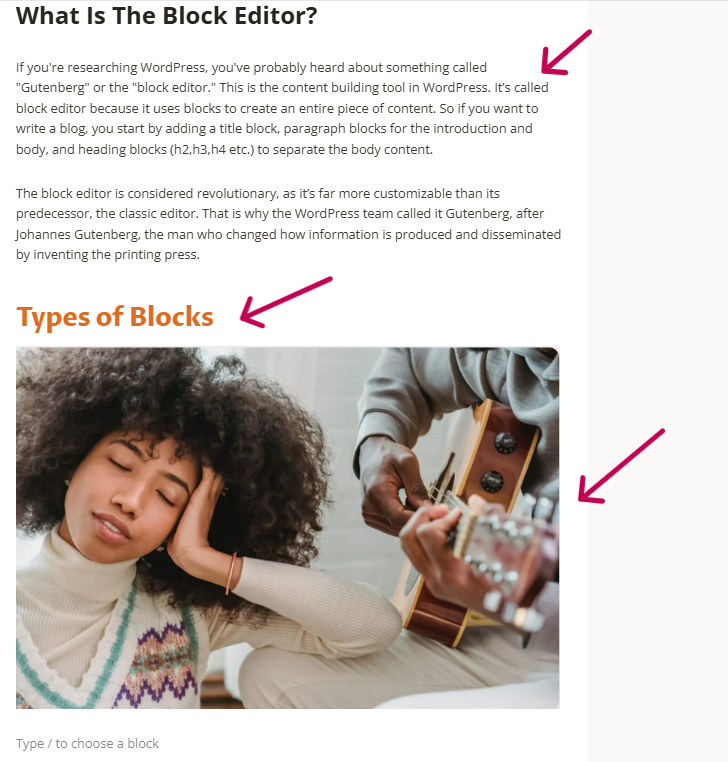
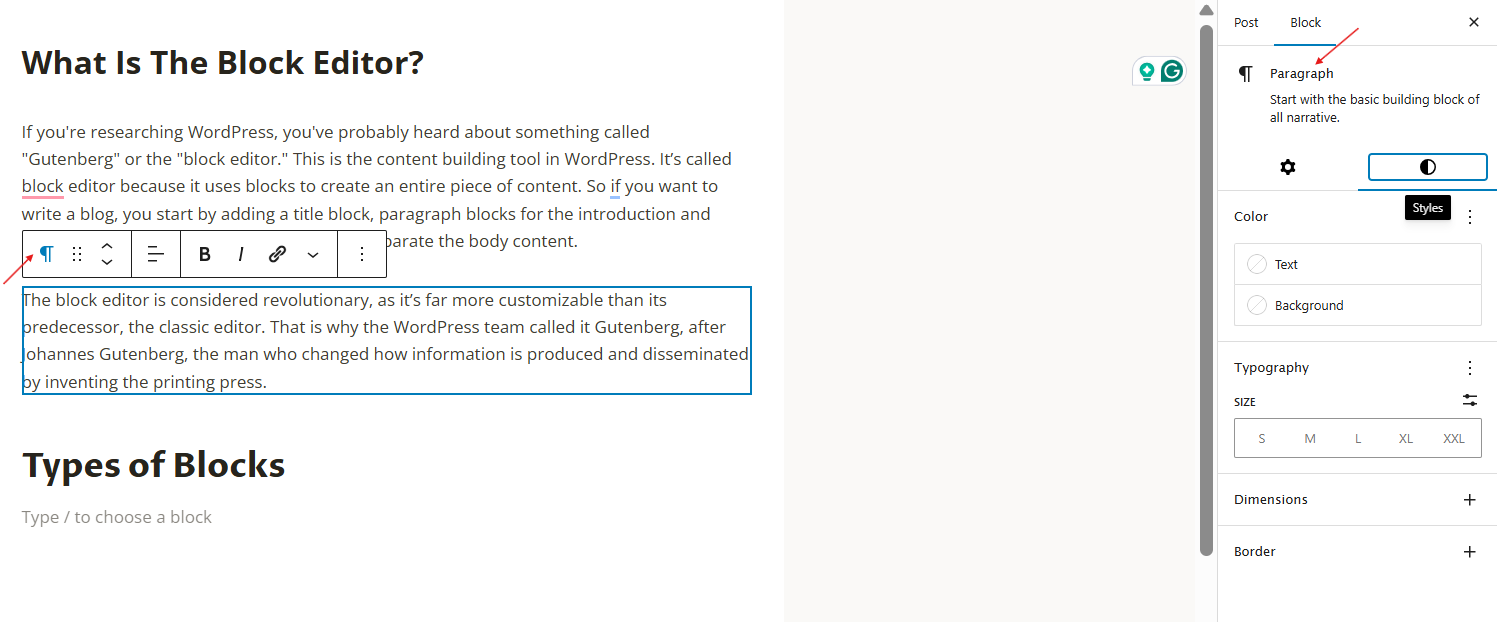
If you’re researching WordPress, you’ve probably heard about something called “Gutenberg” or the “block editor.” This is the content building tool in WordPress.
It’s called the block editor because it uses blocks to create an entire piece of content.
So, if, for example, you want to write a blog, you start by adding a title block, paragraph blocks for the introduction and body, and heading blocks (h2, h3, h4, etc.) to separate the body content.
The block editor is considered revolutionary, as it’s way more customizable than its predecessor, the classic editor.
That is why the WordPress team named it Gutenberg, after Johannes Gutenberg, the man who revolutionized the way information is produced and disseminated by inventing the printing press.
Also Read: How to Install WordPress for Beginners
How Did The Block Come To Be?
The block editor isn’t just a simple content creation tool, but is part of WordPress’s ambitious four-phase plan to create a complete site-building experience.
Phase 1 of the plan launched with WordPress 5.0 in 2018 and introduced the block editor. The editor replaced the traditional TinyMCE editor (the classic editor) with a more intuitive, visual approach.
This is the classic editor:

Phase 2 made full site editing possible by introducing block themes. The block directory is a central place containing all blocks. You can access the directory inside the editor (shown on the left in the image below) by clicking on the + sign just above the directory.

In addition to the block directory, phase 2 also introduced navigation blocks and block themes.
Block themes are website themes that you can edit with blocks, making it possible to easily build and edit an entire website. The themes shown in the image above, for instance, are theme blocks, and they allow you to do far more (e.g, add maps, countup, count down) with your website than regular blocks. (see more in the section about full site editing below)
Navigation blocks contain the navigation menu. This phase was released with WordPress 5.9 in 2022.
Phase 3 is still underway. Its focus is to introduce real-time collaboration and multi-user editing capabilities. Once released, it will enable multiple people to work on the same project inside WordPress, in real-time.
Phase 4 is also underway. It will introduce multi-lingual support into the WordPress core, so you’ll no longer need to use translation plugins.
How Does The Block Editor Work?
The block builder treats every piece of content on your webpage or blog post as a block. Your headline is a block. Your paragraph text is a block. Images, videos, buttons, and contact forms are all individual blocks that you can move around, style, and customize without affecting any other part of your website or content.
For example, the sample post below has paragraph blocks, a heading block (H2), and an image block.
The block approach is much simpler to work with. Instead of struggling with HTML code or trying to figure out why your image won’t align properly, you just click on the plus sign inside the editor, or select the block you want from the directory on the left page of your editor.
Types of Blocks
Gutenberg has hundreds of blocks, all organized in categories depending on their function. Each block comes with its settings and styles.
Text blocks include paragraphs, headings, quotes, code snippets, and lists. Text blocks offer rich formatting options and can be customized with typography settings, colors, and spacing.
Media blocks add visual content like images and videos. If you want sophisticated image layouts, you can use advanced media blocks like cover or media & text.
Design blocks are structural blocks that allow you to create layouts and organize content. They include columns, groups, rows, spacers, and separators. You can build complex pages with design blocks without coding.
Widget blocks contain WordPress widgets such as archives, calendars, tag clouds, and social media icons.
Theme blocks interact with theme elements, allowing you to display site titles, post metadata, navigation menus, and other theme-specific content.
Embed blocks let you display content from external platforms like YouTube, Twitter, Instagram, Spotify, and other services.
Advanced Blocks
WordPress has a range of tools to help you design attractive, functional page sections:
- Media & text block: This block lets you place an image next to a block of text. It’s great when you want to display content side by side, e.g, service descriptions, product overviews, or even before-and-after images.
- Multi-column layouts: You can use the columns block to build structured content areas. This feature is great for:
- Comparing service packages
- Displaying team members side-by-side
- Listing features of a product or service
- Showing contact info with maps or office hours
- Cover block: The Cover block allows you to layer text over images or videos, making it easy to create stylish banners, hero sections, page intros, or eye-catching headers.
- Brand colors: This feature is available in the theme settings. It lets you define your brand’s color palette once. These colors will then appear in the color picker throughout your editor, without the need to memorize or paste hex codes.
- Patterns: If you have commonly used page sections, such as CTAs, FAQs, contact forms, or testimonials, you can save templates or patterns for them (see section about patterns below). This makes page-building much faster and more consistent, especially on larger sites.
Learn the Block Editor Interface
The block editor (Gutenberg) interface is simple, clean, and clutter-free. This is what a blank block editor looks like before you start adding any content to it:
The Block Inserter
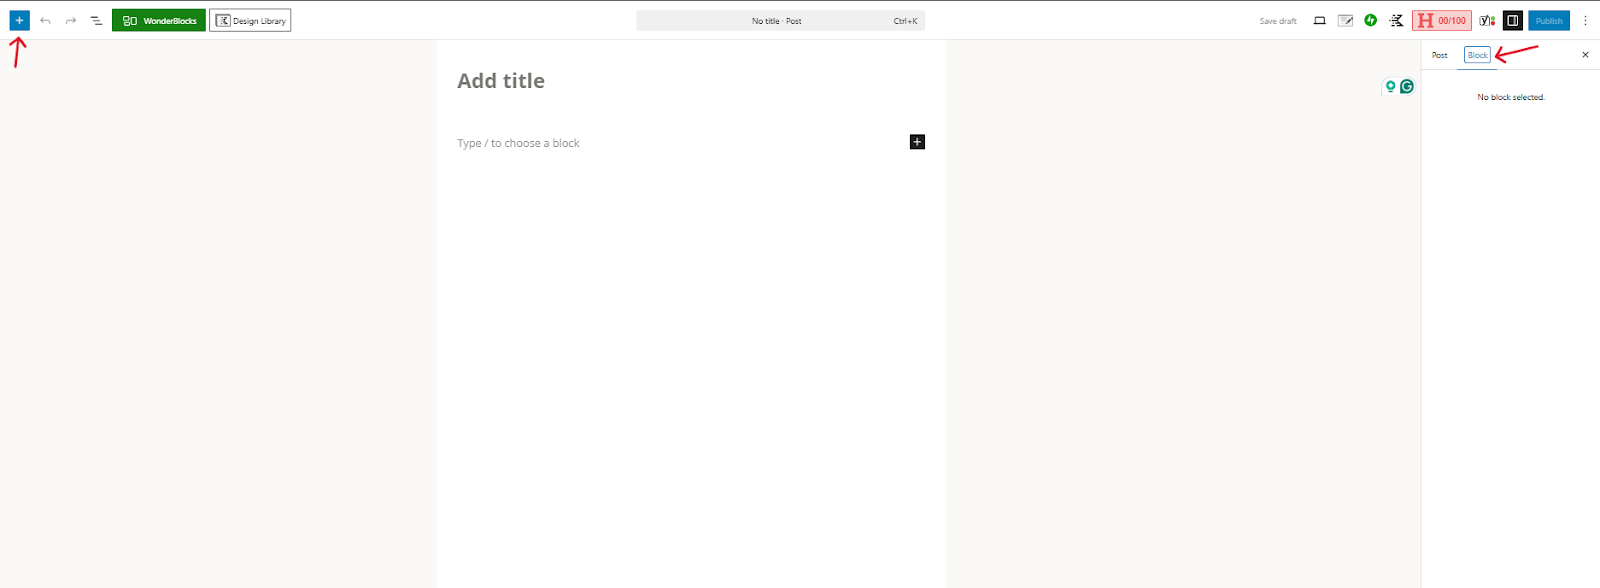
The block inserter is a simple blue plus icon that gives you access to all available blocks (shown by the arrow in the top-left corner of the editor). To find and add blocks, you can:
- Use browse mode to see block previews and descriptions
- Search for a specific block by typing keywords
- Filter by category
- Select from recent blocks
The Settings Sidebar
The right sidebar contains two main tabs:
- Block settings(shown by the arrow on the top right side of the screen in the image above) for customizing the selected block with options for styling, spacing, colors, and advanced features like custom CSS classes.
- Document settings (labeled post) for managing page-level settings such as SEO, featured images, categories, and publishing options.
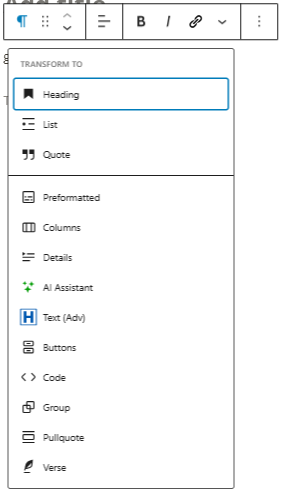
The Block Toolbar
This is the small menu box that appears in the block editor when you select a block, giving you options such as:
- Text formatting (bold, italic, links)
- Alignment controls
- Block-specific settings (e.g, aspect ratio if working with an image block)
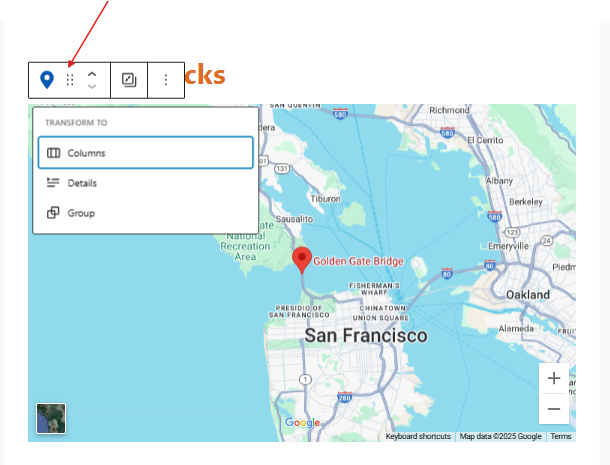
- Transform(to convert between block types)
- Drag handles for repositioning
The block toolbar adapts to the block type you select. Compare the two toolbar options shown below. The one on the left is the image toolbar, and the one on the right is the text (paragraph) toolbar. They have different toolbar options.
Create A Blog Post or Page With The Block Editor
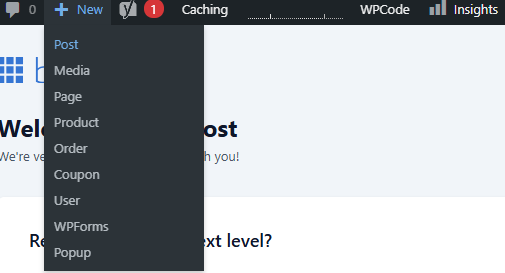
1) Start a new page or post
From your WordPress dashboard, click “Add New” under Pages or Posts.
This will open the Gutenberg editor. Just to recap:
- The main area in the center of the editor is where you’ll build your page or blog post.
- On the right side, you’ll see settings for whatever block you’re working with.
- At the top, you’ll find tools for saving, previewing, and publishing your page.
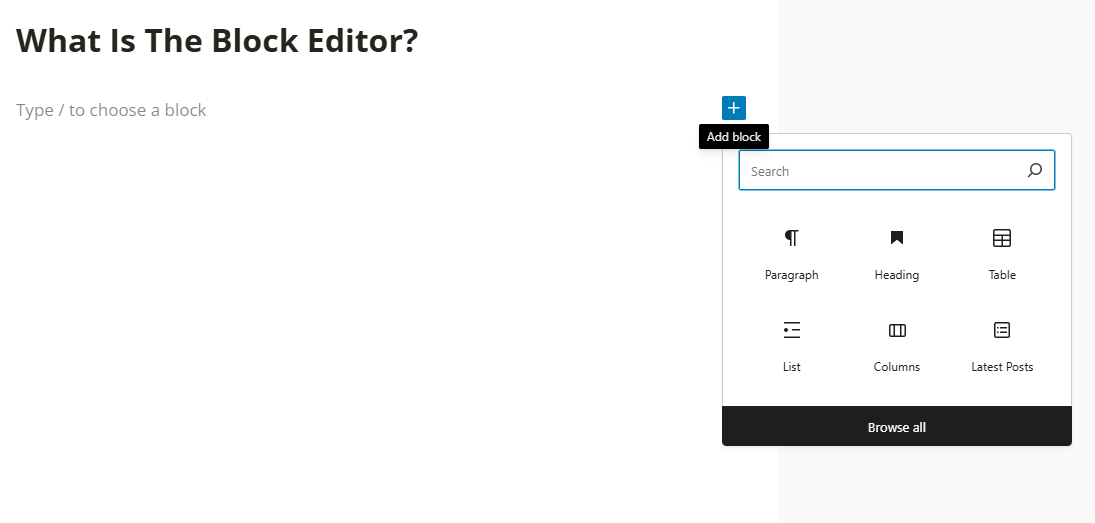
2) Add your first block
Click the blue + icon to open the block library or the black + icon in the content area to choose a block. You’ll see a wide array of options, from simple paragraph and heading blocks to more advanced blocks like Columns, Cover, and Media & Text.
3) Customize your block
Once you add a block, a toolbar will appear above it with customization options. You can change text alignment, make text bold or italic, and adjust settings and style in the right-hand sidebar.
4) Move blocks around
To rearrange blocks, click and hold 6 dots on the toolbar to grab your block and drag it to its new position by moving your mouse.
5) Save blocks for later (re-usable patterns)
Click the + icon and navigate to the “Patterns” tab. Browse the pre-made layouts and insert one with a single click. (More about reusable patterns below)
The Block Editor’s Reusable Patterns
Block patterns are a powerful, time-saving, and efficient feature because they let you save layouts that you can reuse repeatedly instead of rebuilding them from scratch every time. In addition to the time you save, you also get a consistent look across all pages. There are two types of block patterns: synced and unsynced patterns.
Synced patterns stay connected across every area where they’re used. If you make an update to a synced pattern, it automatically reflects everywhere it appears on your site. This keeps critical elements consistent and up to date. You can save the following blocks as synced patterns:
- Announcements
- Call-to-action (CTA) buttons
- Header and footer elements
- Business contact details or support information
Unsynced patterns act more like starting templates or layouts, and you can modify them without affecting other areas where you’ve used them. They are great for maintaining a consistent content structure in sections that require unique content, such as:
- Blog posts
- Product showcases
- Team member bios
- Testimonials
- Case study sections
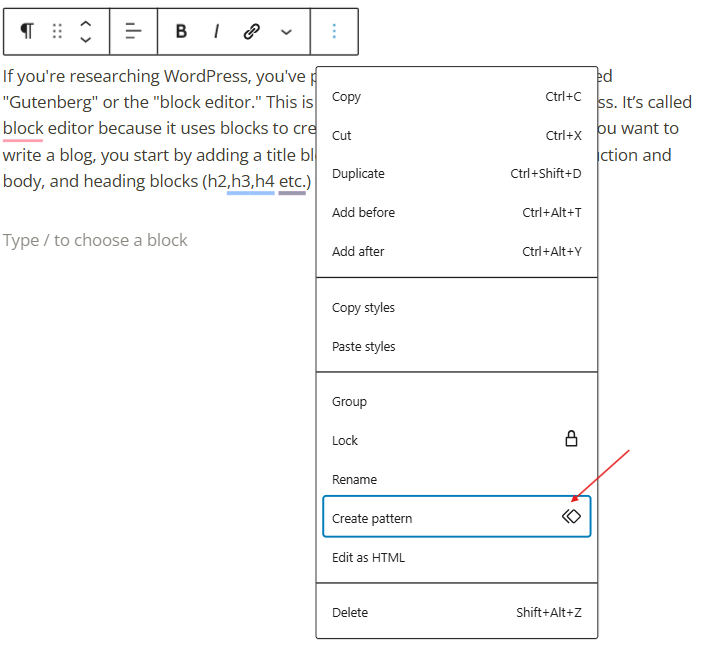
Creating custom patterns is simple. Once you design a layout that you’d like to use later, open the list view and select all the blocks that make up your layout.
- Click the Options menu (three dots) and choose “Create pattern” from the dropdown.
- Give your pattern a name and choose whether it should be synced or not.
- When you need to use the pattern, you can find it under the “patterns” tab in the site editor.
Full-Site Editing With The Block Editor
Full Site Editing brings the block editor experience to every part of your website, allowing you to build and customize your entire site.
Full Site Editing is made possible by templates, which enable you to create layouts that you can customize for every part of your site.
Templates are built using blocks. And as we’ve already mentioned, blocks let you control how you structure and style your pages and posts.
There are three types of templates:
Global Templates
These apply changes across your site to maintain visual consistency. Examples include:
- Header templates. If you customize your site’s logo, menu, and navigation using a header template, the changes will apply across all pages.
- Footer templates. These ensure all information that appears on the footer, such as copyright info, links, and widgets, remains consistent.
- 404 error pages. You can use these templates to create helpful, branded error pages with search bars or navigation links.
- Archive pages – Design the layout for blog indexes, categories, and tags.
Content-Specific Templates
These templates allow tailored layouts for different content types, improving the reading experience and SEO. Examples include:
- Single post templates that you can use to customize blog post layouts with unique headers, author blocks, or CTAs.
- Page templates that allow you to apply specific designs to individual static pages.
- Category and tag archives that group content by taxonomy with unique layouts.
- Author archives for showcasing author bios, images, and post collections.
Custom Templates
These are templates built for special use cases such as marketing campaigns. Examples include:
- Landing page templates for creating distraction-free conversion pages with no header or footer.
- Product page templates for showcasing individual items with galleries, features, and pricing.
- Portfolio templates for designing visual layouts, galleries, or case studies.
- Event templates for sharing event details, maps, RSVP forms, and schedules.
To unlock the full power of Full Site Editing, you need a block-based theme, which is a WordPress theme built to support FSE features. Block-based themes offer a more design-friendly environment compared to traditional themes.
How The Block Editor Benefits Your Business
The block editor helps you build attractive websites for any business niche. But beyond aesthetics, it has far-reaching benefits for your business, such as:
1) You can build websites fast and efficiently
The intuitive, drag-and-drop interface cuts the time it takes to create and publish content. Whether it’s a new blog post, a landing page for a new product, or an update to your home page, you can do it faster than with HTML or the old classic editor.
2) Ensuring brand consistency
With reusable blocks and full site editing, you can enforce specific fonts, colors, and layouts across your entire site without having to remember the exact settings for each block. A consistent appearance across your site builds trust and promotes your brand’s professional image.
3) Better SEO and readability
A well-structured website is more likely to perform better on search engines, because structure makes it easy for users to read. Blocks such as headings (H1, H2, H3), bulleted lists, and blockquotes help you structure your content for a better reading experience. Headers also signal to search engines how content should be prioritized.
4) Cost savings
With the block editor, you are no longer dependent on a developer for every small change. With a few clicks, you can add a new team member to your team page, add a promotional banner, images, or even build out entire pages. This independence translates directly to savings in your budget.
5) Build modern, mobile-responsive websites
The block editor makes it simple to create visually appealing, engaging, and mobile-responsive layouts. You can easily add image galleries, full-width headers, multi-column layouts, and integrated videos, all auto-adjusted to display properly on your mobile phone, tablet, and desktop.
Build a WordPress Site with TrueHost
The block editor (Gutenberg) puts the power of website design and management directly into your hands. For a non-technical business owner, this means you don’t have to deal with slow, costly, and often frustrating website updates.
Ready to invest in a new WordPress website? Build a WordPress Site With TrueHost Now.