Domain SearchInstantly check and register your preferred domain name
 Web Hosting
 cPanel HostingHosting powered by cPanel (Most user friendly)
 KE Domains
 Reseller HostingStart your own hosting business without tech hustles
 Windows HostingOptimized for Windows-based applications and sites.
 Free Domain
 Affiliate ProgramEarn commissions by referring customers to our platforms
 Free HostingTest our SSD Hosting for free, for life (1GB storage)
 All DomainsBrowse and register domain extensions from around the world
 .Com Domain
 WhoisLook up domain ownership, expiry dates, and registrar information
 VPS Hosting
 Managed VPSNon techy? Opt for fully managed VPS server
 Dedicated ServersEnjoy unmatched power and control with your own physical server.
 SupportOur support guides cover everything you need to know about our services
Redirecting a domain simply means that when someone types in your old domain, they are automatically taken to your new website.
From their side, everything feels perfect, since they don’t have to click anything extra or search again.
This comes in handy in several situations.
For example, if you’re rebranding and switching to a new business name, you don’t want to lose visitors who still remember your old domain.
The same applies when you’re combining multiple websites into one, cleaning up duplicate content issues, or protecting your brand from common typos and misspellings.
It’s also useful when you still own an old or expired domain and want to put it to good use instead of letting traffic go to waste.
There isn’t just one way to set this up. The method you choose depends on how your website is built and where your domain is hosted, but the goal is always the same: make sure every visitor lands exactly where they’re supposed to.
If you’ve never done this before, don’t worry, because in this guide, I’ll give you clear steps for each type of redirect and explain why businesses use them.
So pick one of the four practical ways and set one up today without breaking your site or affecting your search rankings.
Types of Domain Redirects
Each type sends a slightly different signal to both browsers and search engines like Google, which affects how your site is handled behind the scenes.
a) 301 Permanent Redirect
A 301 redirect is used when your move is final. This tells Google that your old domain has permanently changed to a new one.

It’s the best choice when:
- You’ve rebranded your business
- You’ve moved to a new domain name
- You’ve merged websites into one
From an SEO perspective, this is the strongest option. It passes nearly all your existing ranking power (link equity) to the new domain, helping you keep your visibility on Google.
b) 302 Temporary Redirect
A 302 redirect is meant for short-term situations. It tells Google that the move is only temporary and that the original domain will be used again.
It’s useful when:
- Your site is under maintenance
- You’re testing a new page or design
- You want to redirect traffic briefly without committing to a full move
With a 302, search engines usually keep the old domain indexed, and the SEO value does not fully transfer to the new destination.
c) Meta Refresh Redirect
A Meta Refresh redirect happens at the browser level rather than the server level. It typically shows a short message like “Redirecting in a few seconds…” before sending visitors to another page.
It’s sometimes used for:
- Quick fixes when server access isn’t available
- Simple page-level redirects
However, this is the weakest option. It’s not ideal for SEO, and it can feel less smooth for users compared to automatic redirects like 301 or 302.
In most cases, a 301 redirect is the safest and most effective choice if you want a clean transition without losing traffic or search rankings.
4 Ways to Redirect Domain Name to Another Domain
There are a few reliable ways to set up a domain redirect.
The right option depends on how your domain and website are configured, but the good news is that none of them are overly complicated once you know where to look.
Let’s start with the simplest method.
1) Redirect Using Your Hosting Provider
If your domain is registered and hosted with the same provider, this is usually the quickest way to get things done. Everything is handled from one dashboard, so you don’t need any technical setup.
Here’s how it typically works:
- Log in to your hosting account
- Go to Domain Management
- Select the domain you want to redirect
- Look for Redirects or Forwarding settings
- Choose Permanent (301) as your redirect type
- Enter your new (target) domain
- Save your changes
Once you’ve done this, the redirect often starts working almost immediately. In some cases, it can take anywhere from a few minutes up to 24 hours to fully take effect due to propagation.
This method is ideal if you want a clean, straightforward setup without touching code or server files.
It’s also the option most people go with when managing business websites, blogs, or online stores.
2) Using cPanel Domains Redirect Feature
If your hosting account comes with cPanel, you already have a built-in tool designed specifically for redirects.
It gives you a bit more control, especially if you want every page on your old domain to point to the matching page on the new one.

This is how you set it up:
- Log in to your cPanel account
- Scroll down to the Domains section
- Click on Redirects
- From the dropdown, select the domain you want to redirect
- Choose your redirect type:
- Permanent (301) for a full move
- Temporary (302) if it’s short-term
- In the “redirects to” field, enter your new domain
- Tick “Redirect with or without www” so all versions are covered
- Enable “Wildcard Redirect” if you want every page (like /blog or /contact) to go to the same path on the new domain
- Click Add and your redirect is set
Once saved, you will get a confirmation message and the redirect starts working almost immediately in most cases.
This option works well if you’re using cPanel and want a bit more flexibility without editing any code.
3) Using a WordPress Plugin
If your website runs on WordPress, you can handle redirects directly from your dashboard using a plugin. This approach is simple and doesn’t require access to server settings or technical files.
This is what you do:
- Log in to your WordPress dashboard
- Go to Plugins, then Add New
- Search for “301 Redirects”
- Install and activate the plugin
- Navigate to Settings, then 301 Redirects
- Enter your old URL in the source field
- Enter your new URL in the target field
- Select 301 (Permanent)
- Save your changes
Once saved, the redirect takes effect immediately.
Key Notes
1. Page-level vs Full-domain Redirects
This method works best when you’re redirecting specific pages or blog posts. For example, sending /old-blog-post to /new-blog-post.
If you’re moving an entire domain, this approach can become tedious since you would need to add each old URL one by one. In that case, using cPanel or a server-level redirect is much faster and more efficient.
2. SEO-friendly setup
When configured correctly, 301 redirects through a plugin pass most of your SEO value to the new URLs.
It’s important to match each old page with its closest equivalent on the new site.
Redirecting everything to the homepage may confuse both users and search engines.
3. Compatibility
This method works on any WordPress site, regardless of your hosting provider. It’s a safe option if you prefer not to touch backend files or server settings.

4. Pro tip for Truehost users
If your domain is registered with Truehost, you can combine this plugin with a cPanel redirect.
This helps cover anything outside WordPress, such as custom landing pages, forms, or email-related links, so nothing gets left behind.
4) Editing the .htaccess File (Advanced)
If you want full control over how your redirect works, you can set it up directly in your server files using the .htaccess file.
This method is more hands-on, but it’s also one of the most powerful and reliable options, especially for full domain redirects.
Here’s how to do it:
- Log in to your cPanel account
- Open File Manager
- Go to your public_html folder
- Click Settings (top right) and enable “Show Hidden Files”
- Locate the .htaccess file
- Right-click and select Edit (create a backup before making any changes)
- Paste the redirect code at the very top of the file
RewriteEngine on

RewriteCond %{HTTP_HOST} ^olddomain.co.ke [NC,OR]

RewriteCond %{HTTP_HOST} ^www.olddomain.co.ke [NC]

RewriteRule ^(.*)$ https://newdomain.co.ke/$1 [L,R=301,NC]- Replace olddomain.co.ke and newdomain.co.ke with your actual domains
- Save your changes
Once saved, the redirect starts working immediately.
This method ensures that every page from your old domain automatically points to the matching page on your new domain, making it ideal for full site migrations.
Just be careful when editing the file, because one small mistake can affect how your site loads.
If you’re unsure, it’s safer to use cPanel redirects or your hosting provider’s tools instead.
How to Test and Verify Your Redirect Domain Name
Once your redirect is set up, it’s worth taking a few minutes to confirm everything is working as expected. This helps you catch any issues early before they affect visitors or search rankings.
i) Browser Test
Open a new browser window and type in your old domain. If everything is set up correctly, you should be taken straight to the new domain without any delay or error.
It’s a good idea to test:
- With www and without www
- Different pages (not just the homepage)
This confirms that your redirect is working across all variations.
ii) Redirect Checker Tools
There are free online tools that show exactly what’s happening behind the scenes.
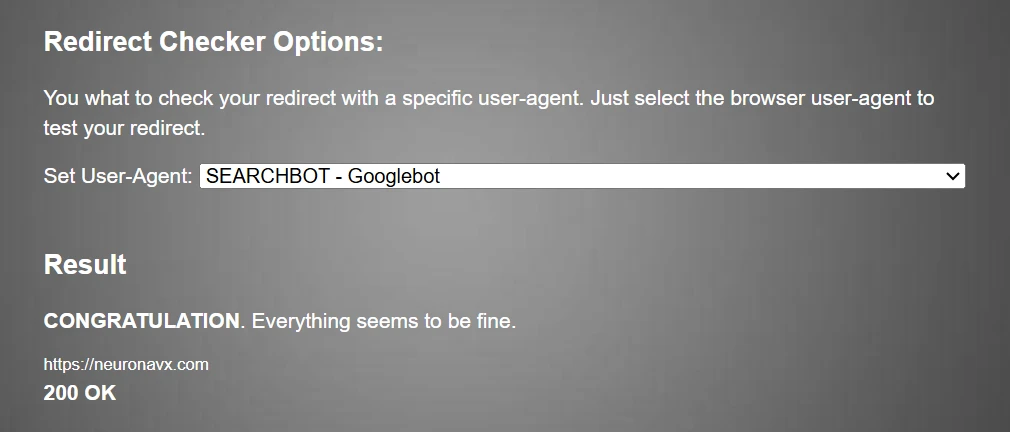
You can use tools like:
redirect-checker.orgwhatsmydns.net
Just enter your old domain, and the tool will tell you:
- If the redirect is working
- Which type it is (301 or 302)
- Whether there are multiple redirects in the chain
This is useful for spotting mistakes that aren’t obvious in a normal browser test.
iii) Curl Command
If you’re comfortable using the command line, this method gives you a direct look at the server response.
Run a curl command to check the HTTP status code returned by your domain. You should see a 301 status code if the redirect is set up as permanent.
This is a quick and reliable way to confirm that your server is sending the correct signal to browsers and search engines.
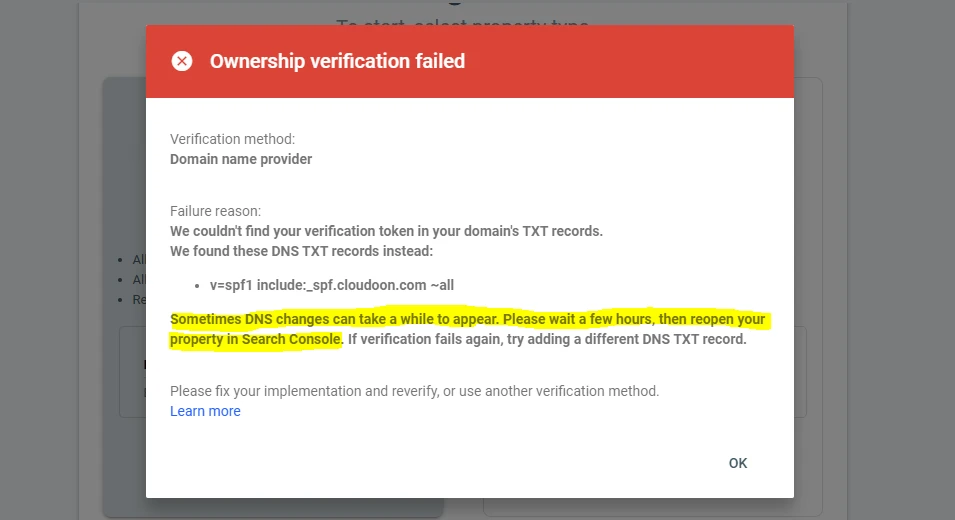
iv) Google Search Console
For a longer-term check, use Google Search Console.
After adding your new domain, you can:
- Monitor how Google is indexing your pages
- Check for crawl errors
- Confirm that your redirects are being recognized
This step is especially important if you’ve moved an entire website and want to maintain your visibility in search results.
Take a moment to test on both desktop and mobile devices as well. A large number of users browse on phones, so it’s important that the redirect works smoothly across all screen types.
Troubleshooting Redirect Domain Name Problems
Even when everything is set up correctly, a few common issues can come up. Most of them are easy to fix once you know what to check.
1. DNS Delay
If your redirect isn’t working right away, it could be due to DNS propagation. Changes don’t always take effect instantly across the internet.
Give it some time. This can take anywhere from a few minutes up to 24 hours. If it’s still not working after that, move on to the next checks.
2. Cache Issues
Sometimes the problem isn’t the redirect, but your browser.
Browsers store cached versions of websites, which can prevent you from seeing the updated redirect. Try clearing your cache or opening your site in an incognito/private window to test again.
3. Redirect Loops
If you see an error saying the page isn’t redirecting properly, you might have created a loop.
This usually happens when the old domain redirects to the new one, but the new domain accidentally redirects back to the old one.
Go back to your settings and confirm that the redirect only points in one direction.
Getting Help
If you’ve checked everything and it’s still not working, it’s okay to get support.
If you’re using Truehost, our support team can help you troubleshoot directly from your dashboard and quickly identify what’s going wrong.
SEO Best Practices When You Redirect Domain Name
Getting the redirect working is one part of the process. Doing it the right way helps you keep your search rankings and traffic.
a. Always Use 301 for Permanent Moves
If your domain change is permanent, stick with a 301 redirect. This ensures most of your existing SEO value is passed to the new domain.
b. Update Your Sitemap
Your sitemap should reflect your new domain, not the old one. This helps search engines crawl and index your updated site faster.
c. Submit in Google Search Console
After updating your sitemap, submit it through Google Search Console.
This lets Google know your site has moved and helps maintain your visibility in search results.
d. Avoid Redirect Chains
Keep your redirects clean and direct.
Instead of:
- olddomain to anotherdomain to newdomain
Set it up as:
- olddomain to newdomain
This improves loading speed and avoids confusion for search engines.
e. Keep Your Old Domain Active
Hold onto your old domain for at least 1–2 years. This ensures that any remaining traffic or backlinks continue to pass value to your new site.
f. Update Internal Links
Go through your website and update all internal links so they point directly to the new domain instead of relying on redirects.
Ready to Redirect Domain Name to Another Domain?
At this point, you’ve seen how domain redirects work, the different types available, and the four practical ways to set them up.
You can use this process to rebrand, clean up your online presence, or move to better a domain name without losing traffic.
But first, secure the name you want with Truehost, set up your redirect properly, and keep your visitors moving in the right direction.
If you need a new domain or help along the way, our support team can make the whole process faster and less stressful.