Domain SearchInstantly check and register your preferred domain name
 Web Hosting
 cPanel HostingHosting powered by cPanel (Most user friendly)
 KE Domains
 Reseller HostingStart your own hosting business without tech hustles
 Windows HostingOptimized for Windows-based applications and sites.
 Free Domain
 Affiliate ProgramEarn commissions by referring customers to our platforms
 Free HostingTest our SSD Hosting for free, for life (1GB storage)
 All DomainsBrowse and register domain extensions from around the world
 .Com Domain
 WhoisLook up domain ownership, expiry dates, and registrar information
 VPS Hosting
 Managed VPSNon techy? Opt for fully managed VPS server
 Dedicated ServersEnjoy unmatched power and control with your own physical server.
 SupportOur support guides cover everything you need to know about our services
You’ve bought a domain and added it as an add-on domain in your cPanel account. Now comes the next step, where you create an email address for that domain.
But first, why not just stick to your main domain for everything?
Well, there are a few practical reasons as a website owner you would choose to use a separate domain for email:
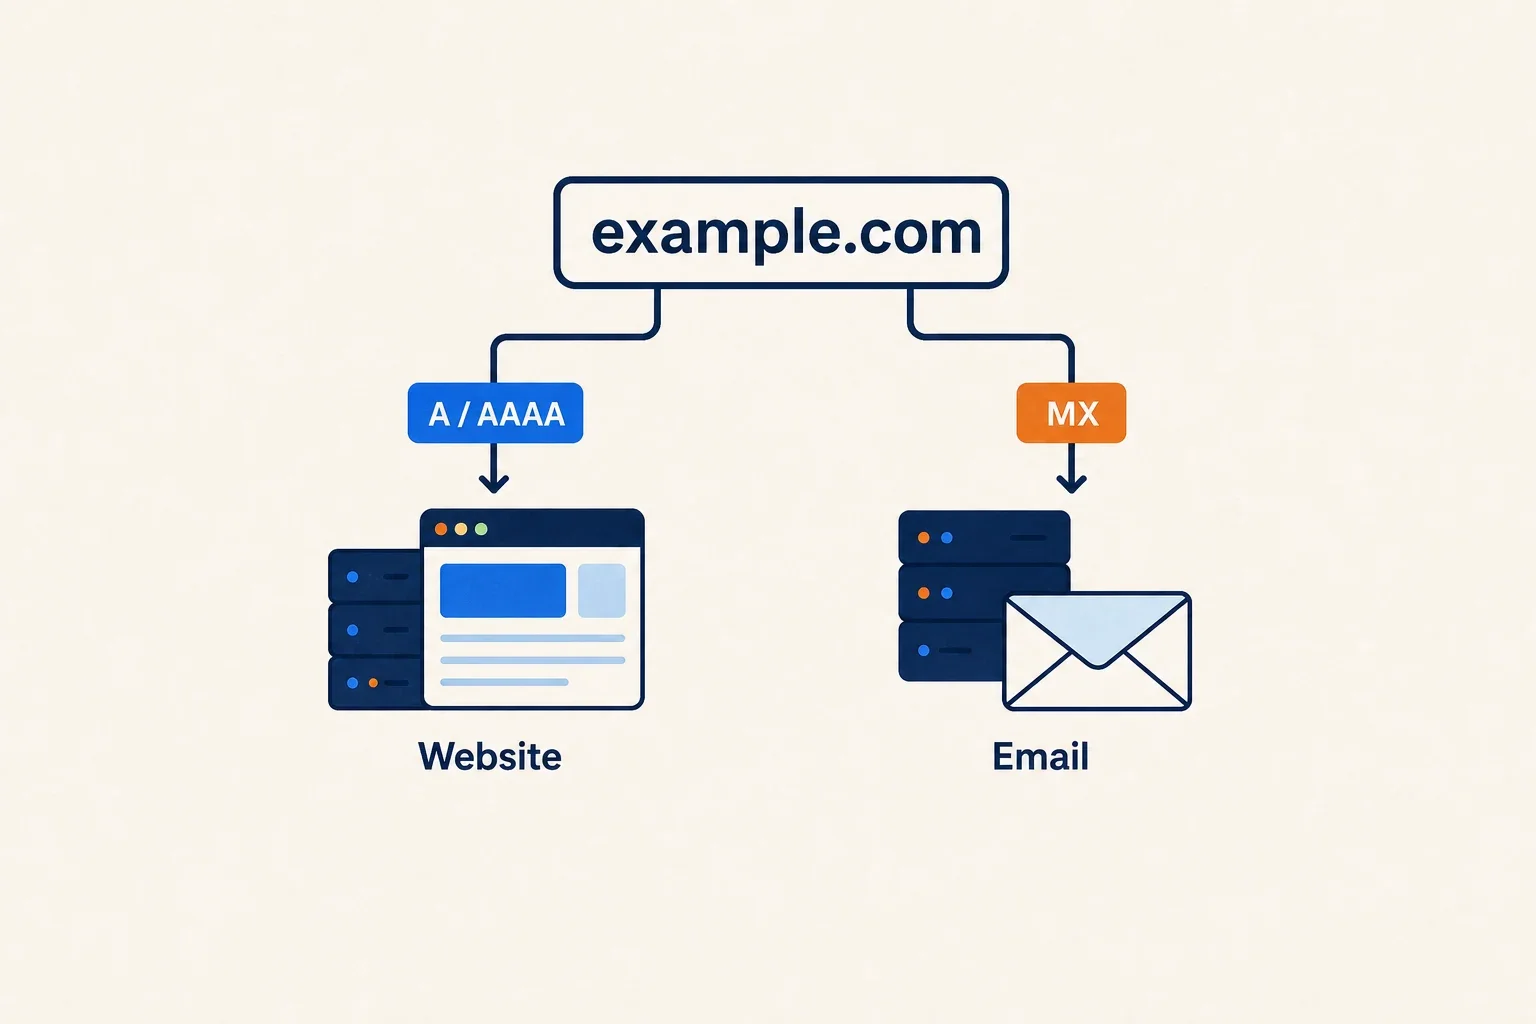
- Brand consistency: a dedicated domain lets you send specific types of emails, like support or transactions, from addresses such as
[email protected], while keeping your main website (yourbrand.com) identity focused and clean. - Better organization: If you’re managing multiple projects, departments, or even side businesses, separate domains help you keep everything neatly structured under one hosting account.
- Improved email reputation: Email deliverability is crucial. Using a separate domain helps isolate your email activity, so if one domain runs into issues, your main domain’s reputation remains unaffected.
Now, if you’ve just added a second domain, it’s only natural to want dedicated inboxes for it.
That’s exactly what I’ll walk you through in this guide: the process to create email account for addon domain.
So, let’s actually do it.
Before You Start
Before jumping into the setup, take a minute to confirm a few things.
This will save you time and prevent the kind of issues that can quietly block your emails from working.
It’s important to have these ready:
- An active cPanel hosting account: For this guide, we’ll use Truehost as the example, but the steps are similar across most cPanel-based hosts.
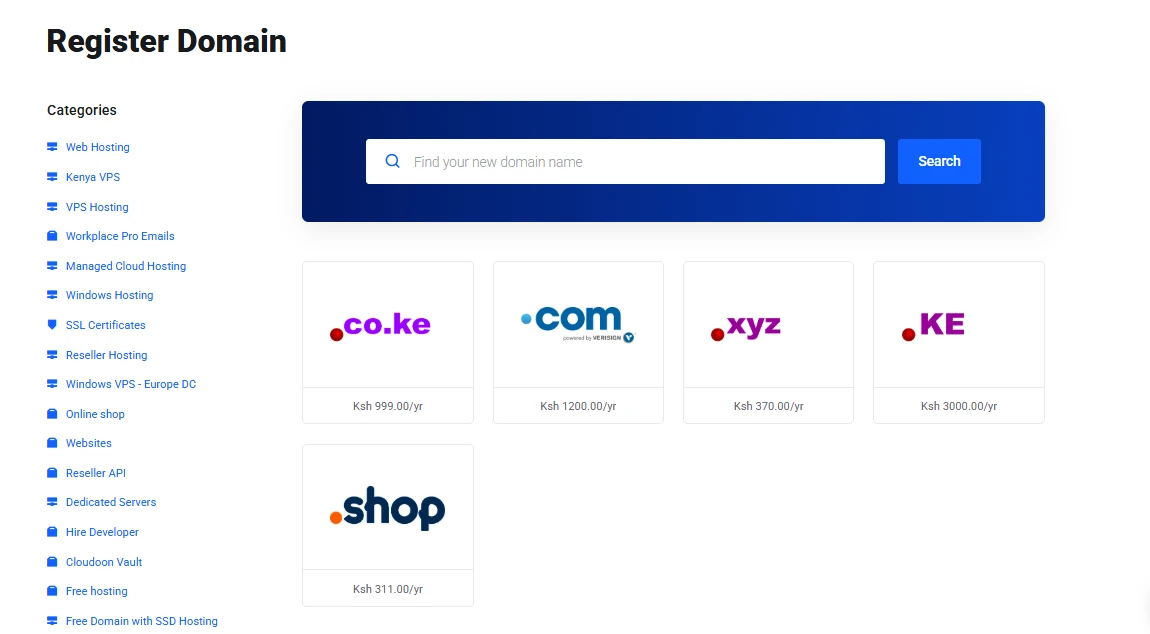
- A registered domain: Your add-on domain needs to be fully registered and active. If you haven’t secured one yet, you can get it from Truehost.
- The domain already added in cPanel: Make sure you’ve already added your domain inside cPanel (under Domains, Create a New Domain).
This step connects the domain to your hosting account so it can be used for email.
- Your cPanel login credentials: You’ll need access to your dashboard to create and manage the email account.
Once everything above is in place, you’re good to go.
How to Create Email Account for Addon Domain
Now that everything is set up, it’s time to create your email account. This part is simple, and you’ll be done in just a few minutes.
Step 1: Log into cPanel and Navigate to Email Accounts
Start by logging into your hosting account. If you’re using Truehost, head to your client area and click “Login to cPanel.”
Once you’re inside cPanel:
- Scroll down until you find the EMAIL section
- Click on Email Accounts
This is where all your email addresses are created and managed.
Step 2: Start Creating a New Email Account
Inside the Email Accounts section, look for the “+ Create” button.

Click it to begin setting up a new email address for your add-on domain.
Step 3: Select Your Add-on Domain
In the Domain dropdown menu, choose the add-on domain you want to create the email for.
For example, if you added yourshop.support, select it here so the email will be created under that domain.
Step 4: Enter Username and Set a Strong Password
Next, enter the username for your email address. This is the part before the “@” symbol.
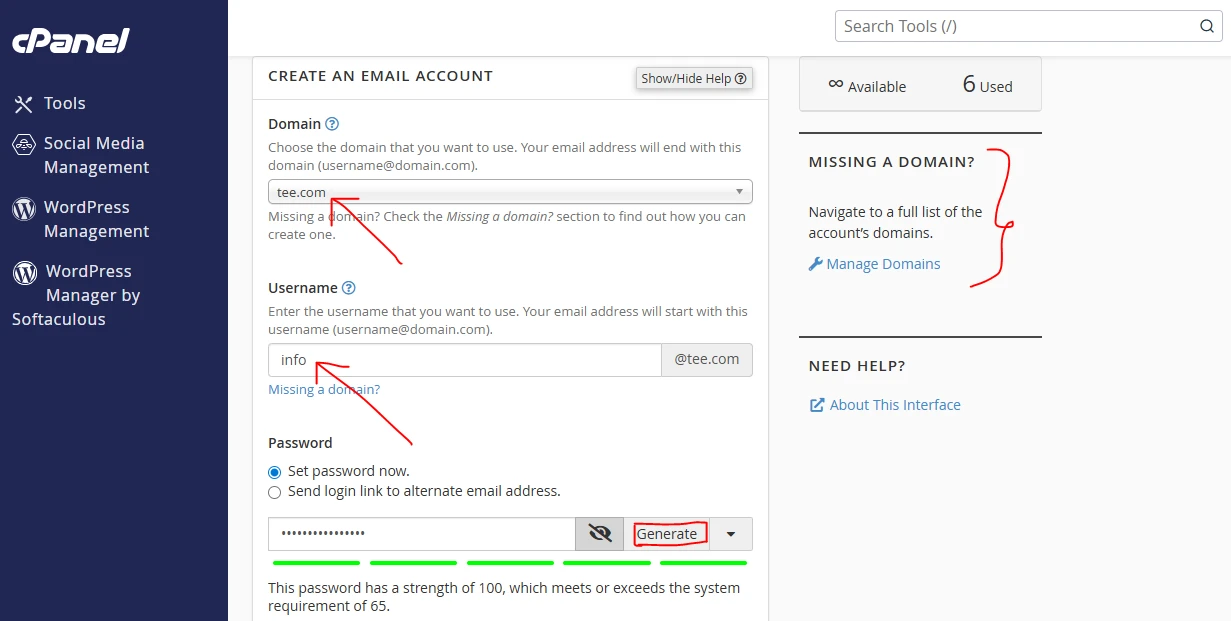
Some common options include:
- info
- support
- hello
- sales
Then set a secure password:
- You can use the Generate button in cPanel for a strong, random password
- Or create your own (just make sure it’s long and hard to guess)
Pro tip: Store your login details in a password manager so you don’t lose access later. It also makes managing multiple email accounts much easier.
Step 5: Set Mailbox Quota
Now choose how much storage space this email account can use.
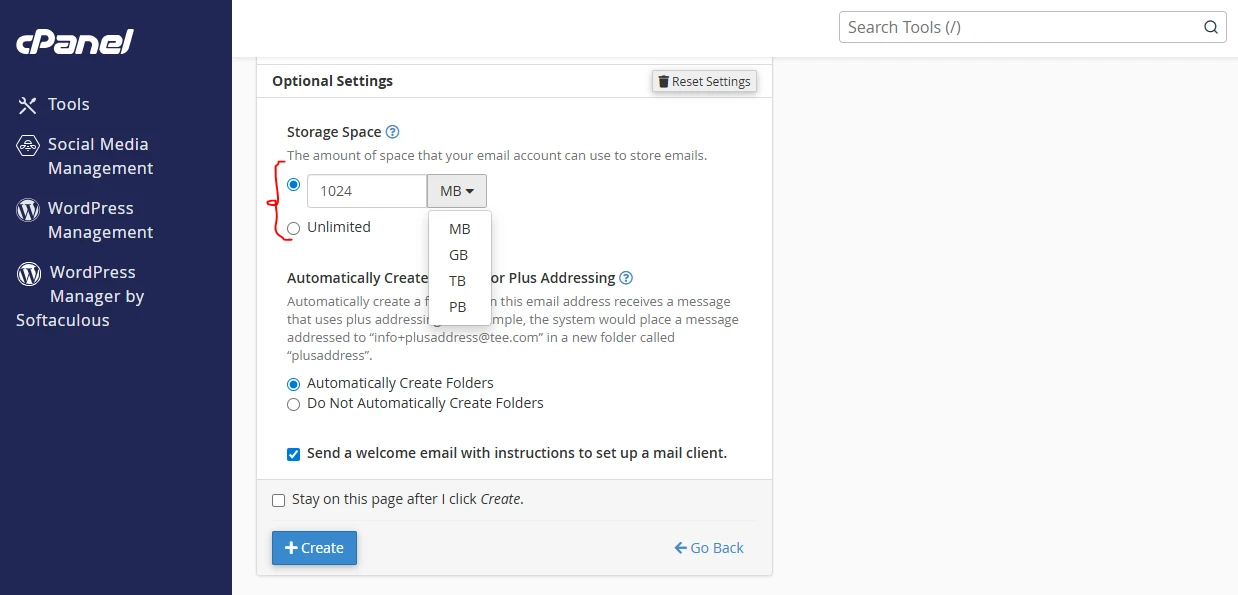
You can:
- Set a specific limit (like 500 MB or 1 GB)
- Or select Unlimited if your hosting plan allows it
If you’re creating multiple email accounts, setting limits helps you manage your server space more efficiently.
Step 6: Create the Account
Once everything is set, click the “+ Create” button to finish.
cPanel will process your request, and within a few seconds, you’ll see a confirmation message showing that your email account has been created successfully.
At this point, your new email address is ready to use. You can start sending and receiving emails right away or connect it to your preferred email app (like Gmail, Outlook, or your phone’s mail app) for easier access.
Alternative Method
There’s another quick way to create an email account, especially if you’re already working inside your domain settings.
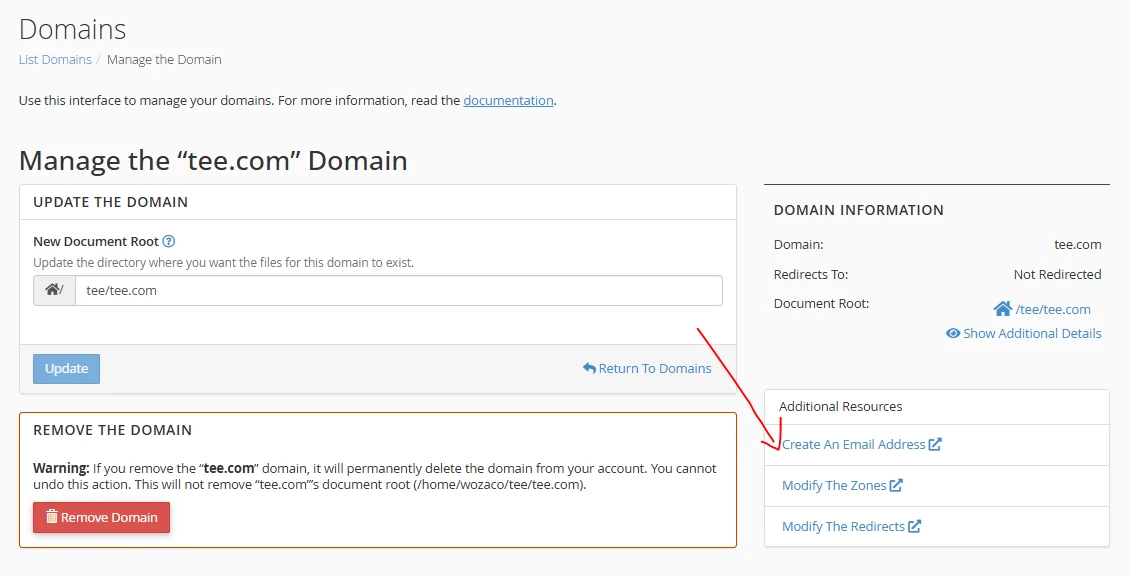
Here’s how to do it:
- In cPanel, go to the Domains section
- Locate your add-on domain in the list
- Click “Manage” next to it
- Then select “Create An Email Address”
From that point, the process is exactly the same. You’ll enter your username, set a password, and choose your mailbox quota just like before.
This method is useful when you’re managing multiple domains and want to create emails for each one without switching back and forth between sections.
How to Access Your New Email Account
Now that your email account is ready, the next step is accessing it. You’ve got a few simple options depending on how you prefer to manage your emails.
Option 1: Webmail
The quickest way to get started is through webmail.
- Log into cPanel
- Go to Email Accounts
- Click “Check Email” next to your new address
This will open Roundcube, which is the default webmail interface. Just click “Open” to access the inbox.
You can also access it directly through your browser using:http://webmail.yourdomain.com
(Replace yourdomain.com with your actual add-on domain.)
Option 2: Email Client (Gmail, Outlook, Apple Mail)
If you prefer managing your emails from an app like Gmail or Microsoft Outlook, you can connect your account using IMAP settings.
Here are the details you’ll need:
| Setting | Value |
| IMAP Server | mail.yourdomain.co.ke |
| IMAP Port | 993 (SSL/TLS) |
| SMTP Server | mail.yourdomain.co.ke |
| SMTP Port | 465 (SSL/TLS) |
| Username | Full email address |
Tip: Use IMAP instead of POP3 so your emails stay synced across all your devices.
Option 3: Mobile Setup
You can also add your email account to your smartphone using the same IMAP settings above.
This makes it easy to check and respond to emails on the go without needing to log into cPanel every time.
Once everything is set up, your email will work just like any other: send, receive, and stay connected wherever you are.
Troubleshooting Common Issues
If something isn’t working as expected, don’t you worry. Fact is, most email setup issues come down to a few common things.
This is how you fix them quickly:
1. Domain not showing in dropdown?
Go back to the Domains section in cPanel and confirm the add-on domain was added correctly. Once it’s properly set up, it will appear automatically.
2. Emails won’t send or receive (and DNS lookup shows nothing)?
This usually means the domain hasn’t been registered yet. cPanel can’t process emails for a domain that isn’t live. Register the domain first, allow a short time for propagation (often 5–30 minutes), then try again.
3. Password rejected?
Make sure your password meets cPanel requirements: at least 8 characters with a mix of uppercase, lowercase, numbers, and symbols. Using the Generate button helps avoid issues.
4. Mailbox quota full?
Delete old emails to free up space, or increase the quota if your hosting plan allows it.
5. Still stuck?
Reach out to your hosting provider’s support team. If you’re using Truehost, you can open a support ticket from your client area and get help quickly.
Setting Up Forwarders and Autoresponders
Once your email is working, you can make it even more efficient using a couple of built-in tools in cPanel:
- Forwarders
Automatically send incoming emails to another address. For example, you can forward all messages from[email protected]to your personal Gmail inbox so everything stays in one place. - Autoresponders
Set up automatic replies for situations like when you’re away or want to confirm receipt of a message. A simple “We’ve received your email and will get back to you shortly” goes a long way.
These tools are especially helpful if you don’t want to rely on webmail daily or if you’re managing multiple email accounts.
Conclusion
You’ve now gone through the full process, from setup to access and even troubleshooting.
Creating email accounts for an add-on domain in cPanel is that quick, and once your domain is properly registered, everything works smoothly.
Many businesses in Kenya add extra domains for different projects, departments, or campaigns because it’s affordable and easy to manage under one hosting account.
For example, we have our truehost.co.ke, truehost.com.ng, truehost.co.in, and truehost.co.za for our presence in Kenya, Nigeria, India, and South Africa, among others.
So, if you’re planning to expand, getting another domain is a simple next step, and with Truehost, you can register and set it up in just a few minutes.
Start now to make a difference in how your business communicates.