Domain SearchInstantly check and register your preferred domain name
 Web Hosting
 cPanel HostingHosting powered by cPanel (Most user friendly)
 KE Domains
 Reseller HostingStart your own hosting business without tech hustles
 Windows HostingOptimized for Windows-based applications and sites.
 Free Domain
 Affiliate ProgramEarn commissions by referring customers to our platforms
 Free HostingTest our SSD Hosting for free, for life (1GB storage)
 All DomainsBrowse and register domain extensions from around the world
 .Com Domain
 WhoisLook up domain ownership, expiry dates, and registrar information
 VPS Hosting
 Managed VPSNon techy? Opt for fully managed VPS server
 Dedicated ServersEnjoy unmatched power and control with your own physical server.
 SupportOur support guides cover everything you need to know about our services
You can’t do without a business email, not anymore.
Professional email offers many benefits:
- Boosts credibility
- Enhances brand image
- Improves communication
- Increases productivity
- Better for the deliverability of your marketing campaigns
To use services like Google Workspace, Truehost Business email, Zoho Mail, or Microsoft 365 Outlook for businesses, you need to set up MX Records.
You also need to them up right.
Wrong MX configurations could lead to all of your emails not reaching your mailbox. This could mean your cold email response rate could drop to nearly 0%, raising concern.
MX Records are special DNS entries. They direct your emails to the right servers.
Think of MX Records as a digital postal service. They ensure your messages reach the correct destination.
Setting up MX Records might sound complex. But don’t worry. It’s simpler than you might think.
This guide will walk you through the process step by step. We’ll cover:
- What MX Records are
- Why they’re important
- How to set them up for different email providers
So, whether you’re a small business owner or an IT pro, this quick guide gets you started in no time.
MX Records Overview
What are MX records?
An MX (Mail Exchanger) record is a type of DNS record that specifies which mail servers are responsible for handling email for a domain.
An MX entry record typically consists of:
a) Domain name: The domain for which this record applies.
b) Record type: In this case, MX for Mail Exchanger.
c) Priority: A number indicating the order in which mail servers should be tried.
d) Mail server hostname: The fully qualified domain name of the mail server.
Here’s an example of a complete MX entry record:
yourdomain.co.ke. 3600 IN MX 10 mailserver.yourdomain.co.ke.
In this example:
- yourdomain.co.ke. is the domain name
- 3600 is the TTL (Time To Live) in seconds
- IN stands for Internet
- MX indicates it’s a Mail Exchanger record
- 10 is the priority
- mailserver.yourdomain.co.ke. is the mail server hostname
In practice, you might have multiple MX records for redundancy, like this:
| Domain | IN | Priority | Hostname |
|---|---|---|---|
| yourdomain.co.ke. | MX | 10 | primary-mail.yourdomain.co.ke. |
| yourdomain.co.ke. | MX | 20 | secondary-mail.yourdomain.co.ke. |
This setup tells email servers to try delivering to the primary mail server first, and if that fails, to attempt delivery to the secondary server.
Thus MX records act as signposts, telling email servers where to deliver messages addressed to your domain.
You’d want to imagine MX records as a highly efficient postal sorting system for the Internet.
When someone sends an email to “[email protected]”, the sender’s email server looks up the MX records for “yourdomain.co.ke” to determine where to route the message.
Why are MX records essential?
Setting up MX records correctly is vital for several reasons:
1) Reliable email delivery: Proper MX records ensure emails reach your inbox instead of bouncing back or getting lost.
2) Professional branding: Using your domain for email (e.g., [email protected]) enhances your brand’s credibility compared to generic email addresses.
3) Enhanced spam protection: Correctly configured MX records help reduce spam by routing emails through your chosen mail servers, which often have robust spam filters.
4) Flexibility in email services: MX records allow you to use third-party email services while maintaining your domain name, giving you more options for email management.
Before Setting Up MX Records
Before we start configuring MX records, ensure you have:
- Access to your domain’s DNS settings (typically through your hosting provider’s control panel)
- The correct MX record information from your chosen email service provider
- A bit of patience (DNS changes can take up to 48 hours to propagate fully)
Step-by-Step Guide to Setting MX Records
Now, let’s walk through the process of setting up MX records:
1) Log into your control panel
For Truehost shared hosting users, this means accessing cPanel.
Go to the Truehost website, log into your account, and look for the cPanel login link, or use the direct cPanel URL provided by Truehost.
Pro tip: Save your cPanel login page as a bookmark for quick access in the future.
You can log in to your cPanel account by adding cpanel to the end of your website address, or as a subdomain, ie:
- https://mywebsite.com/cpanel
- https://cpanel.mywebsite.com/
Simply replace mywebsite.com with the correct domain name associated with your hosting.
To access the cPanel via your client’s area, follow these steps:
a) Log in to your Truehost account

b) Go to your Services
c) Select your hosting service

d) Scroll down to the one-click logins section, then click on Cpanel to be auto-logged in.

2) Find the DNS settings
Once logged in, locate the DNS management area. In cPanel, this is typically called the “Zone Editor” located under the Domains section.

Look for an icon resembling a globe or with “DNS” in its name.
3) Manage your domain
In the Zone Editor, you’ll see a list of domains associated with your account. Find the domain you want to set MX records for and click “Manage” button on the far right of the entry.

4) Review existing MX records
Before adding new records, it’s crucial to check for any existing MX records. You’ll usually find these listed among other DNS records like A, CNAME, and TXT records.
5) Remove old MX records (if necessary)
If you’re switching email providers or setting up email for the first time, it’s often best to start with a clean slate.
To remove an existing MX record:
i) Click on the record you want to remove
ii) Look for a “Delete” or trash can icon
iii) Confirm the deletion when prompted
Be cautious when deleting records – if you’re unsure, consult with your email provider or a DNS expert.
6) Add new MX records

Now it’s time to add your new MX records.
Here’s how:
i) Click “Add Record” or a similar button in your DNS management interface
ii) Select “MX” as the record type
iii) Enter the mail server hostname provided by your email service
iv) Set the priority for this record (we’ll discuss priority in detail shortly)
v) Save the new record
Repeat this process for each MX record your email provider specifies.
About MX record priority
MX records often come with a priority value. This number tells email servers which mail server to try first when delivering email. Lower numbers indicate higher priority. For example:
| Priority | Hostname |
|---|---|
| 10 | mail1.youremailprovider.com |
| 20 | mail2.youremailprovider.com |
In this setup, email servers will first try to deliver to mail1. If that fails, they’ll attempt delivery to mail2.
7) Verify your settings
After adding your MX records, double-check everything:
- Are all the hostnames spelled correctly?
- Have you set the priorities as specified by your email provider?
- Are there any leftover old MX records that might cause conflicts?
8) Save changes and wait
Once you’re confident everything is set up correctly, save your changes. Now comes the waiting game. DNS changes can take anywhere from a few minutes to 48 hours to propagate across the internet.
Setting Up MX Records for Popular Email Services
Let’s look at specific examples for setting up MX records with some popular email providers:
Google Workspace (formerly G Suite)

To set up MX records for Google Workspace, use the following configuration:
| Priority | Hostname |
|---|---|
| 1 | aspmx.l.google.com |
| 5 | alt1.aspmx.l.google.com |
| 5 | alt2.aspmx.l.google.com |
| 10 | alt3.aspmx.l.google.com |
| 10 | alt4.aspmx.l.google.com |
Google Workspace uses these multiple MX records for redundancy and load balancing.
Microsoft 365
For Microsoft 365, use this MX record:
| Priority | Hostname |
|---|---|
| 0 | yourdomain-co-ke.mail.protection.outlook.com |
Replace “yourdomain-co-ke” with your actual domain name, using hyphens instead of dots.
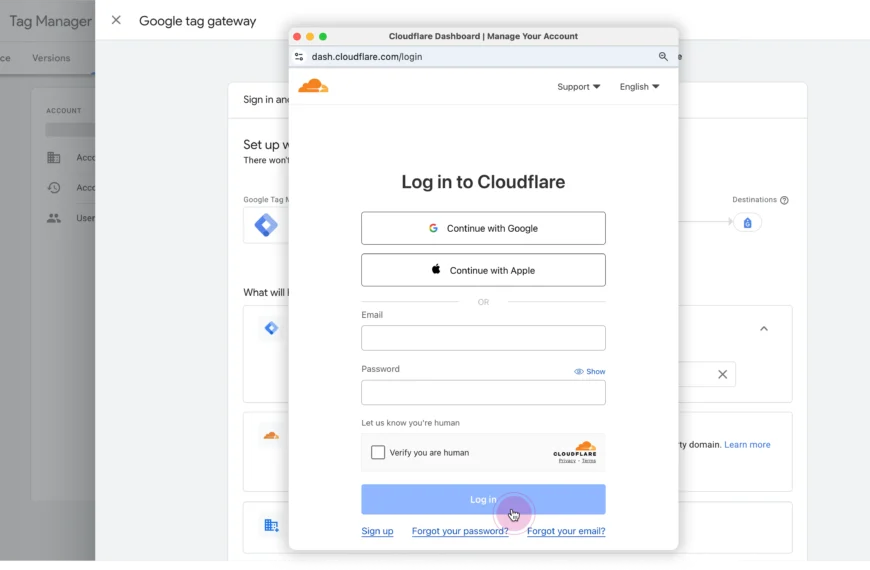
Cloudflare Email Routing
If you’re using Cloudflare’s Email Routing service, you don’t need to set up the records yourself.
Enabling the Email Routing service on Cloudflare will auto-create the MX records for you.
These Cloudflare MX records ensure your emails are routed through their servers before reaching your final destination.
Zoho Mail
For Zoho Mail, use the following MX records:
| Priority | Hostname |
|---|---|
| 10 | mx.zoho.com |
| 20 | mx2.zoho.com |
| 50 | mx3.zoho.com |
Zoho Mail provides multiple MX records for redundancy.
Troubleshooting Common MX Record Issues
Even with careful setup, you might encounter some issues. Here are some common problems and how to address them:
Emails not being received
a) Check propagation: Use an MX lookup tool to verify your records are visible across the internet.
b) Verify settings: Double-check that your MX records match exactly what your email provider specified.
c) Check for conflicts: Ensure you don’t have conflicting MX records pointing to different email services.
Sent emails bouncing back
a) Reverse DNS: Make sure your mail server has a proper reverse DNS setup.
b) SPF records: Implement SPF records to help prevent your emails from being marked as spam.
c) Server blacklists: Check if your mail server’s IP is on any blacklists and work to get it removed if necessary.
Advanced MX Record Concepts
For those looking to dive deeper, here are some advanced concepts related to MX records:
Backup MX records
Setting up backup MX records can improve the reliability of your email system.
These are lower-priority records that act as a fallback if your primary mail server is unavailable.
MX records and email security
MX records play a role in email security protocols like SPF, DKIM, and DMARC. Properly configuring these can significantly reduce email spoofing and phishing attempts.
Testing MX records
Use command-line tools like dig or online services to test your MX records:
dig MX yourdomain.co.keThis command will show you the current MX records for your domain.
How to Verify MX Record Configuration Using nslookup
Checking your MX records is crucial for ensuring proper email delivery. Here’s how to do it on Windows:
a) Open Command Prompt
- Click the Start button
- Type “cmd” and press Enter
b) Enter nslookup interactive mode
- At the command prompt, type: nslookup
- Press Enter
c) (Optional) Specify a DNS server
- If you want to use a specific external DNS server, type its IP address
- Otherwise, skip this step to use your default DNS server
d) Set query type to MX
- Type:
set q=MX- Press Enter
e) Query your domain
- Type your domain name, e.g.:
yourdomain.com - Press Enter
f) Interpret the results
- If MX records are displayed, they’re configured in DNS
- If no MX records appear, it could mean:
- DNS is not configured properly, or
- No MX records are set for the domain
Pro Tips:
- For a quicker check, use this single-line command:
nslookup -type=mx yourdomain.com- To query a specific DNS server (e.g., Google’s public DNS):
nslookup -type=mx yourdomain.com 8.8.8.8DNS changes can take up to 48 hours to propagate globally
Properly configured MX records are essential for reliable email delivery. If you’re unsure about the results, consult with your domain registrar or email service provider.
Best Practices for MX Record Management
To ensure optimal email performance and security, consider these best practices:
i) Regular audits: Periodically review your MX records to ensure they’re up-to-date and correct.
ii) Use multiple MX records: When possible, set up multiple MX records with different priorities for redundancy.
iii) Keep records simple: Avoid unnecessarily complex MX configurations that can lead to delivery issues.
iv) Coordinate with your team: Ensure all stakeholders are aware of any planned changes to MX records to avoid unexpected email disruptions.
v) Document your setup: Keep a record of your MX configuration for future reference and troubleshooting.
The Impact of MX Records on Email Deliverability
Properly configured MX records do more than just route emails; they can significantly impact your email deliverability:
- Reduced bounces: Correct MX records ensure emails reach their intended destination, reducing bounce rates.
- Improved sender reputation: A stable and properly configured email setup contributes to a better sender reputation, which can help your emails avoid spam folders.
- Faster delivery: With the right MX record configuration, emails can be routed more efficiently, leading to faster delivery times.
MX Records FAQs
What are MX records for Gmail?
If you’re using Gmail for your domain’s email (through Google Workspace, formerly G Suite), Google provides a specific set of MX records.
Here are the official MX records for Gmail:
| Domain | IN | Priority | Hostname |
|---|---|---|---|
| yourdomain.co.ke. | MX | 1 | aspmx.l.google.com. |
| yourdomain.co.ke. | MX | 5 | alt1.aspmx.l.google.com. |
| yourdomain.co.ke. | MX | 5 | alt2.aspmx.l.google.com. |
| yourdomain.co.ke. | MX | 10 | alt3.aspmx.l.google.com. |
| yourdomain.co.ke. | MX | 10 | alt4.aspmx.l.google.com. |
These multiple records provide redundancy and load balancing for your email. The lower priority numbers (1 and 5) are tried first before the higher priority numbers (10).
How do I find my MX record?
There are several ways to find your MX records:
1) Use an online MX lookup tool: Websites like MXToolbox allow you to enter your domain name and view all associated MX records.
2) Command line (for technical users):
- On Windows, open Command Prompt and type:
nslookup -type=mx yourdomain.co.ke- On Mac or Linux, open Terminal and type:
dig yourdomain.co.ke MX3) Check your DNS management interface: Log into your domain registrar or hosting provider’s control panel. Look for a DNS management or Zone Editor section.
4) Email provider’s admin panel: If you use a service like Google Workspace or Microsoft 365, their admin panels often display your current MX records.
Pro tip: Always verify your MX records from outside your network to ensure they’re publicly visible.
Understanding these components helps you correctly interpret and set up your own MX records, ensuring smooth email delivery for your domain.
Can I have more than one MX records on a single domain?
Yes, you can have multiple MX records for a single domain. This setup is commonly used for various purposes, primarily for redundancy and load balancing.
Wrapping Up
Setting up MX records is a crucial step in managing your domain’s email.
By following this comprehensive guide, you should now have a solid understanding of how to configure MX records for your business domain, whether you’re using Truehost or another provider.
However, if you are ever unsure about making DNS changes, don’t hesitate to reach out to your hosting provider’s support team or consult with a DNS expert.
The effort you put into correctly setting up your MX records will pay off in reliable, professional email communication for your domain.
Now that you’re armed with this knowledge, go forth and conquer those MX records – your seamless, professional email experience awaits!