
cPanel is a popular human-friendly web-based control panel that you can use to manage your hosting account and websites.
It’s especially popular with shared hosts, where it’s the de facto solution provided by the most affordable hosting providers.
Although cPanel is primarily intended for technical users, understanding how it functions is helpful for everyone who administers a website.
You can quickly and affordably repair minor website faults yourself by becoming familiar with a small number of controls.
With its user-friendly interface and powerful features, cPanel makes it easy to perform tasks such as managing files, creating email accounts, managing databases, and installing applications.
In this article, we will provide a step-by-step guide on how to use cPanel to manage your hosting account, using the most common tasks performed by website owners.
#1. Accessing cPanel
Assuming your host uses cPanel, your host should provide you with a direct link to access cPanel somewhere in your welcome emails.
To access cPanel, you need to log in to your hosting account using the provided URL and credentials.
Usually, your hosting provider will give you a specific URL that leads to the cPanel login page.
This URL may include your domain name followed by “/cpanel” or may use a specific port number such as “2083” if you have SSL installed.
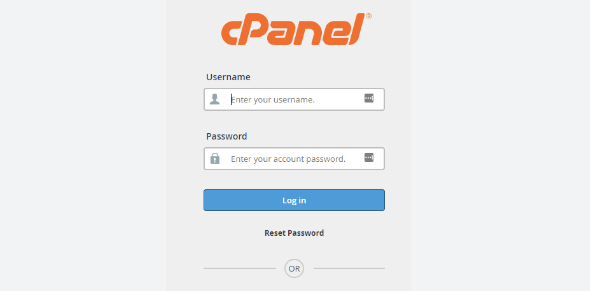
Once you have the URL, open your web browser and navigate to it. You should see the cPanel login page, where you will need to enter your cPanel username and password to log in.
In case where you can’t find the link, here’s a shortcut to access your site’s cPanel dashboard at any time:
If your site’s URL starts with HTTP, append :2082 to the end of your domain.
If your site’s URL starts with HTTPS, append :2083 to the end of your domain.
For example, you can access cPanel by going to:
http://www.yoursite.com:2082
Once you visit that address, you’ll be prompted to log in with your cPanel username and password.
How To Get Your cPanel Username And Password
You should have received your cPanel username and password from your hosting provider. This is usually in the set of welcome emails you received immediately after signing up.
If you can’t find your username and password, it’s recommended to contact your host’s support for help as the process to find that information varies between hosts.
After successful login, you will see the cPanel home screen, which is the central hub for all cPanel features.
What does a cPanel home screen look like?
There’s no single “look” for the cPanel home screen because not only are there different core cPanel themes, but some hosts also apply their unique styling to the cPanel home screens.
Generally, the home screen displays various icons that represent different features and functions of cPanel, such as File Manager, Email Accounts, MySQL Databases, and more.
The icons are arranged in categories, making it easy to navigate through different sections of cPanel.
The home screen also displays useful information such as your hosting account’s disk space and bandwidth usage, server status, and account details.
From the cPanel home screen, you can access and manage all the features of your hosting account.
#2. Managing Files
While you can always upload and manage files using something called FTP, your hosting account cPanel also provides a web-based interface to help you manage files called File Manager.
The File Manager is a powerful tool in cPanel that allows users to manage the files and folders of their hosting account.
It provides an easy-to-use interface for performing various file management tasks, such as uploading, downloading, creating, renaming, deleting, and editing files.
To access the File Manager from the cPanel home screen, simply locate the File Manager icon and click on it.

This will take you to the File Manager interface, which is divided into two panes. The left pane shows the directory tree of your hosting account, while the right pane displays the contents of the selected folder.
From the File Manager, you can navigate through the files and folders of your hosting account by clicking on the folders in the directory tree or by using the breadcrumb trail at the top of the right pane.
To perform a file management task, simply select the file or folder you want to manage and click on the appropriate icon in the top menu bar.
For example, to upload a file, you can click on the “Upload” icon, select the file you want to upload, and click on the “Upload” button.
The File Manager also allows users to change file and folder permissions, which can be useful for configuring the security of your website.
To change permissions, simply right-click on the file or folder and select “Change Permissions” from the context menu.
List of tasks that you can perform with the File Manager
Here’s an outline of tasks that can be performed with the File Manager feature in cPanel:
1. Navigate through files by using the directory tree and the breadcrumb trail to navigate through folders.
2. Selecting files to upload, uploading the files from the local computer to the hosting account, and tracking the progress of the upload.
3. Creating new folders in the hosting account, renaming existing folders, and deleting old ones.
4. Changing file permissions using the context menu or the file manager interface. Also, understanding file permissions and their impact on website security.
5. Using the built-in code editor or other third-party code editors to modify save and update files.
6. Download files to the local computer from the hosting account.
7. Copying, moving, and deleting files.
#3. Creating Email Accounts
The Email Accounts feature in cPanel is a tool that allows you to create and manage email accounts associated with your domain name.
With this feature, you can create email addresses using your domain name, such as “[email protected]“, and access your email from anywhere with an internet connection.
To access the Email Accounts feature from the cPanel home screen, simply locate the Email Accounts icon and click on it.
This will take you to the Email Accounts interface, where you can view a list of existing email accounts and perform various tasks related to email management.

From the Email Accounts interface, you can create a new email account by entering a username and selecting the domain name associated with your hosting account.
You can also set a password for the email account, allocate storage space, and configure various email settings such as autoresponders and spam filters.
In addition to creating and managing email accounts, the Email Accounts feature also allows you to access your email accounts through webmail.
By clicking on the “Access Webmail” button next to an email account, you can log in to your email account through cPanel’s webmail interface and send and receive emails using a web browser.
The process of creating a new email account
Creating a new email account using cPanel’s Email Accounts feature is a straightforward process.
Here are the steps involved:
1. Log in to your cPanel account and locate the Email Accounts icon. Click on it to access the Email Accounts interface.
2. Click on the “Create” button to start the process of creating a new email account.
3. Enter the desired email address and select the domain name associated with your hosting account from the drop-down menu.
4. Choose a strong password for your email account. You can use the password generator tool in cPanel to create a secure password.
5. Set the mailbox quota for the email account. The quota determines the amount of disk space allocated to the email account. You can either choose an unlimited quota or specify a specific size limit for the mailbox.
6. If you want to forward incoming emails from this email account to another email address, you can enter the forwarding email address in the “Forwarding” section.
7. If you want to set up an autoresponder for the email account, you can do so in the “Autoresponder” section. This will automatically send a predefined message to anyone who sends an email to the email address.
8. Once you have entered all the necessary information, click on the “Create” button to create the new email account.
After creating the email account, you can manage it from the Email Accounts interface.
From here, you can change the email account password, set or modify the mailbox quota, configure email forwarding and autoresponders, and more.
#4. Managing Databases
The MySQL Databases feature in cPanel allows you to create and manage MySQL databases associated with your hosting account.
With this feature, you can easily create and manage databases for your websites or web applications.
To access the MySQL Databases feature from the cPanel home screen, locate the MySQL Databases icon and click on it.
This will take you to the MySQL Databases interface, where you can view and manage your databases.

From the MySQL Databases interface, you can create new databases, manage existing ones, create and manage database users, and assign user privileges.
You can also use phpMyAdmin to manage your databases and perform SQL queries.
Creating a new database is a straightforward process. You need to enter the desired database name and click on the “Create Database” button.
Once the database is created, you can create a database user and assign privileges to the user. This allows the user to access and modify the database.
You can also manage existing databases by performing tasks such as renaming, deleting, or backing up databases.
Additionally, you can manage database users and their privileges.
Tasks that can be performed with the database manager
The MySQL Databases feature in cPanel offers users a range of tasks that can be performed to manage databases associated with their hosting account.
Here are some of the tasks that can be performed with this feature:
Creating new databases
You can create new databases easily from the MySQL Databases interface.
You need to enter the desired name for the new database and click on the “Create Database” button.
Creating new database users
You can create new database users and assign privileges to them.
This allows the user to access and modify the database.
To create a new database user, you need to enter the desired username and password and click on the “Create User” button.
Managing existing databases
You can manage existing databases by performing tasks such as renaming, deleting, or backing up databases.
You can also view information such as the database size and the number of tables in the database.
Managing database users
You can manage database users and their privileges.
You can assign different levels of privileges to different users, such as allowing them to create tables, insert data, or modify existing data.
Using phpMyAdmin
cPanel’s MySQL Databases feature also includes phpMyAdmin, a popular tool for managing MySQL databases.
With phpMyAdmin, you can also perform tasks such as creating and modifying tables, importing and exporting data, executing SQL queries, and more.
It provides an efficient way for you to manage your databases without having to use the command line interface.
#5. Installing Applications
The Softaculous Apps Installer on cPanel
Softaculous Apps Installer is a powerful feature that allows you to easily install a wide range of popular web applications on your hosting account.
These applications include popular CMSes such as WordPress, Joomla, and Drupal, as well as e-commerce platforms like Magento and PrestaShop, forums, wikis, and much more.
To access Softaculous Apps Installer from your cPanel home screen, follow these steps:
1. Log in to your cPanel account using your username and password.
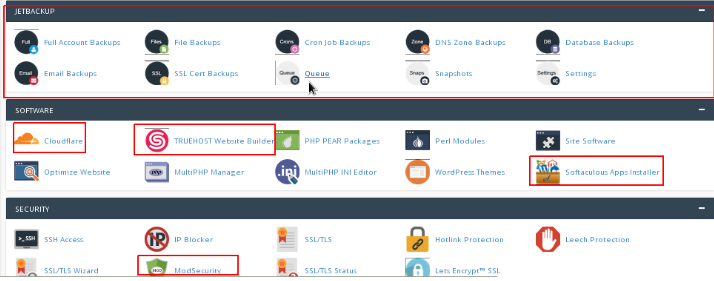
2. Once you are logged in, look for the “Softaculous Apps Installer” icon on the cPanel home screen. It should be located in the “Software” section of the home screen.
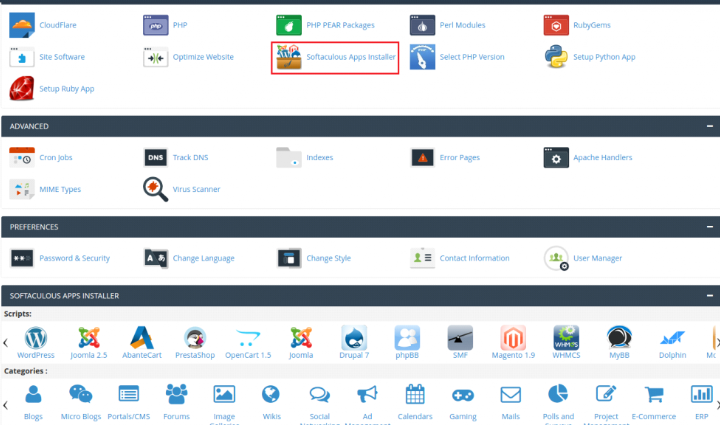
3. Click on the “Softaculous Apps Installer” icon to launch the Softaculous interface.
4. You will now see a list of all the available applications that you can install using Softaculous. You can browse through the list or use the search bar to find a specific application.
5. Once you have found the application you want to install, click on the “Install” button next to it.
6. You will now be taken to a page where you can configure the installation settings. Here, you can choose the installation directory, set up a database, and configure other settings specific to the application you are installing.
7. Once you have configured all the settings, click on the “Install” button to start the installation process.
8. Wait for the installation process to complete. Once it is done, you will see a confirmation message that the application has been successfully installed.
9. You can now access the newly installed application by navigating to the installation directory you specified during the installation process.
Softaculous handles the installation and configuration of the applications
Generally, Softaculous is a powerful script installer that can handle the installation and configuration of various applications.
It is a one-click installer that makes it easy to install popular web applications.
With Softaculous, you don’t need to have technical knowledge or experience with installing applications manually.
You can simply select the application you want to install, choose the settings you want, and let Softaculous handle the rest.
Once the installation is complete, you can manage your applications from within cPanel.
You can update, backup, and restore your applications with just a few clicks. Softaculous also makes it easy to clone or migrate your applications to another server if needed.
Popular questions on using cPanel to manage your hosting account
1. How To Add A New Domain/Subdomain With cPanel
Log in to cPanel using your username and password.
Navigate to the “Domains” or “Subdomains” section of cPanel, depending on whether you want to add a new domain or subdomain.
Click on the “Add Domain” or “Add Subdomain” buttons, respectively.
Enter the domain or subdomain name you want to add in the appropriate field.
If you’re adding a new domain, you’ll need to specify the document root, which is the directory where the files for the domain will be stored on the server. You can use the default setting or choose a custom directory.
Click the “Create Domain” or “Create Subdomain” button to complete the process.
2. How To Back Up Your Site With cPanel
Log in to cPanel using your username and password.
Navigate to the “Files” section of cPanel and click on the “Backup” icon.
Choose the type of backup you want to create, such as a full backup or partial backup of specific files or directories.
Select the destination for the backup file, such as a directory on your server or a remote location via FTP.
Click the “Generate Backup” button to start the backup process.
Wait for the backup process to complete. Depending on the size of your site and the type of backup you’re creating, this may take some time.
Once the backup is complete, you can download the backup file to your local computer or save it to a remote location for safekeeping.
Conclusion
There are so many benefits of using cPanel to manage your hosting account. You can explore more cPanel features beyond the ones covered in this article.
Choose your host provider and dive right in with the cPanel to discover all the ways you can use it to manage your hosting account.