
Truehost Cloud has a partnership program with Let’s Encrypt SSL to provide free SSL certificates to those hosting at Truehost. With SSL being more and more critical for sites, this is a very timely partnership that benefits Truehost clients.
To install the free Let’s Encrypt SSL, please follow the steps below:
- Login to the cPanel
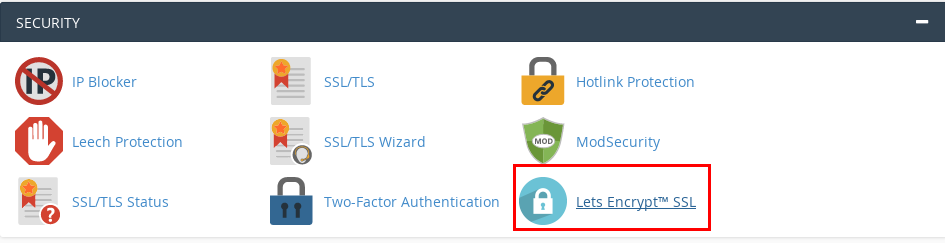
- Navigate to Let’s Encrypt icon in the cPanel under Security section
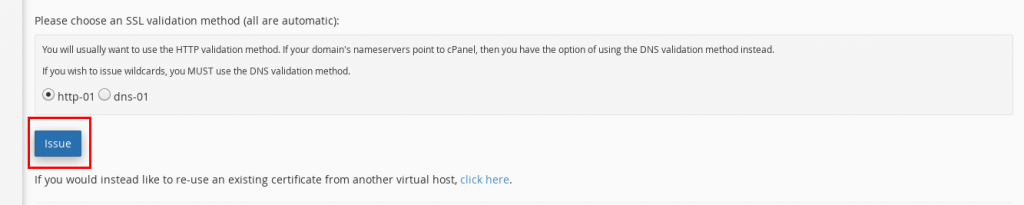
- Click Issue link

- On the page that appears, click Issue button at the base of the page. The certificate will now install. Should take about 30 seconds to 1 minute. Once through, you’ll get a notice saying the SSL has been installed successfully.
- Now, on cPanel, go to File Manager>>public_html folder. On your top right, click Settings>>Show Hidden Files then Save.
- Check for a file called .htaccess and add the following code at the top and Save
RewriteEngine On
RewriteCond %{HTTPS} off
RewriteRule ^(.*)$ https://%{HTTP_HOST}%{REQUEST_URI} [L,R=301]
Note: If you are installing the Let’s Encrypt SSL on a subdomain, instead of navigating to File Manager >> public_html folder as described in step 6, you will navigate to the root folder of the subdomain. The same applies to Addon domains. Simply put, where your website files will reside is where you place the .htaccess file after installing Let’s Encrypt
- Now that You have installed Let’s Encrypt, access the site and confirm it’s on https!

Leave A Comment?